For Subversion 1.5(Compiled from r3133)
版权 © 2002, 2003, 2004, 2005, 2006, 2007, 2008 Ben Collins-Sussman, Brian W. Fitzpatrick, C. Michael Pilato
版权 © 2005-2008 Daijun Sun ([email protected])
版权 © 2005-2006 Xun Leasun ([email protected])
版权 © 2007-2008 Dongsheng Song ([email protected])
(TBA)
目录
- 前言
- 序言
- 1. 基本概念
- 2. 基本使用
- 3. 高级主题
- 4. 分支与合并
- 5. 版本库管理
- 6. 服务配置
- 7. 定制你的Subversion体验
- 8. 嵌入Subversion
- 9. Subversion 完全参考
- A. Subversion 快速入门指南
- B. CVS用户的Subversion指南
- C. WebDAV和自动版本
- D. Copyright
- 索引
插图清单
- 1. Subversion's architecture
- 1.1. 一个典型的客户/服务器系统
- 1.2. 需要避免的问题
- 1.3. 锁定-修改-解锁 方案
- 1.4. 拷贝-修改-合并 方案
- 1.5. 拷贝-修改-合并 方案(续)
- 1.6. 版本库的文件系统
- 1.7. 版本库
- 4.1. 分支与开发
- 4.2. 开始规划版本库
- 4.3. 版本库与复制
- 4.4. 一个文件的分支历史
- 8.1. 二维的文件和目录
- 8.2. 版本时间—第三维!
范例清单
- 5.1. txn-info.sh (reporting outstanding transactions)
- 5.2. 镜像版本库的 pre-revprop-change 钩子
- 5.3. 镜像版本库的 start-commit 钩子
- 6.1. 匿名访问的配置实例。
- 6.2. 一个认证访问的配置实例。
- 6.3. A sample configuration for mixed authenticated/anonymous access
- 6.4. 禁用所有的路径检查
- 7.1. Sample registration entries (.reg) file.
- 7.2. diffwrap.sh
- 7.3. diffwrap.bat
- 7.4. diff3wrap.sh
- 7.5. diff3wrap.bat
- 8.1. 使用版本库层
- 8.2. 使用 Python 处理版本库层
- 8.3. A Python status crawler
A bad Frequently Asked Questions (FAQ) sheet is one that is composed not of the questions people actually ask, but of the questions the FAQ's author wishes people would ask. Perhaps you've seen the type before:
Q:怎样使用Glorbosoft XYZ最大程度的提高团队生产率?
A: Many of our customers want to know how they can maximize productivity through our patented office groupware innovations. The answer is simple. First, click on the
Filemenu, scroll down toIncrease Productivity, then…
The problem with such FAQs is that they are not, in a literal sense, FAQs at all. No one ever called the tech support line and asked, “How can we maximize productivity?”. Rather, people asked highly specific questions, such as “How can we change the calendaring system to send reminders two days in advance instead of one?” and so on. But it's a lot easier to make up imaginary Frequently Asked Questions than it is to discover the real ones. Compiling a true FAQ sheet requires a sustained, organized effort: over the lifetime of the software, incoming questions must be tracked, responses monitored, and all gathered into a coherent, searchable whole that reflects the collective experience of users in the wild. It calls for the patient, observant attitude of a field naturalist. No grand hypothesizing, no visionary pronouncements here—open eyes and accurate note-taking are what's needed most.
我很喜欢这本书,因为它正是按照这种精神建立起来的,这种精神体现在本书的每一页中。这是作者与用户直接交流的结果。而这一切是源于Ben Collins-Sussman's对于Subversion常见问题邮件列表的研究。他发现人们总是在邮件列表中重复询问一些基本问题:使用subversion的一般程序是怎样的?分支与标签同其它版本控制系统的工作方式一样吗?我怎样知道某一处修改是谁做的?
Frustrated at seeing the same questions day after day, Ben worked intensely over a month in the summer of 2002 to write The Subversion Handbook, a 60 page manual that covered all the basics of using Subversion. The manual made no pretense of being complete, but it was distributed with Subversion and got users over that initial hump in the learning curve. When O'Reilly decided to publish a full-length Subversion book, the path of least resistance was obvious: just expand the Subversion handbook.
The three coauthors of the new book were thus presented with an unusual opportunity. Officially, their task was to write a book top-down, starting from a table of contents and an initial draft. But they also had access to a steady stream—indeed, an uncontrollable geyser—of bottom-up source material. Subversion was already in the hands of thousands of early adopters, and those users were giving tons of feedback, not only about Subversion, but about its existing documentation.
在写这本书的过程里,Ben,Mike 和 Brian一直像鬼魂一样游荡在Subversion邮件列表和聊天室中,仔细的研究用户实际遇到的问题。监视这些反馈也是他们在CollabNet工作的一部分,这给他们撰写Subversion文档提供了巨大的便利。这本书建立在丰富的使用经验,而非在流沙般脆弱的想象之上,它结合了用户手册和FAQ的优点。初次阅读时,这种二元性的优势并不明显,按照顺序,从前到后,这本书只是简单的从头到尾描述了软件的细节。书中的内容包括一章概述,一章必不可少的快速指南,一章关于管理配置,一些高级主题,当然还包括命令参考手册和故障排除指南。而当你过一段时间之后,再次翻开本书查找一些特定问题的解决方案时,这种二元性才得以显现:这些生动的细节一定来自不可预测的实际用例的提炼,大多是源于用户的需要和视点。
Of course, no one can promise that this book will answer
every question you have about Subversion. Sometimes, the
precision with which it anticipates your questions will seem
eerily telepathic; yet occasionally, you will stumble into a
hole in the community's knowledge and come away empty-handed.
When this happens, the best thing you can do is email
<[email protected]> and present your
problem. The authors are still there and still watching, and the
authors include not just the three listed on the cover, but many others
who contributed corrections and original material. From the
community's point of view, solving your problem is merely a
pleasant side effect of a much larger project—namely,
slowly adjusting this book, and ultimately Subversion itself, to
more closely match the way people actually use it. They are
eager to hear from you, not only because they can help you, but
because you can help them. With Subversion, as with all active
free software projects, you are not
alone.
让这本书将成为你的第一个伙伴。
目录
|
“即使你能确认什么是完美,也不要让完美成为好的敌人,更何况你不能确认。因为落入过去陷阱的不悦,你会在设计时因为担心自己的缺陷而无所作为。” |
||
| --Greg Hudson, Subversion developer | ||
In the world of open source software, the Concurrent Versions System (CVS) was the tool of choice for version control for many years. And rightly so. CVS was open source software itself, and its nonrestrictive modus operandi and support for networked operation allowed dozens of geographically dispersed programmers to share their work. It fit the collaborative nature of the opensource world very well. CVS and its semi-chaotic development model have since become cornerstones of open source culture.
But CVS was not without its flaws, and simply fixing those flaws promised to be an enormous effort. Enter Subversion. Designed to be a successor to CVS, Subversion's originators set out to win the hearts of CVS users in two ways—by creating an open source system with a design (and “look and feel”) similar to CVS, and by attempting to avoid most of CVS's noticeable flaws. While the result isn't necessarily the next great evolution in version control design, Subversion is very powerful, very usable, and very flexible. And for the most part, almost all newly started open source projects now choose Subversion instead of CVS.
This book is written to document the 1.5 series of the Subversion version control system. We have made every attempt to be thorough in our coverage. However, Subversion has a thriving and energetic development community, so there are already a number of features and improvements planned for future versions that may change some of the commands and specific notes in this book.
This book is written for computer-literate folk who want to use Subversion to manage their data. While Subversion runs on a number of different operating systems, its primary user interface is command-line-based. That command-line tool (svn), and some auxiliary programs, are the focus of this book.
For consistency, the examples in this book assume that the reader
is using a Unix-like operating system and is relatively comfortable
with Unix and command-line interfaces. That said, the
svn program also runs on non-Unix platforms
such as Microsoft Windows. With a few minor exceptions, such as
the use of backward slashes (\) instead of
forward slashes (/) for path separators, the
input to and output from this tool when run on Windows are
identical to its Unix counterpart.
大多数读者可能是那些需要跟踪代码变化的程序员或者系统管理员,这是Subversion最普遍的用途,因此这个场景贯穿于整本书的例子中。但是Subversion可以用来管理任何类型的数据:图像、音乐、数据库、文档等等。对于Subversion,数据就是数据而已。
While this book is written with the assumption that the reader has never used a version control system, we've also tried to make it easy for users of CVS (and other systems) to make a painless leap into Subversion. Special sidebars may mention other version control systems from time to time, and Appendix B summarizes many of the differences between CVS and Subversion.
Note also that the source code examples used throughout the book are only examples. While they will compile with the proper compiler incantations, they are intended to illustrate a particular scenario and not necessarily serve as examples of good programming style or practices.
Technical books always face a certain dilemma: whether to cater to top-down or to bottom-up learners. A top-down learner prefers to read or skim documentation, getting a large overview of how the system works; only then does she actually start using the software. A bottom-learner is a “learn by doing” person—someone who just wants to dive into the software and figure it out as she goes, referring to book sections when necessary. Most books tend to be written for one type of person or the other, and this book is undoubtedly biased towards top-down learners. (And if you're actually reading this section, you're probably already a top-down learner yourself!) However, if you're a bottom-up person, don't despair. While the book may be laid out as a broad survey of Subversion topics, the content of each section tends to be heavy with specific examples that you can try-by-doing. For the impatient folks who just want to get going, you can jump right to 附录 A, Subversion 快速入门指南.
Regardless of your learning style, this book aims to be useful to people of widely different backgrounds—from those with no previous experience in version control to experienced system administrators. Depending on your own background, certain chapters may be more or less important to you. The following can be considered a “recommended reading list” for various types of readers:
- 资深系统管理员
-
The assumption here is that you've probably used version control before and are dying to get a Subversion server up and running ASAP. 第 5 章 版本库管理 and 第 6 章 服务配置 will show you how to create your first repository and make it available over the network. After that's done, 第 2 章 基本使用 and 附录 B, CVS用户的Subversion指南 are the fastest routes to learning the Subversion client.
- 新用户
-
如果管理员已经为你准备好了Subversion服务,你所需要的是学习如何使用客户端。如果你没有使用版本控制系统(像CVS)的经验,那么第 1 章 基本概念和第 2 章 基本使用是重要的入门教程,其中介绍了版本控制的重要思想。
- 高级用户
-
Whether you're a user or administrator, eventually your project will grow larger. You're going to want to learn how to do more advanced things with Subversion, such as how to use Subversion's property support (第 3 章 高级主题), how to use branches and perform merges (第 4 章 分支与合并), how to configure runtime options (第 7 章 定制你的Subversion体验), and other things. These chapters aren't critical at first, but be sure to read them once you're comfortable with the basics.
- 开发者
-
你应该已经很熟悉Subversion了,并且想扩展它或使用它的API开发新软件。第 8 章 嵌入Subversion将最适合你。
本书以参考材料作为结束—第 9 章 Subversion 完全参考是一部Subversion全部命令的详细指南,此外,在附录中还有许多很有意义的主题。阅读完本书后,这些章节将会是你经常查阅的内容。
本节描述了本书中使用的各种约定。
The following typographic conventions are used in this book:
- 等宽字体
-
用于命令,命令输出和选项
-
等宽字体 -
用于代码和文本中的可替换部分
-
斜体 -
Used for file and directory names as well as for new terms
以下是各个章节的内容介绍:
- 序言
-
回顾了Subversion的历史,描述了Subversion的特性、架构、组件。
- 第 1 章 基本概念
-
介绍了版本控制的基础知识及不同的版本模型,同时讲述了Subversion版本库,工作拷贝和修订版本的概念。
- 第 2 章 基本使用
-
引领你开始一个Subversion用户的工作。示范怎样使用Subversion获得、修改和提交数据。
- 第 3 章 高级主题
-
覆盖了许多普通用户最终要面对的复杂特性,例如版本化的元数据、文件锁定和peg修订版本。
- 第 4 章 分支与合并
-
讨论分支、合并与标签,包括最佳实践的介绍,常见用例的描述,怎样取消修改,以及怎样从一个分支转到另一个分支。
- 第 5 章 版本库管理
-
讲述Subversion版本库的基本概念,怎样建立、配置和维护版本库,以及哪些工具可以完成上述的工作。
- 第 6 章 服务配置
-
Explains how to configure your Subversion server and offers different ways to access your repository:
HTTP, thesvnprotocol, and local disk access. It also covers the details of authentication, authorization and anonymous access. - 第 7 章 定制你的Subversion体验
-
研究了Subversion的客户端配置文件,对国际化字符的处理,以及Subversion如何与外置工具交互。
- 第 8 章 嵌入Subversion
-
介绍了Subversion的核心部件、Subversion的文件系统,以及程序员眼中的工作拷贝管理区域,展示了如何使用公共API编写Subversion应用程序。最重要的内容是,如何为Subversion的开发贡献力量。
- 第 9 章 Subversion 完全参考
-
以大量的实例,详细描述了svn、svnadmin和svnlook的所有子命令。
- 附录 A, Subversion 快速入门指南
-
因为缺乏耐心,我们会立刻解释如何安装和使用Subversion,我们已经告诉你了。
- 附录 B, CVS用户的Subversion指南
-
Covers the similarities and differences between Subversion and CVS, with numerous suggestions on how to break all the bad habits you picked up from years of using CVS. Included are descriptions of Subversion revision numbers, versioned directories, offline operations, update versus status, branches, tags, metadata, conflict resolution, and authentication.
- 附录 C, WebDAV和自动版本
-
Describes the details of WebDAV and DeltaV and how you can configure your Subversion repository to be mounted read/write as a DAV share.
- 附录 D, Copyright
-
A copy of the Creative Commons Attribution License., under which this book is licensed.
This book started out as bits of documentation written by Subversion project developers, which were then coalesced into a single work and rewritten. As such, it has always been under a free license (see 附录 D, Copyright). In fact, the book was written in the public eye, originally as a part of Subversion project itself. This means two things:
-
总可以在Subversion的版本库里找到本书的最新版本。
-
可以任意分发或修改本书—它在免费许可证的控制之下,你的唯一限制是必须保留正确的最初作者。当然,与其独自发布私有版本,不如向Subversion开发社区提供反馈和修正信息。
本书的在线主页在http://svnbook.red-bean.com,有许多志愿的翻译工作。在网站上,你可以找到许多本书最新快照和标签版本的链接,也可以访问到本书的Subversion版本库(存放了DocBook XML源文件)。我们欢迎反馈—也愿意接受鼓励。请将所有的评论、抱怨和对本书源文件的补丁发送到<[email protected]>。本书的中文版主要是由Subversion中文站的志愿者翻译的,可以在http://www.subversion.org.cn/看到本书的最新版本和其他资料,也要感谢i18n-zh的朋友的一些支持。
This book would not be possible (nor very useful) if Subversion did not exist. For that, the authors would like to thank Brian Behlendorf and CollabNet for the vision to fund such a risky and ambitious new open source project; Jim Blandy for the original Subversion name and design—we love you, Jim; and Karl Fogel for being such a good friend and a great community leader, in that order. [1]
Thanks to O'Reilly and our editors, Linda Mui and Tatiana Apandi, for their patience and support.
Finally, we thank the countless people who contributed to this book with informal reviews, suggestions, and fixes. While this is undoubtedly not a complete list, this book would be incomplete and incorrect without the help of: David Anderson, Jani Averbach, Ryan Barrett, Francois Beausoleil, Jennifer Bevan, Matt Blais, Zack Brown, Martin Buchholz, Brane Cibej, John R. Daily, Peter Davis, Olivier Davy, Robert P. J. Day, Mo DeJong, Brian Denny, Joe Drew, Nick Duffek, Ben Elliston, Justin Erenkrantz, Shlomi Fish, Julian Foad, Chris Foote, Martin Furter, Vlad Georgescu, Dave Gilbert, Eric Gillespie, David Glasser, Matthew Gregan, Art Haas, Eric Hanchrow, Greg Hudson, Alexis Huxley, Jens B. Jorgensen, Tez Kamihira, David Kimdon, Mark Benedetto King, Andreas J. Koenig, Nuutti Kotivuori, Matt Kraai, Scott Lamb, Vincent Lefevre, Morten Ludvigsen, Paul Lussier, Bruce A. Mah, Philip Martin, Feliciano Matias, Patrick Mayweg, Gareth McCaughan, Jon Middleton, Tim Moloney, Christopher Ness, Mats Nilsson, Joe Orton, Amy Lyn Pilato, Kevin Pilch-Bisson, Dmitriy Popkov, Michael Price, Mark Proctor, Steffen Prohaska, Daniel Rall, Jack Repenning, Tobias Ringstrom, Garrett Rooney, Joel Rosdahl, Christian Sauer, Larry Shatzer, Russell Steicke, Sander Striker, Erik Sjoelund, Johan Sundstroem, John Szakmeister, Mason Thomas, Eric Wadsworth, Colin Watson, Alex Waugh, Chad Whitacre, Josef Wolf, Blair Zajac, and the entire Subversion community.
Thanks to my wife Frances, who, for many months, got to hear, “But honey, I'm still working on the book,” rather than the usual, “But honey, I'm still doing email.” I don't know where she gets all that patience! She's my perfect counterbalance.
感谢我的家人对我的鼓励,无论他们是否真的对我的课题感兴趣。(你知道的,一个人说 “哇,你正在写一本书?”,然后当他知道你是写一本计算机书时,那种惊讶就变得没有那么多了。)
感谢我身边让我富有的朋友,不要那样看我—你们知道你们是谁。
Thanks to my parents for the perfect low-level formatting and being unbelievable role models. Thanks to my kids for the opportunity to pass that on.
Huge thanks to my wife Marie for being incredibly understanding, supportive, and most of all, patient. Thank you to my brother Eric who first introduced me to Unix programming way back when. Thanks to my Mom and Grandmother for all their support, not to mention enduring a Christmas holiday where I came home and promptly buried my head in my laptop to work on the book.
Mike和Ben:与你们一起工作非常快乐,Heck,我们在一起工作很愉快!
感谢所有在Subversion和Apache软件基金会的人们给我机会与你们在一起,没有一天我不从你们那里学到知识。
最后,感谢我的祖父,他一直跟我说“自由等于责任”,我深信不疑。
Special thanks to Amy, my best friend and wife of nearly ten incredible years, for her love and patient support, for putting up with the late nights, and for graciously enduring the version control processes I've imposed on her. Don't worry, Sweetheart—you'll be a TortoiseSVN wizard in no time!
Gavin, you can probably read half of the words in this book yourself now; sadly, it's the other half that provide the key concepts. But when you've finally gotten a handle on the written form of this crazy language we speak, I hope you're as proud of your Daddy as he is of you.
Aidan, what can I say? I'm sorry this book doesn't have any pictures or stories of locomotives. I still love you, son. (And I recommend the works of Rev. W. V. Awdry to fuel your current passion.)
妈妈和爸爸,感谢你们的支持和热情,岳父岳母,以同样的理由感谢你们,还要感谢你们难以置信的女儿。
Hats off to Shep Kendall, through whom the world of
computers was first opened to me; Ben Collins-Sussman, my
tour-guide through the open source world; Karl Fogel, you
are my .emacs; Greg
Stein, for oozing practical programming know-how; Brian
Fitzpatrick, for sharing this writing experience with me.
To the many folks from whom I am constantly picking up new
knowledge—keep dropping it!
最后,对所有为我展现完美卓越创造力的人们—感谢。
Subversion is a free/open source version control system. That is, Subversion manages files and directories, and the changes made to them, over time. This allows you to recover older versions of your data or examine the history of how your data changed. In this regard, many people think of a version control system as a sort of “time machine.”
Subversion的版本库可以通过网络访问,从而使用户可以在不同的电脑上进行操作。从某种程度上来说,允许用户在各自的空间里修改和管理同一组数据可以促进团队协作。因为修改不再是单线进行,开发速度会更快。此外,由于所有的工作都已版本化,也就不必担心由于错误的更改而影响软件质量—如果出现不正确的更改,只要撤销那一次更改操作即可。
Some version control systems are also software configuration management (SCM) systems. These systems are specifically tailored to manage trees of source code and have many features that are specific to software development—such as natively understanding programming languages, or supplying tools for building software. Subversion, however, is not one of these systems. It is a general system that can be used to manage any collection of files. For you, those files might be source code—for others, anything from grocery shopping lists to digital video mixdowns and beyond.
If you're a user or system administrator pondering the use of Subversion, the first question you should ask yourself is: "Is this the right tool for the job?" Subversion is a fantastic hammer, but be careful not to view every problem as a nail.
If you need to archive old versions of files and directories, possibly resurrect them, or examine logs of how they've changed over time, then Subversion is exactly the right tool for you. If you need to collaborate with people on documents (usually over a network) and keep track of who made which changes, then Subversion is also appropriate. This is why Subversion is so often used in software development environments— programming is an inherently social activity, and Subversion makes it easy to collaborate with other programmers. Of course, there's a cost to using Subversion as well: administrative overhead. You'll need to manage a data repository to store the information and all its history, and be diligent about backing it up. When working with the data on a daily basis, you won't be able to copy, move, rename, or delete files the way you usually do. Instead, you'll have to do all of those things through Subversion.
Assuming you're fine with the extra workflow, you should still make sure you're not using Subversion to solve a problem that other tools solve better. For example, because Subversion replicates data to all the collaborators involved, a common misuse is to treat it as a generic distribution system. People will sometimes use Subversion to distribute huge collections of photos, digital music, or software packages. The problem is that this sort of data usually isn't changing at all. The collection itself grows over time, but the individual files within the collection aren't being changed. In this case, using Subversion is “overkill.” [2] There are simpler tools that efficiently replicate data without the overhead of tracking changes, such as rsync or unison.
In early 2000, CollabNet, Inc. (http://www.collab.net) began seeking developers to
write a replacement for CVS. CollabNet offers a collaboration
software suite called CollabNet Enterprise Edition (CEE), of
which one component is version control. Although CEE used CVS
as its initial version control system, CVS's limitations were
obvious from the beginning, and CollabNet knew it would
eventually have to find something better. Unfortunately, CVS
had become the de facto standard in the open source world
largely because there wasn't anything
better, at least not under a free license. So CollabNet
determined to write a new version control system from scratch,
retaining the basic ideas of CVS, but without the bugs and
misfeatures.
In February 2000, they contacted Karl Fogel, the author of Open Source Development with CVS (Coriolis, 1999), and asked if he'd like to work on this new project. Coincidentally, at the time Karl was already discussing a design for a new version control system with his friend Jim Blandy. In 1995, the two had started Cyclic Software, a company providing CVS support contracts, and although they later sold the business, they still used CVS every day at their jobs. Their frustration with CVS had led Jim to think carefully about better ways to manage versioned data, and he'd already come up with not only the name “Subversion,” but also with the basic design of the Subversion data store. When CollabNet called, Karl immediately agreed to work on the project, and Jim got his employer, Red Hat Software, to essentially donate him to the project for an indefinite period of time. CollabNet hired Karl and Ben Collins-Sussman, and detailed design work began in May 2000. With the help of some well-placed prods from Brian Behlendorf and Jason Robbins of CollabNet, and from Greg Stein (at the time an independent developer active in the WebDAV/DeltaV specification process), Subversion quickly attracted a community of active developers. It turned out that many people had encountered the same frustrating experiences with CVS and welcomed the chance to finally do something about it.
The original design team settled on some simple goals. They didn't want to break new ground in version control methodology, they just wanted to fix CVS. They decided that Subversion would match CVS's features and preserve the same development model, but not duplicate CVS's most obvious flaws. And although it did not need to be a drop-in replacement for CVS, it should be similar enough that any CVS user could make the switch with little effort.
After 14 months of coding, Subversion became “self-hosting” on August 31, 2001. That is, Subversion developers stopped using CVS to manage Subversion's own source code and started using Subversion instead.
While CollabNet started the project, and still funds a large chunk of the work (it pays the salaries of a few full-time Subversion developers), Subversion is run like most open source projects, governed by a loose, transparent set of rules that encourage meritocracy. CollabNet's copyright license is fully compliant with the Debian Free Software Guidelines. In other words, anyone is free to download, modify, and redistribute Subversion as he pleases; no permission from CollabNet or anyone else is required.
在讲解Subversion为版本控制领域带来的特性时,我们会经常通过Subversion对CVS的改进进行说明。如果不熟悉CVS,了解所有Subversion的特性会有一定的困难。而如果根本就不熟悉版本控制,你就只有干瞪眼的份儿了。因此,最好首先阅读一下第 1 章 基本概念,这一章简单介绍了一些版本控制的基本思想和概念。
Subversion支持:
- 版本化的目录
-
CVS tracks only the history of individual files, but Subversion implements a “virtual” versioned filesystem that tracks changes to whole directory trees over time. Files and directories are versioned.
- 真实的版本历史
-
由于只能跟踪单个文件的变更,CVS无法支持如文件拷贝和改名这些常见的操作—这些操作改变了目录的内容。同样,在CVS中,一个目录下的文件只要名字相同即拥有相同的历史,即使这些同名文件在历史上毫无关系。而在Subversion中,可以对文件或目录进行增加、拷贝和改名操作,也解决了同名而无关的文件之间的历史联系问题。
- 原子提交
-
A collection of modifications either goes into the repository completely or not at all. This allows developers to construct and commit changes as logical chunks and prevents problems that can occur when only a portion of a set of changes is successfully sent to the repository.
- 版本化的元数据
-
每一个文件和目录都有自己的一组属性—键和它们的值。可以根据需要建立并存储任何键/值对。和文件本身的内容一样,属性也在版本控制之下。
- 可选的网络层
-
Subversion has an abstracted notion of repository access, making it easy for people to implement new network mechanisms. Subversion can plug into the Apache HTTP Server as an extension module. This gives Subversion a big advantage in stability and interoperability, and instant access to existing features provided by that server—authentication, authorization, wire compression, and so on. A more lightweight, standalone Subversion server process is also available. This server speaks a custom protocol that can be easily tunneled via SSH.
- 一致的数据操作
-
Subversion用一个二进制差异算法描述文件的变化,对于文本(可读)和二进制(不可读)文件其操作方式是一致的。这两种类型的文件压缩存储在版本库中,而差异信息则在网络上双向传递。
- 高效的分支和标签操作
-
The cost of branching and tagging need not be proportional to the project size. Subversion creates branches and tags by simply copying the project, using a mechanism similar to a hard link. Thus these operations take only a very small, constant amount of time.
- 可修改性
-
Subversion没有历史负担,它以一系列优质的共享C程序库的方式实现,具有定义良好的API。这使得Subversion非常容易维护,和其它语言的互操作性很强。
图 1 “Subversion's architecture”给出了Subversion设计总体上的“俯视图”。
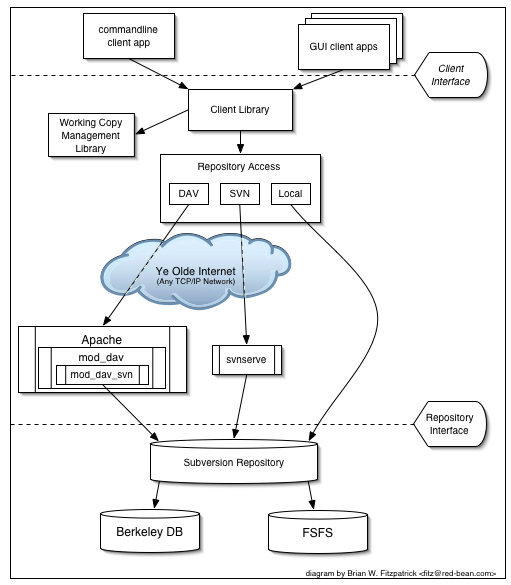
图中的一端是保存所有版本数据的Subversion版本库,另一端是Subvesion的客户程序,管理着所有版本数据的本地影射(称为“工作拷贝”),在这两极之间是各种各样的版本库访问(RA)层,某些使用电脑网络通过网络服务器访问版本库,某些则绕过网络服务器直接访问版本库。
安装好的Subversion由几个部分组成,下面将简单的介绍一下这些组件。下文的描述或许过于简略,不易理解,但不用担心—本书后面的章节中会用更多的内容来详细阐述这些组件。
- svn
-
命令行客户端程序。
- svnversion
-
此工具用来显示工作拷贝的状态(用术语来说,就是当前项目的修订版本)。
- svnlook
-
直接查看Subversion版本库的工具。
- svnadmin
-
A tool for creating, tweaking, or repairing a Subversion repository.
- svndumpfilter
-
过滤Subversion版本库转储数据流的工具。
- mod_dav_svn
-
Apache HTTP服务器的一个插件,使版本库可以通过网络访问。
- svnserve
-
一个单独运行的服务器程序,可以作为守护进程或由SSH调用。这是另一种使版本库可以通过网络访问的方式。
- svnsync
-
一个通过网络增量镜像版本库的程序。
The first edition of this book was released in 2004,
shortly after Subversion had reached 1.0. Over the following
four years Subversion released five major new versions, fixing
bugs and adding major new features. While we've managed to
keep the online version of this book up to date, we're
thrilled that the second edition from O'Reilly now covers
Subversion up through release 1.5, a major milestone for the
project. Here's a quick summary of major new changes since
Subversion 1.0. Note that this is not a complete list; for
full details, please visit Subversion's web site at
http://subversion.tigris.org.
- Subversion 1.1 (September 2004)
-
Release 1.1 introduced FSFS, a flat-file repository storage option for the repository. While the BerkeleyDB back-end is still widely used and supported, FSFS has since become the “default” choice for newly-created repositories due to its low barrier to entry and minimal maintenance requirements. Also in this release came the ability to put symbolic links under version control, auto-escaping of URLs, and a localized user interface.
- Subversion 1.2 (May 2005)
-
Release 1.2 introduced the ability to create server-side “locks” on files, thus serializing commit access to certain resources. While Subversion is still a fundamentally concurrent version control system, certain types of binary files (art assets, for example) cannot be merged together. The locking feature fulfills the need to version and protect such resources. With locking also came a complete “auto-versioning” implementation, allowing Subversion repositories to be mounted as network folders. Finally, Subversion 1.2 began using a new, faster binary-differencing algorithm to compress and retrieve old versions of files.
- Subversion 1.3 (December 2005)
-
Release 1.3 brought path-based authorization controls to the svnserve server, matching a feature formerly found only in the Apache server. The Apache server, however, gained some new logging features of its own, and Subversion's API bindings to other languages also made great leaps forward.
- Subversion 1.4 (September 2006)
-
Release 1.4 introduced a whole new tool—svnsync— for doing one-way repository replication over a network. Major parts of the working copy metadata were revamped to no longer use XML (resulting in client side speed gains), while the BerkeleyDB repository back-end gained the ability to automatically “recover” itself after a server crash.
- Subversion 1.5 (June 2008)
-
Release 1.5 took much longer to finish than prior releases, but the headliner feature was gigantic: semi-automated tracking of branching and merging. This was a huge boon for users, and pushed Subversion far beyond the abilities of CVS and into the ranks of commercial competitors such as Perforce and Clearcase. Subversion 1.5 also introduced a bevy of other user-focused features, such as interactive resolution of file conflicts, partial checkouts, client side management of changelists, powerful new syntax for the
svn:externalsfeature, and SASL authentication support for the svnserve server.
目录
本章主要为那些不熟悉版本控制技术的入门者提供一个简单扼要的、非系统的介绍。我们将从版本控制的基本概念开始,随后阐述Subversion的独特理念,并演示一些使用Subversion的例子。
虽然我们在本章中以分享程序源代码作为例子,但是记住Subversion可以管理任何类型的文件集—它并非是程序员专用的。
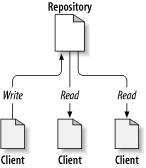
Subversion是一个“集中式”的信息共享系统。版本库是Subversion的核心部分,是数据的中央仓库。版本库以典型的文件和目录结构形式文件系统树来保存信息。任意数量的客户端连接到Subversion版本库,读取、修改这些文件。客户端通过写数据将信息分享给其他人,通过读取数据获取别人共享的信息。图 1.1 “一个典型的客户/服务器系统”展示了这种系统:
So why is this interesting? So far, this sounds like the definition of a typical file server. And indeed, the repository is a kind of file server, but it's not your usual breed. What makes the Subversion repository special is that it remembers every change ever written to it—every change to every file, and even changes to the directory tree itself, such as the addition, deletion, and rearrangement of files and directories.
When a client reads data from the repository, it normally sees only the latest version of the filesystem tree. But the client also has the ability to view previous states of the filesystem. For example, a client can ask historical questions such as “What did this directory contain last Wednesday?” or “Who was the last person to change this file, and what changes did he make?” These are the sorts of questions that are at the heart of any version control system: systems that are designed to track changes to data over time.
版本控制系统的核心任务是实现协作编辑和数据共享,但是不同的系统使用不同的策略实现这个目的。我们有许多理由要去理解这些策略的区别,首先,如果你遇到了其他类似Subversion的系统,可以帮助你比较现有的版本控制系统。此外,可以帮助你更有效的使用Subversion,因为Subversion本身支持不同的工作方式。
所有的版本控制系统都需要解决这样一个基础问题:怎样让系统允许用户共享信息,而不会让他们因意外而互相干扰?版本库里意外覆盖别人的更改非常的容易。
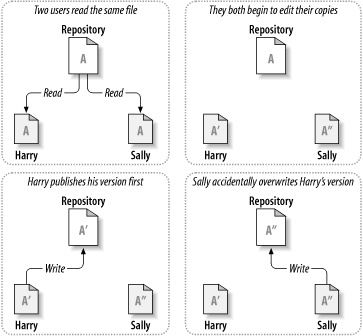
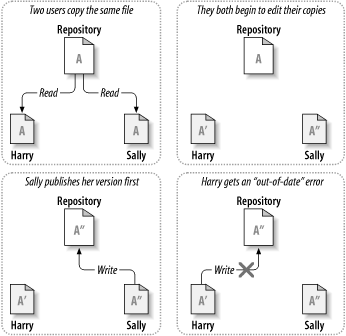
Consider the scenario shown in 图 1.2 “需要避免的问题”. Suppose we have two coworkers, Harry and Sally. They each decide to edit the same repository file at the same time. If Harry saves his changes to the repository first, then it's possible that (a few moments later) Sally could accidentally overwrite them with her own new version of the file. While Harry's version of the file won't be lost forever (because the system remembers every change), any changes Harry made won't be present in Sally's newer version of the file, because she never saw Harry's changes to begin with. Harry's work is still effectively lost—or at least missing from the latest version of the file—and probably by accident. This is definitely a situation we want to avoid!
Many version control systems use a lock-modify-unlock model to address the problem of many authors clobbering each other's work. In this model, the repository allows only one person to change a file at a time. This exclusivity policy is managed using locks. Harry must “lock” a file before he can begin making changes to it. If Harry has locked a file, then Sally cannot also lock it, and therefore cannot make any changes to that file. All she can do is read the file and wait for Harry to finish his changes and release his lock. After Harry unlocks the file, Sally can take her turn by locking and editing the file. 图 1.3 “锁定-修改-解锁 方案” demonstrates this simple solution.
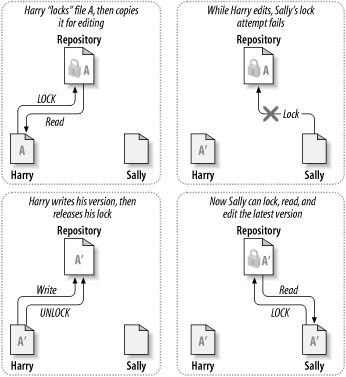
The problem with the lock-modify-unlock model is that it's a bit restrictive and often becomes a roadblock for users:
-
锁定可能导致管理问题。有时候Harry会锁住文件然后忘了此事,这就是说Sally一直等待解锁来编辑这些文件,她在这里僵住了。然后Harry去旅行了,现在Sally只好去找管理员放开锁,这种情况会导致不必要的耽搁和时间浪费。
-
锁定可能导致不必要的线性化开发。如果Harry编辑一个文件的开始,Sally想编辑同一个文件的结尾,这种修改不会冲突,设想修改可以正确的合并到一起,他们可以轻松的并行工作而没有太多的坏处,没有必要让他们轮流工作。
-
Locking may create a false sense of security. Suppose Harry locks and edits file A, while Sally simultaneously locks and edits file B. But what if A and B depend on one another, and the changes made to each are semantically incompatible? Suddenly A and B don't work together anymore. The locking system was powerless to prevent the problem—yet it somehow provided a false sense of security. It's easy for Harry and Sally to imagine that by locking files, each is beginning a safe, insulated task, and thus they need not bother discussing their incompatible changes early on. Locking often becomes a substitute for real communication.
Subversion, CVS, and many other version control systems use a copy-modify-merge model as an alternative to locking. In this model, each user's client contacts the project repository and creates a personal working copy—a local reflection of the repository's files and directories. Users then work simultaneously and independently, modifying their private copies. Finally, the private copies are merged together into a new, final version. The version control system often assists with the merging, but ultimately, a human being is responsible for making it happen correctly.
Here's an example. Say that Harry and Sally each create working copies of the same project, copied from the repository. They work concurrently and make changes to the same file A within their copies. Sally saves her changes to the repository first. When Harry attempts to save his changes later, the repository informs him that his file A is out-of-date. In other words, that file A in the repository has somehow changed since he last copied it. So Harry asks his client to merge any new changes from the repository into his working copy of file A. Chances are that Sally's changes don't overlap with his own; once he has both sets of changes integrated, he saves his working copy back to the repository. 图 1.4 “拷贝-修改-合并 方案” and 图 1.5 “拷贝-修改-合并 方案(续)” show this process.
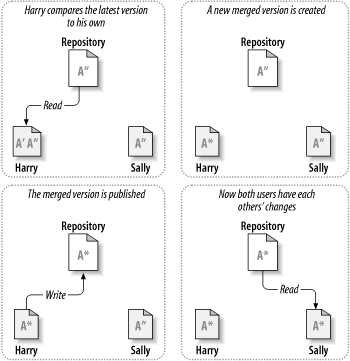
But what if Sally's changes do overlap with Harry's changes? What then? This situation is called a conflict, and it's usually not much of a problem. When Harry asks his client to merge the latest repository changes into his working copy, his copy of file A is somehow flagged as being in a state of conflict: he'll be able to see both sets of conflicting changes and manually choose between them. Note that software can't automatically resolve conflicts; only humans are capable of understanding and making the necessary intelligent choices. Once Harry has manually resolved the overlapping changes—perhaps after a discussion with Sally—he can safely save the merged file back to the repository.
拷贝-修改-合并模型感觉有一点混乱,但在实践中,通常运行的很平稳,用户可以并行的工作,不必等待别人,当工作在同一个文件上时,也很少会有交迭发生,冲突并不频繁,处理冲突的时间远比等待解锁花费的时间少。
最后,一切都要归结到一条重要的因素:用户交流。当用户交流贫乏,语法和语义的冲突就会增加,没有系统可以强制用户完美的交流,没有系统可以检测语义上的冲突,所以没有任何证据能够承诺锁定系统可以防止冲突,实践中,锁定除了约束了生产力,并没有做什么事。
是时候从抽象转到具体了,在本小节,我们会展示一个Subversion真实使用的例子。
正如我们在整本书里描述的,Subversion使用URL来识别Subversion版本库中的版本化资源,通常情况下,这些URL使用标准的语法,允许服务器名称和端口作为URL的一部分:
$ svn checkout http://svn.example.com:9834/repos
…
但是Subversion处理URL的一些细微的不同之处需要注意,例如,使用file:访问方法的URL(用来访问本地版本库)必须与习惯一致,可以包括一个localhost服务器名或者没有服务器名:
$ svn checkout file:///var/svn/repos
…
$ svn checkout file://localhost/var/svn/repos
…
Also, users of the file:// scheme on
Windows platforms will need to use an unofficially
“standard” syntax for accessing repositories
that are on the same machine, but on a different drive than
the client's current working drive. Either of the two
following URL path syntaxes will work, where
X is the drive on which the repository
resides:
C:\> svn checkout file:///X:/var/svn/repos
…
C:\> svn checkout "file:///X|/var/svn/repos"
…
在第二个语法里,你需要使用引号包含整个URL,这样竖线字符才不会被解释为管道。当然,也要注意URL使用普通的斜线而不是Windows本地(不是URL)的反斜线。
注意
也必须意识到Subversion的file: URL不能在普通的web服务器中工作。当你尝试在web服务器查看一个file:的URL时,它会通过直接检测文件系统读取和显示那个位置的文件内容,但是Subversion的资源存在于虚拟文件系统(见“版本库层”一节)中,你的浏览器不会理解怎样读取这个文件系统。
Finally, it should be noted that the Subversion client will automatically encode URLs as necessary, just like a web browser does. For example, if a URL contains a space or upper-ASCII character as in the following:
$ svn checkout "http://host/path with space/project/españa"
then Subversion will escape the unsafe characters and behave as if you had typed:
$ svn checkout http://host/path%20with%20space/project/espa%C3%B1a
如果URL包含空格,一定要使用引号,这样你的脚本才会把它做一个单独的svn参数。
你已经阅读过了关于工作拷贝的内容;现在我们要讲一讲客户端怎样建立和使用它。
一个Subversion工作拷贝是你本地机器上的一个普通目录,保存着一些文件,你可以任意的编辑文件,而且如果是源代码文件,你可以像平常一样编译,你的工作拷贝是你的私有工作区,在你明确的做了特定操作之前,Subversion不会把你的修改与其他人的合并,也不会把你的修改展示给别人,你甚至可以拥有同一个项目的多个工作拷贝。
After you've made some changes to the files in your working copy and verified that they work properly, Subversion provides you with commands to “publish” your changes to the other people working with you on your project (by writing to the repository). If other people publish their own changes, Subversion provides you with commands to merge those changes into your working copy (by reading from the repository).
A working copy also contains some extra files, created and
maintained by Subversion, to help it carry out these commands.
In particular, each directory in your working copy contains a
subdirectory named .svn, also known as
the working copy's administrative
directory. The files in each administrative
directory help Subversion recognize which files contain
unpublished changes, and which files are out of date with
respect to others' work.
一个典型的Subversion的版本库经常包含许多项目的文件(或者说源代码),通常每一个项目都是版本库的子目录,在这种布局下,一个用户的工作拷贝往往对应版本库的的一个子目录。
举一个例子,你的版本库包含两个软件项目,paint和calc。每个项目在它们各自的顶级子目录下,见图 1.6 “版本库的文件系统”。
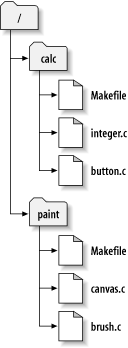
To get a working copy, you must check
out some subtree of the repository. (The term
check out may sound like it has something to do
with locking or reserving resources, but it doesn't; it simply
creates a private copy of the project for you.) For example,
if you check out /calc, you will get a
working copy like this:
$ svn checkout http://svn.example.com/repos/calc
A    calc/Makefile
A    calc/integer.c
A    calc/button.c
Checked out revision 56.

$ ls -A calc
Makefile  button.c integer.c .svn/
The list of letter As in the left
margin indicates that Subversion is adding a number of items
to your working copy. You now have a personal copy of the
repository's /calc directory, with one
additional entry—.svn—which
holds the extra information needed by Subversion, as mentioned
earlier.
假定你修改了button.c,因为.svn目录记录着文件的修改日期和原始内容,Subversion可以告诉你已经修改了文件,然而,在你明确告诉它之前,Subversion不会将你的改变公开,将改变公开的操作被叫做提交(committing,或者是checking in)修改到版本库。
将你的修改发布给别人,你可以使用Subversion的提交(commit)命令。
$ svn commit button.c -m "Fixed a typo in button.c."
Sending        button.c
Transmitting file data .
Committed revision 57.
这时你对button.c的修改已经提交到了版本库,其中包含了关于此次提交的日志信息(例如是修改了拼写错误)。如果其他人取出了/calc的一个工作拷贝,他们会看到这个文件最新的版本。
Suppose you have a collaborator, Sally, who checked out a
working copy of /calc at the same time
you did. When you commit your change to
button.c, Sally's working copy is left
unchanged; Subversion modifies working copies only at the
user's request.
To bring her project up to date, Sally can ask Subversion to update her working copy, by using the update command. This will incorporate your changes into her working copy, as well as any others that have been committed since she checked it out.
$ pwd
/home/sally/calc

$ ls -A
Makefile button.c integer.c .svn/

$ svn update
U    button.c
Updated to revision 57.
The output from the svn update command
indicates that Subversion updated the contents of
button.c. Note that Sally didn't need to
specify which files to update; Subversion uses the information
in the .svn directory as well as further
information in the repository, to decide which files need to
be brought up to date.
An svn commit operation publishes changes to any number of files and directories as a single atomic transaction. In your working copy, you can change files' contents; create, delete, rename, and copy files and directories; then commit a complete set of changes as an atomic transaction.
By atomic transaction, we mean simply this: either all of the changes happen in the repository, or none of them happen. Subversion tries to retain this atomicity in the face of program crashes, system crashes, network problems, and other users' actions.
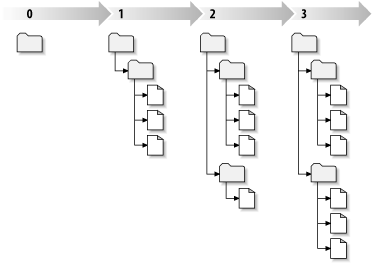
Each time the repository accepts a commit, this creates a new state of the filesystem tree, called a revision. Each revision is assigned a unique natural number, one greater than the number of the previous revision. The initial revision of a freshly created repository is numbered 0 and consists of nothing but an empty root directory.
图 1.7 “版本库”可以更形象的描述版本库,想象有一组修订号,从0开始,从左到右,每一个修订号有一个目录树挂在它下面,每一个树好像是一次提交后的版本库“快照”。
需要特别注意的是,工作拷贝并不一定对应版本库中的单个修订版本,他们可能包含多个修订版本的文件。举个例子,你从版本库检出一个工作拷贝,最近的修订号是4:
calc/Makefile:4
     integer.c:4
     button.c:4
此刻,工作目录与版本库的修订版本4完全对应,然而,你修改了button.c并且提交之后,假设没有别的提交出现,你的提交会在版本库建立修订版本5,你的工作拷贝会是这个样子的:
calc/Makefile:4
     integer.c:4
     button.c:5
假设此刻,Sally提交了对integer.c的修改,建立修订版本6,如果你使用svn update来更新你的工作拷贝,你会看到:
calc/Makefile:6
     integer.c:6
     button.c:6
Sally对integer.c的改变会出现在你的工作拷贝,你对button.c的改变还在,在这个例子里,Makefile在4、5、6修订版本都是一样的,但是Subversion会把他的Makefile的修订号设为6来表明它是最新的,所以你在工作拷贝顶级目录作一次干净的更新,会使得所有内容对应版本库的同一修订版本。
对于工作拷贝的每一个文件,Subversion在管理区域.svn/记录两项关键的信息:
-
What revision your working file is based on (this is called the file's working revision) and
-
A timestamp recording of when the local copy was last updated by the repository
给定这些信息,通过与版本库通讯,Subversion可以告诉我们工作文件是处于如下四种状态的那一种:
- 未修改且是当前的
-
文件在工作目录里没有修改,在工作修订版本之后没有修改提交到版本库。svn commit操作不做任何事情,svn update不做任何事情。
- 本地已修改且是当前的
-
在工作目录已经修改,从基本修订版本之后没有修改提交到版本库。本地修改没有提交,因此svn commit会成功提交,svn update不做任何事情。
- 未修改且不是当前的了
-
The file has not been changed in the working directory, but it has been changed in the repository. The file should eventually be updated in order to make it current with the latest public revision. An svn commit of the file will do nothing, and an svn update of the file will fold the latest changes into your working copy.
- 本地已修改且不是最新的
-
The file has been changed both in the working directory and in the repository. An svn commit of the file will fail with an “out-of-date” error. The file should be updated first; an svn update command will attempt to merge the public changes with the local changes. If Subversion can't complete the merge in a plausible way automatically, it leaves it to the user to resolve the conflict.
这看起来需要记录很多事情,但是svn status命令可以告诉你工作拷贝中文件的状态,关于此命令更多的信息,请看“查看你的修改概况”一节。
作为一个普遍原理,Subversion努力做到尽可能的灵活,一个特殊的灵活特性就是让工作拷贝包含不同工作修订版本的文件和目录,不幸的是,这个灵活性会让许多新用户感到迷惑。如果上一个混合修订版本的例子让你感到困惑,这里是一个为何有这种特性和如何利用这个特性的基础介绍。
One of the fundamental rules of Subversion is that a “push” action does not cause a “pull,” nor the other way around. Just because you're ready to submit new changes to the repository doesn't mean you're ready to receive changes from other people. And if you have new changes still in progress, then svn update should gracefully merge repository changes into your own, rather than forcing you to publish them.
The main side effect of this rule is that it means a working copy has to do extra bookkeeping to track mixed revisions as well as be tolerant of the mixture. It's made more complicated by the fact that directories themselves are versioned.
For example, suppose you have a working copy entirely at
revision 10. You edit the
file foo.html and then perform
an svn commit, which creates revision 15
in the repository. After the commit succeeds, many new
users would expect the working copy to be entirely at
revision 15, but that's not the case! Any number of changes
might have happened in the repository between revisions 10
and 15. The client knows nothing of those changes in the
repository, since you haven't yet run svn
update, and svn commit doesn't
pull down new changes. If, on the other hand,
svn commit were to automatically download
the newest changes, then it would be possible to set the
entire working copy to revision 15—but then we'd be
breaking the fundamental rule of “push”
and “pull” remaining separate actions.
Therefore, the only safe thing the Subversion client can do
is mark the one
file—foo.html—as being at
revision 15. The rest of the working copy remains at
revision 10. Only by running svn update
can the latest changes be downloaded and the whole working
copy be marked as revision 15.
The fact is, every time you run svn commit, your working copy ends up with some mixture of revisions. The things you just committed are marked as having larger working revisions than everything else. After several commits (with no updates in between), your working copy will contain a whole mixture of revisions. Even if you're the only person using the repository, you will still see this phenomenon. To examine your mixture of working revisions, use the svn status --verbose command (see “查看你的修改概况”一节 for more information.)
通常,新用户对于工作拷贝的混合修订版本一无所知,这会让人糊涂,因为许多客户端命令对于所检验条目的修订版本很敏感。例如svn log命令显示一个文件或目录的历史修改信息(见“Generating a List of Historical Changes”一节),当用户对一个工作拷贝对象调用这个命令,他们希望看到这个对象的整个历史信息。但是如果这个对象的修订版本已经相当老了(通常因为很长时间没有运行svn update),此时会显示比这个对象更老的历史。
If your project is sufficiently complex, you'll discover that it's sometimes nice to forcibly backdate (or, update to a revision older than the one you already have) portions of your working copy to an earlier revision; you'll learn how to do that in 第 2 章 基本使用. Perhaps you'd like to test an earlier version of a submodule contained in a subdirectory, or perhaps you'd like to figure out when a bug first came into existence in a specific file. This is the “time machine” aspect of a version control system—the feature that allows you to move any portion of your working copy forward and backward in history.
无论你如何在工作拷贝中利用混合修订版本,这种灵活性还是有限制的。
First, you cannot commit the deletion of a file or directory that isn't fully up to date. If a newer version of the item exists in the repository, your attempt to delete will be rejected in order to prevent you from accidentally destroying changes you've not yet seen.
Second, you cannot commit a metadata change to a directory unless it's fully up to date. You'll learn about attaching “properties” to items in 第 3 章 高级主题. A directory's working revision defines a specific set of entries and properties, and thus committing a property change to an out-of-date directory may destroy properties you've not yet seen.
现在,我们将要深入到Subversion的使用细节当中,完成本章时,你将学会所有Subversion日常使用的命令,你将从把数据导入到Subversion开始,接着是初始化的检出(check out),然后是做出修改并检查,你也将会学到如何在工作拷贝中获取别人的修改,检查他们,并解决所有可能发生的冲突。
Note that this chapter is not meant to be an exhaustive list of all Subversion's commands—rather, it's a conversational introduction to the most common Subversion tasks that you'll encounter. This chapter assumes that you've read and understood 第 1 章 基本概念 and are familiar with the general model of Subversion. For a complete reference of all commands, see 第 9 章 Subversion 完全参考.
在继续阅读之前,需要知道Subversion使用中最重要的命令:svn help,Subversion命令行工具是一个自文档的工具—在任何时候你可以运行svn help SUBCOMMAND来查看子命令的语法、参数以及行为方式。
$ svn help import
import: Commit an unversioned file or tree into the repository.
usage: import [PATH] URL

  Recursively commit a copy of PATH to URL.
  If PATH is omitted '.' is assumed.
  Parent directories are created as necessary in the repository.
  If PATH is a directory, the contents of the directory are added
  directly under URL.
  Unversionable items such as device files and pipes are ignored
  if --force is specified.

Valid options:
  -q [--quiet]             : print nothing, or only summary information
  -N [--non-recursive]     : obsolete; try --depth=files or --depth=immediates
  --depth ARG              : limit operation by depth ARG ('empty', 'files',
                             'immediates', or 'infinity')
…
There are two ways to get new files into your Subversion repository: svn import and svn add. We'll discuss svn import now and will discuss svn add later in this chapter when we review a typical day with Subversion.
svn import是将未版本化文件导入版本库的最快方法,会根据需要创建中介目录。svn import不需要一个工作拷贝,你的文件会直接提交到版本库,这通常用在你希望将一组文件加入到Subversion版本库时,例如:
$ svnadmin create /var/svn/newrepos
$ svn import mytree file:///var/svn/newrepos/some/project \
             -m "Initial import"
Adding         mytree/foo.c
Adding         mytree/bar.c
Adding         mytree/subdir
Adding         mytree/subdir/quux.h

Committed revision 1.
在上一个例子里,将会拷贝目录mytree到版本库的some/project下:
$ svn list file:///var/svn/newrepos/some/project
bar.c
foo.c
subdir/
注意,在导入之后,原来的目录树并没有转化成工作拷贝,为了开始工作,你还是需要运行svn checkout导出一个工作拷贝。
While Subversion's flexibility allows you to lay out your
repository in any way that you choose, we recommend that you
create a trunk directory to hold the
“main line” of development, a
branches directory to contain branch
copies, and a tags directory to contain tag
copies—for example:
$ svn list file:///var/svn/repos
/trunk
/branches
/tags
You'll learn more about tags and branches in 第 4 章 分支与合并. For details and how to set up multiple projects, see “版本库布局”一节 and “规划你的版本库结构”一节 to read more about project roots.
大多数时候,你会使用checkout从版本库取出一个新拷贝开始使用Subversion,这样会在本机创建一个项目的“本地拷贝”,这个拷贝包括了命令行指定版本库中的HEAD(最新的)版本:
$ svn checkout http://svn.collab.net/repos/svn/trunk
A    trunk/Makefile.in
A    trunk/ac-helpers
A    trunk/ac-helpers/install.sh
A    trunk/ac-helpers/install-sh
A    trunk/build.conf
…
Checked out revision 8810.
尽管上面的例子取出了trunk目录,你也完全可以通过输入特定URL取出任意深度的子目录:
$ svn checkout \
      http://svn.collab.net/repos/svn/trunk/subversion/tests/cmdline/
A    cmdline/revert_tests.py
A    cmdline/diff_tests.py
A    cmdline/autoprop_tests.py
A    cmdline/xmltests
A    cmdline/xmltests/svn-test.sh
…
Checked out revision 8810.
Since Subversion uses a “copy-modify-merge” model instead of “lock-modify-unlock” (see “版本模型”一节), you can start right in making changes to the files and directories in your working copy. Your working copy is just like any other collection of files and directories on your system. You can edit and change them, move them around, even delete the entire working copy and forget about it.
警告
While your working copy is “just like any other collection of files and directories on your system,” you can edit files at will, but you must tell Subversion about everything else that you do. For example, if you want to copy or move an item in a working copy, you should use svn copy or svn move instead of the copy and move commands provided by your operating system. We'll talk more about them later in this chapter.
Unless you're ready to commit the addition of a new file or directory or changes to existing ones, there's no need to further notify the Subversion server that you've done anything.
因为你可以使用版本库的URL作为唯一参数取出一个工作拷贝,你也可以在版本库URL之后指定一个目录,这样会将你的工作目录放到你的新目录,举个例子:
$  svn checkout http://svn.collab.net/repos/svn/trunk subv
A    subv/Makefile.in
A    subv/ac-helpers
A    subv/ac-helpers/install.sh
A    subv/ac-helpers/install-sh
A    subv/build.conf
…
Checked out revision 8810.
这样将把你的工作拷贝放到subv而不是和前面那样放到trunk,如果subv不存在,将会自动创建。
When you perform a Subversion operation that requires you to authenticate, by default Subversion caches your authentication credentials on disk. This is done for convenience, so that you don't have to continually re-enter your password for future operations. If you're concerned about caching your Subversion passwords, [3] you can disable caching either permanently or on a case-by-case basis.
To disable password caching for a particular one-time
command, pass the --no-auth-cache option on
the command line. To permanently disable caching, you can add
the line store-passwords = no to your local
machine's Subversion configuration file. See “客户端凭证缓存”一节 for
details.
Since Subversion caches auth credentials by default (both
username and password), it conveniently remembers who you were
acting as the last time you modified you working copy. But
sometimes that's not helpful—particularly if you're
working in a shared working copy such as a system
configuration directory or a webserver document root. In this
case, just pass the --username option on the
command line, and Subversion will attempt to authenticate as
that user, prompting you for a password if necessary.
Subversion has numerous features, options, bells, and whistles, but on a day-to-day basis, odds are that you will only use a few of them. In this section, we'll run through the most common things that you might find yourself doing with Subversion in the course of a day's work.
典型的工作周期是这样的:
-
更新你的工作拷贝。
-
svn update
-
-
Make changes.
-
svn add
-
svn delete
-
svn copy
-
svn move
-
-
Examine your changes.
-
svn status
-
svn diff
-
-
Possibly undo some changes.
-
svn revert
-
-
Resolve conflicts (merge others' changes).
-
svn update
-
svn resolve
-
-
Commit your changes.
-
svn commit
-
When working on a project with a team, you'll want to update your working copy to receive any changes made since your last update by other developers on the project. Use svn update to bring your working copy into sync with the latest revision in the repository:
$ svn update
U  foo.c
U  bar.c
Updated to revision 2.
In this case, it appears that someone checked in
modifications to both foo.c
and bar.c since the last time you
updated, and Subversion has updated your working copy to
include those changes.
When the server sends changes to your working copy via svn update, a letter code is displayed next to each item to let you know what actions Subversion performed to bring your working copy up-to-date. To find out what these letters mean, run svn help update.
现在你可以开始工作并且修改你的工作拷贝了,你很容易决定作出一个修改(或者是一组),像写一个新的特性,修正一个错误等等。这时可以使用的Subversion命令包括svn add、 svn delete、svn copy和svn move。如果你只是修改版本库中已经存在的文件,在你提交之前,不必使用上面的任何一个命令。
There are two kinds of changes you can make to your working copy: file changes and tree changes. You don't need to tell Subversion that you intend to change a file; just make your changes using your text editor, word processor, graphics program, or whatever tool you would normally use. Subversion automatically detects which files have been changed, and in addition, handles binary files just as easily as it handles text files—and just as efficiently too. For tree changes, you can ask Subversion to “mark” files and directories for scheduled removal, addition, copying, or moving. These changes may take place immediately in your working copy, but no additions or removals will happen in the repository until you commit them.
下面是Subversion用来修改目录树结构的五个子命令。
- svn add foo
-
Schedule file, directory, or symbolic link
footo be added to the repository. When you next commit,foowill become a child of its parent directory. Note that iffoois a directory, everything underneathfoowill be scheduled for addition. If you want only to addfooitself, pass the--depth emptyoption. - svn delete foo
-
预定将文件、目录或者符号链
foo从版本库中删除,如果foo是文件,它马上从工作拷贝中删除,如果是目录,不会被删除,但是Subversion准备好删除了,当你提交你的修改,foo就会在你的工作拷贝和版本库中被删除。[4] - svn copy foo bar
-
Create a new item
baras a duplicate offooand automatically schedulebarfor addition. Whenbaris added to the repository on the next commit, its copy history is recorded (as having originally come fromfoo). svn copy does not create intermediate directories unless you pass the--parents. - svn move foo bar
-
This command is exactly the same as running svn copy foo bar; svn delete foo. That is,
baris scheduled for addition as a copy offoo, andfoois scheduled for removal. svn move does not create intermediate directories unless you pass the--parents. - svn mkdir blort
-
这个命令同运行 mkdir blort; svn add blort相同,也就是创建一个叫做
blort的文件,并且预定添加到版本库。
当你完成修改,你需要提交他们到版本库,但是在此之前,检查一下做过什么修改是个好主意,通过提交前的检查,你可以整理一份精确的日志信息,你也可以发现你不小心修改的文件,给了你一次恢复修改的机会。此外,这是一个审查和仔细察看修改的好机会,你可通过命令svn status浏览所做的修改,通过svn diff检查修改的详细信息。
Subversion has been optimized to help you with this task,
and it is able to do many things without communicating with
the repository. In particular, your working copy contains a
hidden cached “pristine” copy of each version
controlled file within the .svn area.
Because of this, Subversion can quickly show you how your
working files have changed or even allow you to undo your
changes without contacting the repository.
为了浏览修改的内容,你会使用这个svn status命令,在所有Subversion命令里,svn status可能会是你用的最多的命令。
如果你在工作拷贝的顶级目录运行不带参数的svn status命令,它会检测你做的所有的文件或目录的修改,以下的例子是来展示svn status可能返回的状态码(注意,#之后的不是svn status打印的)。
?       scratch.c           # file is not under version control
A       stuff/loot/bloo.h   # file is scheduled for addition
C       stuff/loot/lump.c   # file has textual conflicts from an update
D       stuff/fish.c        # file is scheduled for deletion
M       bar.c               # the content in bar.c has local modifications
In this output format, svn status prints six columns of characters, followed by several whitespace characters, followed by a file or directory name. The first column tells the status of a file or directory and/or its contents. The codes we listed are:
-
A item -
预定加入到版本库的文件、目录或符号链的
item。 -
C item -
The file
itemis in a state of conflict. That is, changes received from the server during an update overlap with local changes that you have in your working copy (and weren't resolved during the update). You must resolve this conflict before committing your changes to the repository. -
D item -
文件、目录或是符号链
item预定从版本库中删除。 -
M item -
文件
item的内容被修改了。
如果你传递一个路径给svn status,它只给你这个项目的信息:
$ svn status stuff/fish.c
D      stuff/fish.c
svn status also has a
--verbose (-v) option,
which will show you the status of every
item in your working copy, even if it has not been
changed:
$ svn status -v
M               44        23    sally     README
                44        30    sally     INSTALL
M               44        20    harry     bar.c
                44        18    ira       stuff
                44        35    harry     stuff/trout.c
D               44        19    ira       stuff/fish.c
                44        21    sally     stuff/things
A                0         ?     ?        stuff/things/bloo.h
                44        36    harry     stuff/things/gloo.c
This is the “long form” output of svn status. The letters in the first column mean the same as before, but the second column shows the working revision of the item. The third and fourth columns show the revision in which the item last changed, and who changed it.
None of the prior invocations to svn
status contact the repository—instead, they
compare the metadata in the .svn
directory with the working copy. Finally, there is the
--show-updates (-u)
option, which contacts the repository and adds information
about things that are out of date:
$ svn status -u -v
M      *        44        23    sally     README
M               44        20    harry     bar.c
       *        44        35    harry     stuff/trout.c
D               44        19    ira       stuff/fish.c
A                0         ?     ?        stuff/things/bloo.h
Status against revision:   46
Notice the two asterisks: if you were to run
svn update at this point, you would
receive changes to README
and trout.c. This tells you some very
useful information—you'll need to update and get the
server changes on README before you
commit, or the repository will reject your commit for being
out of date (more on this subject later).
svn status can display much more information about the files and directories in your working copy than we've shown here—for an exhaustive description of svn status and its output, see svn status.
另一种检查修改的方式是svn diff命令,你可以通过不带参数的svn diff精确的找出你所做的修改,这会输出统一区别格式的区别信息:
$ svn diff
Index: bar.c
===================================================================
--- bar.c	(revision 3)
+++ bar.c	(working copy)
@@ -1,7 +1,12 @@
+#include <sys/types.h>
+#include <sys/stat.h>
+#include <unistd.h>
+
+#include <stdio.h>

 int main(void) {
-  printf("Sixty-four slices of American Cheese...\n");
+  printf("Sixty-five slices of American Cheese...\n");
 return 0;
 }

Index: README
===================================================================
--- README	(revision 3)
+++ README	(working copy)
@@ -193,3 +193,4 @@
+Note to self:  pick up laundry.

Index: stuff/fish.c
===================================================================
--- stuff/fish.c	(revision 1)
+++ stuff/fish.c	(working copy)
-Welcome to the file known as 'fish'.
-Information on fish will be here soon.

Index: stuff/things/bloo.h
===================================================================
--- stuff/things/bloo.h	(revision 8)
+++ stuff/things/bloo.h	(working copy)
+Here is a new file to describe
+things about bloo.
The svn diff command produces this
output by comparing your working files against the cached
“pristine” copies within the
.svn area. Files scheduled for
addition are displayed as all added text, and files
scheduled for deletion are displayed as all deleted
text.
Output is displayed in unified diff format. That is,
removed lines are prefaced with -, and
added lines are prefaced with
+. svn diff also
prints filename and offset information useful to the
patch program, so you can generate
“patches” by redirecting the diff output to a
file:
$ svn diff > patchfile
举个例子,你可以把补丁文件发送邮件到其他开发者,在提交之前审核和测试。
Subversion uses its internal diff engine, which produces
unified diff format, by default. If you want diff output in
a different format, specify an external diff program using
--diff-cmd and pass any flags you'd like to
it using the --extensions
(-x) option. For example, to see local
differences in file foo.c in context
output format while ignoring case differences, you might run
svn diff --diff-cmd /usr/bin/diff --extensions '-i'
foo.c.
假定我们在看svn diff的输出,你发现对某个文件的所有修改都是错误的,或许你根本不应该修改这个文件,或者是从开头重新修改会更加容易。
这是使用svn revert的好机会:
$ svn revert README
Reverted 'README'
Subversion reverts the file to its premodified state by
overwriting it with the cached “pristine” copy
from the .svn area. But also note that
svn revert can undo
any scheduled operations—for
example, you might decide that you don't want to add a new
file after all:
$ svn status foo
?      foo

$ svn add foo
A         foo

$ svn revert foo
Reverted 'foo'

$ svn status foo
?      foo
注意
svn revertITEM的效果与删除ITEM然后执行svn update -r BASEITEM完全一样,但是,如果你使用svn revert它不必通知版本库就可以恢复文件。
或许你不小心删除了一个文件:
$ svn status README

$ svn delete README
D         README

$ svn revert README
Reverted 'README'

$ svn status README
我们可以使用svn status -u来预测冲突,当你运行svn update一些有趣的事情发生了:
$ svn update
U  INSTALL
G  README
Conflict discovered in 'bar.c'.
Select: (p) postpone, (df) diff-full, (e) edit,
        (h) help for more options:
U和G没必要关心,文件干净的接受了版本库的变化,文件标示为U表明本地没有修改,文件已经根据版本库更新。G标示合并,标示本地已经修改过,与版本库没有重迭的地方,已经合并。
But the next two lines are part of a feature (new in
Subversion 1.5) called interactive conflict
resolution. This means that the changes from the
server overlapped with your own, and you have the opportunity
to resolve this conflict. The most commonly used options are
displayed, but you can see all of the options by
typing h:
…
  (p)  postpone    - mark the conflict to be resolved later
  (df) diff-full   - show all changes made to merged file
  (e)  edit        - change merged file in an editor
  (r)  resolved    - accept merged version of file
  (mf) mine-full   - accept my version of entire file (ignore their changes)
  (tf) theirs-full - accept their version of entire file (lose my changes)
  (l)  launch      - launch external tool to resolve conflict
  (h)  help        - show this list
Let's briefly review each of these options before we go into detail on what each option means.
-
(p)ostpone -
Leave the file in a conflicted state for you to resolve after your update is complete.
-
(d)iff -
Display the differences between the base revision and the conflicted file itself in unified diff format.
-
(e)dit -
Open the file in conflict with your favorite editor, as set in the environment variable
EDITOR. -
(r)esolved -
After editing a file, tell svn that you've resolved the conflicts in the file and that it should accept the current contents—basically that you've “resolved” the conflict.
-
(m)ine-(f)ull -
Discard the newly received changes from the server and use only your local changes for the file under review.
-
(t)heirs-(f)ull -
Discard your local changes to the file under review and use only the newly received changes from the server.
-
(l)aunch -
Launch an external program to perform the conflict resolution. This requires a bit of preparation beforehand.
-
(h)elp -
Show the list of all possible commands you can use in interactive conflict resolution.
We'll cover these commands in more detail now, grouping them together by related functionality.
Before deciding how to attack a conflict interactively, odds are that you'd like to see what exactly is in conflict, and the diff command (d) is what you'll use for this:
…
Select: (p) postpone, (df) diff-full, (e) edit,
        (h)elp for more options : d
--- .svn/text-base/sandwich.txt.svn-base      Tue Dec 11 21:33:57 2007
+++ .svn/tmp/tempfile.32.tmp     Tue Dec 11 21:34:33 2007
@@ -1 +1,5 @@
-Just buy a sandwich.
+<<<<<<< .mine
+Go pick up a cheesesteak.
+=======
+Bring me a taco!
+>>>>>>> .r32
…
The first line of the diff content shows the previous
contents of the working copy (the BASE
revision), the next content line is your change, and the
last content line is the change that was just received from
the server (usually the
HEAD revision). With this information in
hand, you're ready to move on to the next action.
There are four different ways to resolve conflicts interactively—two of which allow you to selectively merge and edit changes, and two of which allow you to simply pick a version of the file and move along.
If you wish to choose some combination of your local
changes, you can use the “edit” command
(e) to manually edit the file with
conflict markers in a text editor (determined by the
EDITOR environment variable). Editing
the file by hand in your favorite text editor is a somewhat
low-tech way of remedying conflicts (see “Merging conflicts by hand”一节 for a
walkthrough), so some people like to use fancy graphical
merge tools instead.
In order to use a merge tool, you need to either set the
SVN_MERGE environment variable or define
the merge-tool-cmd option in your
Subversion configuration file (see “配置选项”一节 for more details).
Subversion will pass four arguments to the merge tool: The
BASE revision of the file, the revision
of the file received from the server as part of the update,
the copy of the file containing your local edits, and
lastly, the merged copy of the file (which contains conflict
markers). If your merge tool is expecting arguments in a
different order or format, you'll need to write a wrapper
script for Subversion to invoke. After you've edited the
file, if you're satisfied with the changes you've made, you
can tell Subversion that the edited file is no longer in
conflict by using the “resolve” command
(r).
If you decide that you don't need to merge any changes, but just want to accept one version of the file or the other, you can either choose your changes (aka “mine”) by using the “mine-full” command (mf) or choose theirs by using the “theirs-full” command (tf).
This may sound like an appropriate section for avoiding
marital disagreements, but it's actually still about
Subversion, so read on. If you're doing an update and
encounter a conflict that you're not prepared to review or
resolve, you can type p to postpone
resolving a conflict on a file-by-file basis when you run
svn update. If you're running an update
and don't want to resolve any conflicts, you can pass the
--non-interactive option to svn
update, and any file in conflict will be marked
with a C
automatically.
The C stands for
conflict. This means that
the changes from the server overlapped with your own, and
now you have to manually choose between them after the
update has completed. When you postpone a conflict
resolution, svn typically does three
things to assist you in noticing and resolving that
conflict:
-
Subversion prints a
Cduring the update and remembers that the file is in a state of conflict. -
If Subversion considers the file to be mergeable, it places conflict markers—special strings of text that delimit the “sides” of the conflict—into the file to visibly demonstrate the overlapping areas. (Subversion uses the
svn:mime-typeproperty to decide if a file is capable of contextual, line-based merging. See “文件内容类型”一节 to learn more.) -
对于每一个冲突的文件,Subversion放置三个额外的未版本化文件到你的工作拷贝:
-
filename.mine -
你更新前的文件,没有冲突标志,只是你最新更改的内容。(如果Subversion认为这个文件不可以合并,
.mine文件不会创建,因为它和工作文件相同。) -
filename.rOLDREV -
这是你的做更新操作以前的
BASE版本文件,就是你在上次更新之后未作更改的版本。 -
filename.rNEWREV -
这是你的Subversion客户端从服务器刚刚收到的版本,这个文件对应版本库的
HEAD版本。
Here
OLDREVis the revision number of the file in your.svndirectory, andNEWREVis the revision number of the repositoryHEAD. -
For example, Sally makes changes to the file
sandwich.txt in the repository. Harry has
just changed the file in his working copy and checked it in.
Sally updates her working copy before checking in and she gets
a conflict, which she postpones:
$ svn update
Conflict discovered in 'sandwich.txt'.
Select: (p) postpone, (df) diff-full, (e) edit,
        (h)elp for more options : p
C  sandwich.txt
Updated to revision 2.
$ ls -1
sandwich.txt
sandwich.txt.mine
sandwich.txt.r1
sandwich.txt.r2
At this point, Subversion will not
allow Sally to commit the file
sandwich.txt until the three temporary
files are removed.
$ svn commit -m "Add a few more things"
svn: Commit failed (details follow):
svn: Aborting commit: '/home/sally/svn-work/sandwich.txt' remains in conflict
If you've postponed a conflict, you need to resolve the
conflict before Subversion will allow you to commit your
changes. You'll do this with the svn
resolve command and one of several arguments to
the --accept option.
If you want to choose the version of the file that you
last checked out before making your edits, choose
the base argument.
If you want to choose the version that contains only
your edits, choose the mine-full
argument.
If you want to choose the version that your most recent
update pulled from the server (and thus discarding your
edits entirely), choose
the theirs-full argument.
However, if you want to pick and choose from your
changes and the changes that your update fetched from the
server, merge the conflicted text “by hand” (by
examining and editing the conflict markers within the file)
and then choose the working
argument.
svn resolve removes the three
temporary files, accepts the version of the file that you
specified with the --accept option, and
Subversion no longer considers the file to be in a state of
conflict.
$ svn resolve --accept working sandwich.txt
Resolved conflicted state of 'sandwich.txt'
第一次尝试解决冲突让人感觉很害怕,但经过一点训练,它简单的像是骑着车子下坡。
这里一个简单的例子,由于不良的交流,你和同事Sally,同时编辑了sandwich.txt。Sally提交了修改,当你准备更新你的工作拷贝,冲突发生了,我们不得不去修改sandwich.txt来解决这个问题。首先,看一下这个文件:
$ cat sandwich.txt
Top piece of bread
Mayonnaise
Lettuce
Tomato
Provolone
<<<<<<< .mine
Salami
Mortadella
Prosciutto
=======
Sauerkraut
Grilled Chicken
>>>>>>> .r2
Creole Mustard
Bottom piece of bread
The strings of less-than signs, equal signs, and greater-than signs are conflict markers and are not part of the actual data in conflict. You generally want to ensure that those are removed from the file before your next commit. The text between the first two sets of markers is composed of the changes you made in the conflicting area:
<<<<<<< .mine
Salami
Mortadella
Prosciutto
=======
后两组之间的是Sally提交的修改冲突:
=======
Sauerkraut
Grilled Chicken
>>>>>>> .r2
Usually you won't want to just delete the conflict markers and Sally's changes—she's going to be awfully surprised when the sandwich arrives and it's not what she wanted. So this is where you pick up the phone or walk across the office and explain to Sally that you can't get sauerkraut from an Italian deli. [6] Once you've agreed on the changes you will check in, edit your file and remove the conflict markers.
Top piece of bread
Mayonnaise
Lettuce
Tomato
Provolone
Salami
Mortadella
Prosciutto
Creole Mustard
Bottom piece of bread
Now run svn resolve, and you're ready to commit your changes:
$ svn resolve --accept working sandwich.txt
Resolved conflicted state of 'sandwich.txt'
$ svn commit -m "Go ahead and use my sandwich, discarding Sally's edits."
Note that svn resolve, unlike most of the other commands we deal with in this chapter, requires that you explicitly list any filenames that you wish to resolve. In any case, you want to be careful and run svn resolve only when you're certain that you've fixed the conflict in your file—once the temporary files are removed, Subversion will let you commit the file even if it still contains conflict markers.
记住,如果你修改冲突时感到混乱,你可以参考subversion生成的三个文件—包括你未作更新的文件。你也可以使用三方交互合并工具检验这三个文件。
If you get a conflict and decide that you want to throw out your changes, you can run svn resolve --accept theirs-full and Subversion will discard your edits and remove the temporary files:
$ svn update
Conflict discovered in 'sandwich.txt'.
Select: (p) postpone, (df) diff-full, (e) edit,
        (h) help for more options: p
C    sandwich.txt
Updated to revision 2.
$ ls sandwich.*
sandwich.txt  sandwich.txt.mine  sandwich.txt.r2  sandwich.txt.r1
$ svn resolve --accept theirs-full sandwich.txt
Resolved conflicted state of 'sandwich.txt'
If you decide that you want to throw out your changes and start your edits again (Whether this occurs after a conflict or anytime), just revert your changes:
$ svn revert sandwich.txt
Reverted 'sandwich.txt'
$ ls sandwich.*
sandwich.txt
Note that when you revert a conflicted file, you don't have to run svn resolve.
最后!你的修改结束了,你合并了服务器上所有的修改,你准备好提交修改到版本库。
svn commit命令发送所有的修改到版本库,当你提交修改时,你需要提供一些描述修改的日志信息,你的信息会附到这个修订版本上,如果信息很简短,你可以在命令行中使用--message(或-m)选项:
$ svn commit -m "Corrected number of cheese slices."
Sending        sandwich.txt
Transmitting file data .
Committed revision 3.
However, if you've been composing your log message as you
work, you may want to tell Subversion to get the message from
a file by passing the filename with the
--file (-F) option:
$ svn commit -F logmsg
Sending        sandwich.txt
Transmitting file data .
Committed revision 4.
如果你没有指定--message或者--file选项,Subversion会自动地启动你最喜欢的编辑器(见“配置”一节的editor-cmd部分)来编辑日志信息。
提示
如果你使用编辑器撰写日志信息时希望取消提交,你可以直接关掉编辑器,不要保存,如果你已经做过保存,只要简单的删掉所有的文本并再次保存,然后退出。
$ svn commit
Waiting for Emacs...Done

Log message unchanged or not specified
(a)bort, (c)ontinue, (e)dit
a
$
The repository doesn't know or care if your changes make any sense as a whole; it checks only to make sure that nobody else has changed any of the same files that you did when you weren't looking. If somebody has done that, the entire commit will fail with a message informing you that one or more of your files is out of date:
$ svn commit -m "Add another rule"
Sending        rules.txt
svn: Commit failed (details follow):
svn: File '/sandwich.txt' is out of date
…
(错误信息的精确措辞依赖于网络协议和你使用的服务器,但对于所有的情况,其思想完全一样。)
此刻,你需要运行svn update来处理所有的合并和冲突,然后再尝试提交。
我们已经覆盖了Subversion基本的工作周期,还有许多其它特性可以管理你得版本库和工作拷贝,但是只使用前面介绍的命令你就可以很进行日常工作了,我们还会覆盖更多用的还算频繁的命令。
Your Subversion repository is like a time machine. It keeps a record of every change ever committed and allows you to explore this history by examining previous versions of files and directories as well as the metadata that accompanies them. With a single Subversion command, you can check out the repository (or restore an existing working copy) exactly as it was at any date or revision number in the past. However, sometimes you just want to peer into the past instead of going into it.
有许多命令可以为你提供版本库历史:
- svn log
-
Shows you broad information: log messages with date and author information attached to revisions and which paths changed in each revision.
- svn diff
-
显示特定修改的行级详细信息。
- svn cat
-
Retrieves a file as it existed in a particular revision number and displays it on your screen.
- svn list
-
显示一个目录在某一版本存在的文件。
To find information about the history of a file or directory, use the svn log command. svn log will provide you with a record of who made changes to a file or directory, at what revision it changed, the time and date of that revision, and—if it was provided—the log message that accompanied the commit.
$ svn log
------------------------------------------------------------------------
r3 | sally | Mon, 15 Jul 2002 18:03:46 -0500 | 1 line

Added include lines and corrected # of cheese slices.
------------------------------------------------------------------------
r2 | harry | Mon, 15 Jul 2002 17:47:57 -0500 | 1 line

Added main() methods.
------------------------------------------------------------------------
r1 | sally | Mon, 15 Jul 2002 17:40:08 -0500 | 1 line

Initial import
------------------------------------------------------------------------
Note that the log messages are printed in
reverse chronological order by default.
If you wish to see a different range of revisions in a
particular order or just a single revision, pass the
--revision (-r)
option:
$ svn log -r 5:19    # shows logs 5 through 19 in chronological order

$ svn log -r 19:5    # shows logs 5 through 19 in reverse order

$ svn log -r 8       # shows log for revision 8
你也可以检查单个文件或目录的日志历史,举个例子:
$ svn log foo.c
…
$ svn log http://foo.com/svn/trunk/code/foo.c
…
这样只会显示这个工作文件(或者URL)做过修订的版本的日志信息。
If you want even more information about a file or
directory, svn log also takes a
--verbose (-v) option.
Because Subversion allows you to move and copy files and
directories, it is important to be able to track path changes
in the filesystem. So, in verbose mode, svn
log will include a list of changed paths in a
revision in its output:
$ svn log -r 8 -v
------------------------------------------------------------------------
r8 | sally | 2002-07-14 08:15:29 -0500 | 1 line
Changed paths:
   M /trunk/code/foo.c
   M /trunk/code/bar.h
   A /trunk/code/doc/README

Frozzled the sub-space winch.

------------------------------------------------------------------------
svn log也有一个--quiet (-q)选项,会禁止日志信息的主要部分,当与--verbose结合使用,仅会显示修改的文件名。
我们已经看过svn diff—使用标准区别文件格式显示区别,它在提交前用来显示本地工作拷贝与版本库的区别。
事实上,svn diff有三种不同的用法:
-
比较本地修改
-
比较工作拷贝与版本库
-
比较版本库与版本库
像我们看到的,不使用任何参数调用时,svn diff将会比较你的工作文件与缓存在.svn的“原始”拷贝:
$ svn diff
Index: rules.txt
===================================================================
--- rules.txt	(revision 3)
+++ rules.txt	(working copy)
@@ -1,4 +1,5 @@
 Be kind to others
 Freedom = Responsibility
 Everything in moderation
-Chew with your mouth open
+Chew with your mouth closed
+Listen when others are speaking
$
如果传递一个--revision(-r)参数,你的工作拷贝会与指定的版本比较。
$ svn diff -r 3 rules.txt
Index: rules.txt
===================================================================
--- rules.txt	(revision 3)
+++ rules.txt	(working copy)
@@ -1,4 +1,5 @@
 Be kind to others
 Freedom = Responsibility
 Everything in moderation
-Chew with your mouth open
+Chew with your mouth closed
+Listen when others are speaking
$
If two revision numbers, separated by a colon, are
passed via --revision
(-r), then the two revisions are directly
compared:
$ svn diff -r 2:3 rules.txt
Index: rules.txt
===================================================================
--- rules.txt	(revision 2)
+++ rules.txt	(revision 3)
@@ -1,4 +1,4 @@
 Be kind to others
-Freedom = Chocolate Ice Cream
+Freedom = Responsibility
 Everything in moderation
 Chew with your mouth open
$
A more convenient way of comparing a revision to the
previous revision is to use the --change
(-c) option:
$ svn diff -c 3 rules.txt
Index: rules.txt
===================================================================
--- rules.txt	(revision 2)
+++ rules.txt	(revision 3)
@@ -1,4 +1,4 @@
 Be kind to others
-Freedom = Chocolate Ice Cream
+Freedom = Responsibility
 Everything in moderation
 Chew with your mouth open
$
最后,即使你在本机没有工作拷贝,还是可以比较版本库的修订版本,只需要在命令行中输入合适的URL:
$ svn diff -c 5 http://svn.example.com/repos/example/trunk/text/rules.txt
…
$
通过svn cat和svn list,你可以在未修改工作修订版本的情况下查看文件和目录的内容,实际上,你甚至也不需要有一个工作拷贝。
如果你只是希望检查一个过去的版本而不希望察看它们的区别,使用svn cat:
$ svn cat -r 2 rules.txt
Be kind to others
Freedom = Chocolate Ice Cream
Everything in moderation
Chew with your mouth open
$
你可以重定向输出到一个文件:
$ svn cat -r 2 rules.txt > rules.txt.v2
$
svn list可以在不下载文件到本地目录的情况下来察看目录中的文件:
$ svn list http://svn.collab.net/repos/svn
README
branches/
clients/
tags/
trunk/
If you want a more detailed listing, pass the
--verbose (-v) flag to get
output like this:
$ svn list -v http://svn.collab.net/repos/svn
  20620 harry            1084 Jul 13  2006 README
  23339 harry                 Feb 04 01:40 branches/
  21282 sally                 Aug 27 09:41 developer-resources/
  23198 harry                 Jan 23 17:17 tags/
  23351 sally                 Feb 05 13:26 trunk/
这些列告诉你文件和目录最后修改的修订版本、做出修改的用户、如果是文件还会有文件的大小,最后是修改日期和项目的名字。
警告
The svn list with no arguments defaults to the repository URL of the current working directory, not the local working copy directory. After all, if you want a listing of your local directory, you could use just plain ls (or any reasonable non-Unixy equivalent).
In addition to all of the previous commands, you can use
svn update and svn
checkout with the --revision option
to take an entire working copy “back in time”:
[7]
$ svn checkout -r 1729 # Checks out a new working copy at r1729
…
$ svn update -r 1729 # Updates an existing working copy to r1729
…
提示
Many Subversion newcomers attempt to use the preceding svn update example to “undo” committed changes, but this won't work as you can't commit changes that you obtain from backdating a working copy if the changed files have newer revisions. See “找回删除的项目”一节 for a description of how to “undo” a commit.
最后,如果你构建了一个版本,并且希望从Subversion打包文件,但是你不希望有讨厌的.svn目录,这时你可以导出版本库的一部分文件而没有.svn目录。就像svn update和svn checkout,你也可以传递--revision选项给svn export:
$ svn export http://svn.example.com/svn/repos1 # Exports latest revision
…
$ svn export http://svn.example.com/svn/repos1 -r 1729
# Exports revision r1729
…
Now that we've covered the day-to-day tasks that you'll frequently use Subversion for, we'll review a few administrative tasks relating to your working copy.
Subversion doesn't track either the state or existence of working copies on the server, so there's no server overhead to keeping working copies around. Likewise, there's no need to let the server know that you're going to delete a working copy.
If you're likely to use a working copy again, there's nothing wrong with just leaving it on disk until you're ready to use it again, at which point all it takes is an svn update to bring it up to date and ready for use.
However, if you're definitely not going to use a working
copy again, you can safely delete the entire thing, but you'd
be well served to take a look through the working copy for
unversioned files. To find these files, run svn
status and review any files that are prefixed by a
? to make certain that they're not of
importance. After you're done reviewing, you can safely
delete your working copy.
When Subversion modifies your working copy (or any
information within .svn), it tries to do
so as safely as possible. Before changing the working copy,
Subversion writes its intentions to a log file. Next, it
executes the commands in the log file to apply the requested
change, holding a lock on the relevant part of the working
copy while it works—to prevent other Subversion clients
from accessing the working copy mid-change. Finally,
Subversion removes the log file. Architecturally, this is
similar to a journaled filesystem. If a Subversion operation
is interrupted (if the process is killed or if the machine
crashes, for example), the log files remain on disk. By
re-executing the log files, Subversion can complete the
previously started operation, and your working copy can get
itself back into a consistent state.
And this is exactly what svn cleanup
does: it searches your working copy and runs any leftover
logs, removing working copy locks in the process.
If Subversion ever tells you that some part of your working copy
is “locked,” then this is the command that you
should run. Also, svn status will display
an L next to locked items:
$ svn status
  L    somedir
M      somedir/foo.c

$ svn cleanup
$ svn status
M      somedir/foo.c
不要将工作拷贝锁与Subversion用户使用并发版本控制的“锁定-修改-解锁”模型创建的锁混淆;更多细节见The Three Meanings of “Lock”。
我们已经覆盖了大多数Subversion的客户端命令,引人注目的例外是处理分支与合并(见第 4 章 分支与合并)以及属性(见“属性”一节)的命令,然而你也许会希望跳到第 9 章 Subversion 完全参考来察看所有不同的命令—怎样利用它们使你的工作更容易。
[3] Of course, you're not terribly worried—first because you know that you can't really delete anything from Subversion and, secondly, because your Subversion password isn't the same as any of the other 3 million passwords you have, right? Right?
[4] Of course, nothing is ever totally deleted from
the repository—just from the
HEAD of the repository. You can
get back anything you delete by checking out (or
updating your working copy to) a revision earlier
than the one in which you deleted it. Also see “找回删除的项目”一节.
[5] 而且你也没有WAN卡,考虑到你得到我们,哈!
[6] 如果你向他们询问,他们非常有理由把你带到城外的铁轨上。
[7] 看到了吧?我们说过Subversion是一个时间机器。
If you've been reading this book chapter by chapter, from start to finish, you should by now have acquired enough knowledge to use the Subversion client to perform the most common version control operations. You understand how to check out a working copy from a Subversion repository. You are comfortable with submitting and receiving changes using the svn commit and svn update functions. You've probably even developed a reflex that causes you to run the svn status command almost unconsciously. For all intents and purposes, you are ready to use Subversion in a typical environment.
But the Subversion feature set doesn't stop at “common version control operations.” It has other bits of functionality besides just communicating file and directory changes to and from a central repository.
This chapter highlights some of Subversion's features that, while important, aren't part of the typical user's daily routine. It assumes that you are familiar with Subversion's basic file and directory versioning capabilities. If you aren't, you'll want to first read 第 1 章 基本概念 and 第 2 章 基本使用. Once you've mastered those basics and consumed this chapter, you'll be a Subversion power user!
As we described in “修订版本”一节, revision numbers in Subversion are pretty straightforward—integers that keep getting larger as you commit more changes to your versioned data. Still, it doesn't take long before you can no longer remember exactly what happened in each and every revision. Fortunately, the typical Subversion workflow doesn't often demand that you supply arbitrary revisions to the Subversion operations you perform. For operations that do require a revision specifier, you generally supply a revision number that you saw in a commit email, in the output of some other Subversion operation, or in some other context that would give meaning to that particular number.
But occasionally, you need to pinpoint a moment in time for which you don't already have a revision number memorized or handy. So besides the integer revision numbers, svn allows as input some additional forms of revision specifiers: revision keywords and revision dates.
注意
当用来指定修订版本范围时,不同形式的Subversion修订版本可以混合匹配。例如,你可以REV1是修订版本关键字,REV2是修订版本号,或者是REV1是日期,而REV2是修订版本关键字,等等。不同的修订版本指定符是等价的,所以你可以在冒号两边任意使用。
The Subversion client understands a number of revision
keywords. These keywords can be used instead of integer
arguments to the --revision
(-r) option, and are resolved into specific
revision numbers by Subversion:
-
HEAD -
版本库中最新的(或者是“最年轻的”)版本。
-
BASE -
The revision number of an item in a working copy. If the item has been locally modified, this refers to the way the item appears without those local modifications.
-
COMMITTED -
项目最近修改的修订版本,与
BASE相同或更早。 -
PREV -
一个项目最后修改版本之前的那个版本,技术上可以认为是
COMMITTED-1。
因为可以从描述中得到,关键字PREV,BASE和COMMITTED只在引用工作拷贝路径时使用,而不能用于版本库URL,而关键字HEAD则可以用于两种路径类型。
下面是一些修订版本关键字的例子:
$ svn diff -r PREV:COMMITTED foo.c
# shows the last change committed to foo.c

$ svn log -r HEAD
# shows log message for the latest repository commit

$ svn diff -r HEAD
# compares your working copy (with all of its local changes) to the
# latest version of that tree in the repository

$ svn diff -r BASE:HEAD foo.c
# compares the unmodified version of foo.c with the latest version of
# foo.c in the repository

$ svn log -r BASE:HEAD
# shows all commit logs for the current versioned directory since you
# last updated

$ svn update -r PREV foo.c
# rewinds the last change on foo.c, decreasing foo.c's working revision

$ svn diff -r BASE:14 foo.c
# compares the unmodified version of foo.c with the way foo.c looked
# in revision 14
Revision numbers reveal nothing about the world outside
the version control system, but sometimes you need to
correlate a moment in real time with a moment in version
history. To facilitate this, the --revision
(-r) option can also accept as input date
specifiers wrapped in curly braces ({ and
}). Subversion accepts the standard
ISO-8601 date and time formats, plus a few others. Here are
some examples. (Remember to use quotes around any date that
contains spaces.)
$ svn checkout -r {2006-02-17}
$ svn checkout -r {15:30}
$ svn checkout -r {15:30:00.200000}
$ svn checkout -r {"2006-02-17 15:30"}
$ svn checkout -r {"2006-02-17 15:30 +0230"}
$ svn checkout -r {2006-02-17T15:30}
$ svn checkout -r {2006-02-17T15:30Z}
$ svn checkout -r {2006-02-17T15:30-04:00}
$ svn checkout -r {20060217T1530}
$ svn checkout -r {20060217T1530Z}
$ svn checkout -r {20060217T1530-0500}
…
当你指定一个日期,Subversion会在版本库找到接近这个日期的最近版本,并且对这个版本继续操作:
$ svn log -r {2006-11-28}
------------------------------------------------------------------------
r12 | ira | 2006-11-27 12:31:51 -0600 (Mon, 27 Nov 2006) | 6 lines
…
你可以使用时间段,Subversion会找到这段时间的所有版本:
$ svn log -r {2006-11-20}:{2006-11-29}
…
警告
Since the timestamp of a revision is stored as an unversioned, modifiable property of the revision (see “属性”一节), revision timestamps can be changed to represent complete falsifications of true chronology, or even removed altogether. Subversion's ability to correctly convert revision dates into real revision numbers depends on revision datestamps maintaining a sequential ordering—the younger the revision, the younger its timestamp. If this ordering isn't maintained, you will likely find that trying to use dates to specify revision ranges in your repository doesn't always return the data you might have expected.
我们已经详细讲述了Subversion存储和检索版本库中不同版本的文件和目录的细节,并且用了好几个章节来论述这个工具的基本功能。如果对于版本化的支持到此为止,从版本控制的角度来看Subversion已经完整了。
但不仅仅如此。
作为目录和文件版本化的补充,Subversion提供了对每一个版本化的目录和文件添加、修改和删除版本化的元数据的接口,我们用属性来表示这些元数据。我们可以认为它们是一个两列的表,附加到你的工作拷贝的每个条目上,映射属性名到任意的值。一般来说,属性的名称和值可以是你希望的任何值,限制就是名称必须是可读的文本,并且最好的一点是这些属性也是版本化的,就像你的文本文件内容,你可以像提交文本修改一样修改、提交和恢复属性修改,当你更新时也会接收到别人的属性修改—你不必为适应属性改变你的工作流程。
注意
Subversion自己保留了一组名称以svn:开头的属性,现在已经有了一些在用的属性,所以在你根据需要创建自定义属性时,需要避免这些前缀开头的名称,否则,Subversion的新版本可能会采用同名的属性来满足新的特性,而其含义可能会完全不同。
Properties show up elsewhere in Subversion, too. Just as files and directories may have arbitrary property names and values attached to them, each revision as a whole may have arbitrary properties attached to it. The same constraints apply—human-readable names and anything-you-want binary values. The main difference is that revision properties are not versioned. In other words, if you change the value of, or delete, a revision property, there's no way, within the scope of Subversion's functionality, to recover the previous value.
Subversion has no particular policy regarding the use of
properties. It asks only that you not use property names that
begin with the prefix svn:. That's the
namespace that it sets aside for its own use. And Subversion
does, in fact, use properties—both the versioned and
unversioned variety. Certain versioned properties have special
meaning or effects when found on files and directories, or they
house a particular bit of information about the revisions on
which they are found. Certain revision properties are
automatically attached to revisions by Subversion's commit
process, and they carry information about the revision. Most of
these properties are mentioned elsewhere in this or other
chapters as part of the more general topics to which they are
related. For an exhaustive list of Subversion's predefined
properties, see “Subversion Properties”一节.
In this section, we will examine the utility—both to users of Subversion and to Subversion itself—of property support. You'll learn about the property-related svn subcommands and how property modifications affect your normal Subversion workflow.
就像Subversion使用属性保存其包含的文件、目录和修订版本的附加信息,你也会发现属性有一些类似的使用,你会发现如果在数据附近有个地方保存自定义元数据会非常有用。
Say you wish to design a web site that houses many digital photos and displays them with captions and a datestamp. Now, your set of photos is constantly changing, so you'd like to have as much of this site automated as possible. These photos can be quite large, so as is common with sites of this nature, you want to provide smaller thumbnail images to your site visitors.
Now, you can get this functionality using traditional
files. That is, you can have your
image123.jpg and an
image123-thumbnail.jpg side by side in a
directory. Or if you want to keep the filenames the same, you
might have your thumbnails in a different directory, such as
thumbnails/image123.jpg. You can also
store your captions and datestamps in a similar fashion, again
separated from the original image file. But the problem here
is that your collection of files multiplies with each new
photo added to the site.
Now consider the same web site deployed in a way that
makes use of Subversion's file properties. Imagine having a
single image file, image123.jpg, with
properties set on that file that are named
caption, datestamp, and
even thumbnail. Now your working copy
directory looks much more manageable—in fact, it looks
to the casual browser like there are nothing but image files
in it. But your automation scripts know better. They know
that they can use svn (or better yet, they
can use the Subversion language bindings—see “使用API”一节) to dig out the extra
information that your site needs to display without having to
read an index file or play path manipulation games.
Custom revision properties are also frequently used. One
common such use is a property whose value contains an issue
tracker ID with which the revision is associated, perhaps
because the change made in that revision fixes a bug filed in
the tracker issue with that ID. Other uses include hanging
more friendly names on the revision—it might be hard to
remember that revision 1935 was a fully tested revision. But
if there's, say, a test-results property on
that revision with the value all passing,
that's meaningful information to have.
The svn command affords a few ways to add or modify file and directory properties. For properties with short, human-readable values, perhaps the simplest way to add a new property is to specify the property name and value on the command line of the propset subcommand:
$ svn propset copyright '(c) 2006 Red-Bean Software' calc/button.c
property 'copyright' set on 'calc/button.c'
$
But we've been touting the flexibility that Subversion
offers for your property values. And if you are planning to
have a multiline textual, or even binary, property value, you
probably do not want to supply that value on the command line.
So the propset subcommand takes a
--file (-F) option for
specifying the name of a file that contains the new property
value.
$ svn propset license -F /path/to/LICENSE calc/button.c
property 'license' set on 'calc/button.c'
$
对于属性名称也有一些限制,属性名必须以一个字符、一个冒号(:)或下划线(_)开始,之后你可以使用数字,横线(-)和句号(.)。 [8]
In addition to the propset command, the svn program supplies the propedit command. This command uses the configured editor program (see “配置”一节) to add or modify properties. When you run the command, svn invokes your editor program on a temporary file that contains the current value of the property (or that is empty, if you are adding a new property). Then, you just modify that value in your editor program until it represents the new value you wish to store for the property, save the temporary file, and then exit the editor program. If Subversion detects that you've actually changed the existing value of the property, it will accept that as the new property value. If you exit your editor without making any changes, no property modification will occur:
$ svn propedit copyright calc/button.c  ### exit the editor without changes
No changes to property 'copyright' on 'calc/button.c'
$
We should note that, as with other svn subcommands, those related to properties can act on multiple paths at once. This enables you to modify properties on whole sets of files with a single command. For example, we could have done the following:
$ svn propset copyright '(c) 2006 Red-Bean Software' calc/*
property 'copyright' set on 'calc/Makefile'
property 'copyright' set on 'calc/button.c'
property 'copyright' set on 'calc/integer.c'
…
$
如果不能方便的得到存储的属性值,那么属性的添加和编辑操作也不会很容易,所以svn提供了两个子命令来显示文件和目录存储的属性名和值。svn proplist命令会列出路径上存在的所有属性名称,一旦你知道了某个节点的属性名称,你可以用svn propget获取它的值,这个命令获取给定的路径(或者是一组路径)和属性名称,打印这个属性的值到标准输出。
$ svn proplist calc/button.c
Properties on 'calc/button.c':
  copyright
  license
$ svn propget copyright calc/button.c
(c) 2006 Red-Bean Software
还有一个proplist变种命令会列出所有属性的名称和值,只需要设置--verbose(-v)选项。
$ svn proplist -v calc/button.c
Properties on 'calc/button.c':
  copyright : (c) 2006 Red-Bean Software
  license : ================================================================
Copyright (c) 2006 Red-Bean Software.  All rights reserved.

Redistribution and use in source and binary forms, with or without
modification, are permitted provided that the following conditions
are met:

1. Redistributions of source code must retain the above copyright
notice, this list of conditions, and the recipe for Fitz's famous
red-beans-and-rice.
…
最后一个与属性相关的子命令是propdel,因为Subversion允许属性值为空,所有不能用propedit或者propset命令删除一个属性。例如,这个命令不会产生预期的效果:
$ svn propset license '' calc/button.c
property 'license' set on 'calc/button.c'
$ svn proplist -v calc/button.c
Properties on 'calc/button.c':
  copyright : (c) 2006 Red-Bean Software
  license :
$
你需要用propdel来删除属性,语法与其它与属性命令相似:
$ svn propdel license calc/button.c
property 'license' deleted from 'calc/button.c'.
$ svn proplist -v calc/button.c
Properties on 'calc/button.c':
  copyright : (c) 2006 Red-Bean Software
$
Remember those unversioned revision properties? You can
modify those, too, using the same svn
subcommands that we just described. Simply add the
--revprop command line parameter and specify
the revision whose property you wish to modify. Since
revisions are global, you don't need to specify a target path
to these property-related commands so long as you are
positioned in a working copy of the repository whose
revision property you wish to modify. Otherwise, you can
simply provide the URL of any path in the repository of
interest (including the repository's root URL). For example,
you might want to replace the commit log message of an
existing revision.
[9]
If your current working directory is part of a working copy of
your repository, you can simply run the
svn propset command with no target path:
$ svn propset svn:log '* button.c: Fix a compiler warning.' -r11 --revprop
property 'svn:log' set on repository revision '11'
$
但是即使你没有从版本库检出一个工作拷贝,你仍然可以通过提供版本库根URL来影响属性修改。
$ svn propset svn:log '* button.c: Fix a compiler warning.' -r11 --revprop \
              http://svn.example.com/repos/project
property 'svn:log' set on repository revision '11'
$
注意,修改这些未版本化的属性的能力一定要明确的添加给版本库管理员(见“修正提交消息”一节)。因为属性没有版本化,如果编辑的时候不小心,就会冒丢失信息的风险,版本库管理员可以设置方法来防范这种意外,缺省情况下,修改未版本化的属性是禁止的。
提示
Users should, where possible, use svn propedit instead of svn propset. While the end result of the commands is identical, the former will allow them to see the current value of the property that they are about to change, which helps them to verify that they are, in fact, making the change they think they are making. This is especially true when modifying unversioned revision properties. Also, it is significantly easier to modify multiline property values in a text editor than at the command line.
现在你已经熟悉了所有与属性相关的svn子命令,让我们看看属性修改如何影响Subversion的工作流。我们前面提到过,文件和目录的属性是版本化的,这一点类似于版本化的文件内容。后果之一,就是Subversion具有了同样的机制来合并—用干净或者冲突的方式—其他人的修改应用到你的修改。
As with file contents, your property changes are local modifications, made permanent only when you commit them to the repository with svn commit. Your property changes can be easily unmade, too—the svn revert command will restore your files and directories to their unedited states—contents, properties, and all. Also, you can receive interesting information about the state of your file and directory properties by using the svn status and svn diff commands.
$ svn status calc/button.c
 M     calc/button.c
$ svn diff calc/button.c
Property changes on: calc/button.c
___________________________________________________________________
Name: copyright
   + (c) 2006 Red-Bean Software

$
注意status子命令显示的M在第二列而不是在第一列,这是因为我们修改了calc/button.c的属性,而不是它的文本内容,如果我们都修改了,我们也会看到M出现在第一列(见“查看你的修改概况”一节)。
You might also have noticed the nonstandard way that Subversion currently displays property differences. You can still run svn diff and redirect the output to create a usable patch file. The patch program will ignore property patches—as a rule, it ignores any noise it can't understand. This does, unfortunately, mean that to fully apply a patch generated by svn diff, any property modifications will need to be applied by hand.
属性是Subversion一个强大的特性,成为本章和其它章讨论的许多Subversion特性的关键组成部分—文本区别和合并支持、关键字替换、新行的自动转换等等。但是为了从属性得到完全的利益,他们必须设置到正确的文件和目录。不幸的是,在日常工作中很容易忘记这一步工作,特别是当没有设置属性不会引起明显的错误时(至少相对与未能添加一个文件到版本控制这种操作),为了帮助你在需要添加属性的文件上添加属性,Subversion提供了一些简单但是有用的特性。
Whenever you introduce a file to version control using the
svn add or svn import
commands, Subversion tries to assist by setting some common
file properties automatically. First, on operating systems
whose filesystems support an execute permission bit,
Subversion will automatically set the
svn:executable property on newly added or
imported files whose execute bit is enabled. (See “文件的可执行性”一节 later in
this chapter for more about this property.)
Secondly, Subversion tries to determine the file's MIME
type. If you've configured a
mime-types-files runtime configuration
parameter, Subversion will try to find a MIME type mapping in
that file for your file's extension. If it finds such a
mapping, it will set your file's
svn:mime-type property to the MIME type it
found. If no mapping file is configured, or no mapping for
your file's extension could be found, Subversion runs a very
basic heuristic to determine if the file contains nontextual
content. If so, it automatically sets the
svn:mime-type property on that file to
application/octet-stream (the generic
“this is a collection of bytes” MIME type). Of
course, if Subversion guesses incorrectly, or if you wish to
set the svn:mime-type property to something
more precise—perhaps image/png or
application/x-shockwave-flash—you can
always remove or edit that property. (For more on
Subversion's use of MIME types, see “文件内容类型”一节 later in
this chapter.)
Subversion also provides, via its runtime configuration
system (see “运行配置区”一节), a more
flexible automatic property setting feature that allows you
to create mappings of filename patterns to property names and
values. Once again, these mappings affect adds and imports,
and can not only override the default MIME type decision made
by Subversion during those operations, but can also set
additional Subversion or custom properties, too. For example,
you might create a mapping that says that any time you add
JPEG files—ones whose names match the pattern
*.jpg—Subversion should automatically
set the svn:mime-type property on those
files to image/jpeg. Or perhaps any files
that match *.cpp should have
svn:eol-style set to
native, and svn:keywords
set to Id. Automatic property support is
perhaps the handiest property related tool in the Subversion
toolbox. See “配置”一节 for more about
configuring that support.
幸运的是,对于许多在不同操作系统下工作的用户,Subversion命令行程序的行为方式几乎完全一致,如果你知道在一个平台上如何运行svn,你也就学会了在其他平台上运行。
However, the same is not always true of other general classes of software or of the actual files you keep in Subversion. For example, on a Windows machine, the definition of a “text file” would be similar to that used on a Linux box, but with a key difference—the character sequences used to mark the ends of the lines of those files. There are other differences, too. Unix platforms have (and Subversion supports) symbolic links; Windows does not. Unix platforms use filesystem permission to determine executability; Windows uses filename extensions.
因为Subversion不是要将世界上的所有此类事情统一起来,所以我们最好是尽可能让我们在多个计算机和操作系统上使用版本化文件和目录时能够更简单,本节描述了Subversion是如何做的。
Subversion joins the ranks of the many applications that
recognize and make use of Multipurpose Internet Mail
Extensions (MIME) content types. Besides being a
general-purpose storage location for a file's content type,
the value of the svn:mime-type file
property determines some behavioral characteristics of
Subversion itself.
For example, one of the benefits that Subversion typically
provides is contextual, line-based merging of changes received
from the server during an update into your working file. But
for files containing nontextual data, there is often no
concept of a “line.” So, for versioned files
whose svn:mime-type property is set to a
nontextual MIME type (generally, something that doesn't begin
with text/, though there are exceptions),
Subversion does not attempt to perform contextual merges
during updates. Instead, any time you have locally modified a
binary working copy file that is also being updated, your file
is left untouched and Subversion creates two new files. One
file has a .oldrev extension and contains
the BASE revision of the file. The other file has a
.newrev extension and contains the
contents of the updated revision of the file. This behavior
is really for the protection of the user against failed
attempts at performing contextual merges on files that simply
cannot be contextually merged.
警告
The svn:mime-type property, when set
to a value that does not indicate textual file contents, can
cause some unexpected behaviors with respect to other
properties. For example, since the idea of line endings
(and therefore, line-ending conversion) makes no sense when
applied to nontextual files, Subversion will prevent you
from setting the svn:eol-style property
on such files. This is obvious when attempted on a single
file target—svn propset will error
out. But it might not be as clear if you perform a
recursive property set, where Subversion will silently skip
over files that it deems unsuitable for a given
property.
Beginning in Subversion 1.5, users can configure a new
mime-types-file runtime configuration
parameter, which identifies the location of a MIME types
mapping file. Subversion will consult this mapping file to
determine the MIME type of newly added and imported
files.
另外,如果设置了svn:mime-type属性,Subversion的Apache模块会使用这个值来在HTTP头里输入Content-type:,这给了web浏览器如何显示版本库的一个文件提供了至关重要的线索。
On many operating systems, the ability to execute a file
as a command is governed by the presence of an execute
permission bit. This bit usually defaults to being disabled,
and must be explicitly enabled by the user for each file that
needs it. But it would be a monumental hassle to have to
remember exactly which files in a freshly checked-out working
copy were supposed to have their executable bits toggled on,
and then to have to do that toggling. So, Subversion provides
the svn:executable property as a way to
specify that the executable bit for the file on which that
property is set should be enabled, and Subversion honors that
request when populating working copies with such files.
这个属性对于没有可执行权限位的文件系统无效,如FAT32和NTFS。 [11]也就是说,尽管它没有定义的值,在设置这个属性时,Subversion会强制它的值为*,最后,这个属性只对文件有效,目录无效。
Unless otherwise noted using a versioned file's
svn:mime-type property, Subversion
assumes the file contains human-readable data. Generally
speaking, Subversion uses this knowledge only to determine
if contextual difference reports for that file are
possible. Otherwise, to Subversion, bytes are bytes.
This means that by default, Subversion doesn't pay any
attention to the type of end-of-line (EOL)
markers used in your files. Unfortunately,
different operating systems have different conventions about
which character sequences represent the end of a line of text
in a file. For example, the usual line-ending token used by
software on the Windows platform is a pair of ASCII control
characters—a carriage return (CR)
followed by a line feed (LF). Unix
software, however, just uses the LF
character to denote the end of a line.
Not all of the various tools on these operating systems
understand files that contain line endings in a format that
differs from the native line-ending
style of the operating system on which they are
running. So, typically, Unix programs treat the
CR character present in Windows files as a
regular character (usually rendered as ^M),
and Windows programs combine all of the lines of a Unix file
into one giant line because no carriage return-linefeed (or
CRLF) character combination was found to
denote the ends of the lines.
This sensitivity to foreign EOL markers can be frustrating for folks who share a file across different operating systems. For example, consider a source code file, and developers that edit this file on both Windows and Unix systems. If all the developers always use tools that preserve the line-ending style of the file, no problems occur.
But in practice, many common tools either fail to properly read a file with foreign EOL markers, or they convert the file's line endings to the native style when the file is saved. If the former is true for a developer, he has to use an external conversion utility (such as dos2unix or its companion, unix2dos) to prepare the file for editing. The latter case requires no extra preparation. But both cases result in a file that differs from the original quite literally on every line! Prior to committing his changes, the user has two choices. Either he can use a conversion utility to restore the modified file to the same line-ending style that it was in before his edits were made. Or, he can simply commit the file—new EOL markers and all.
The result of scenarios like these include wasted time and unnecessary modifications to committed files. Wasted time is painful enough. But when commits change every line in a file, this complicates the job of determining which of those lines were changed in a nontrivial way. Where was that bug really fixed? On what line was a syntax error introduced?
The solution to this problem is the
svn:eol-style property. When this
property is set to a valid value, Subversion uses it to
determine what special processing to perform on the file so
that the file's line-ending style isn't flip-flopping with
every commit that comes from a different operating
system. The valid values are:
-
native -
This causes the file to contain the EOL markers that are native to the operating system on which Subversion was run. In other words, if a user on a Windows machine checks out a working copy that contains a file with an
svn:eol-styleproperty set tonative, that file will containCRLFEOL markers. A Unix user checking out a working copy that contains the same file will seeLFEOL markers in his copy of the file.注意Subversion实际上使用
LF的EOL标志,而不会考略操作系统,尽管这对用户来说是透明的。 -
CRLF -
这会导致这个文件使用
CRLF序列作为EOL标志,不管使用何种操作系统。 -
LF -
这会导致文件使用
LF字符作为EOL标志,不管使用何种操作系统。 -
CR -
This causes the file to contain
CRcharacters for EOL markers, regardless of the operating system in use. This line-ending style is not very common. It was used on older Macintosh platforms (on which Subversion doesn't even run).
In any given working copy, there is a good chance that alongside all those versioned files and directories are other files and directories that are neither versioned nor intended to be. Text editors litter directories with backup files. Software compilers generate intermediate—or even final—files that you typically wouldn't bother to version. And users themselves drop various other files and directories wherever they see fit, often in version control working copies.
It's ludicrous to expect Subversion working copies to be somehow impervious to this kind of clutter and impurity. In fact, Subversion counts it as a feature that its working copies are just typical directories, just like unversioned trees. But these not-to-be-versioned files and directories can cause some annoyance for Subversion users. For example, because the svn add and svn import commands act recursively by default and don't know which files in a given tree you do and don't wish to version, it's easy to accidentally add stuff to version control that you didn't mean to. And because svn status reports, by default, every item of interest in a working copy—including unversioned files and directories—its output can get quite noisy where many of these things exist.
So Subversion provides two ways for telling it which files you would prefer for it to simply disregard. One of the ways involves the use of Subversion's runtime configuration system (see “运行配置区”一节), and therefore applies to all the Subversion operations that make use of that runtime configuration—generally those performed on a particular computer or by a particular user of a computer. The other way makes use of Subversion's directory property support and is more tightly bound to the versioned tree itself, and therefore affects everyone who has a working copy of that tree. Both of the mechanisms use file patterns (strings of literal and special wildcard characters used to match against filenames) to decide which files to ignore.
The Subversion runtime configuration system provides an
option, global-ignores, whose value is a
whitespace-delimited collection of file patterns. The
Subversion client checks these patterns against the names of the
files that are candidates for addition to version control, as
well as to unversioned files that the svn
status command notices. If any file's name matches
one of the patterns, Subversion will basically act as if the
file didn't exist at all. This is really useful for the kinds
of files that you almost never want to version, such as editor
backup files such as Emacs' *~ and
.*~ files.
When found on a versioned directory, the
svn:ignore property is expected to contain a
list of newline-delimited file patterns that Subversion should
use to determine ignorable objects in that same directory.
These patterns do not override those found in the
global-ignores runtime configuration option,
but are instead appended to that list. And it's worth noting
again that, unlike the global-ignores option,
the patterns found in the svn:ignore
property apply only to the directory on which that property is
set, and not to any of its subdirectories. The
svn:ignore property is a good way to tell
Subversion to ignore files that are likely to be present in
every user's working copy of that directory, such as compiler
output or—to use an example more appropriate to this
book—the HTML, PDF, or PostScript files generated as the
result of a conversion of some source DocBook XML files to a
more legible output format.
注意
Subversion对于忽略文件模式的支持仅限于将未版本化文件和目录添加到版本控制时,如果一个文件已经在Subversion控制下,忽略模式机制不会再有效果,不要期望Subversion会阻止你提交一个符合忽略条件的修改—Subversion一直认为它是版本化的对象。
The global list of ignore patterns tends to be more a
matter of personal taste and ties more closely to a user's
particular tool chain than to the details of any particular
working copy's needs. So, the rest of this section will focus
on the svn:ignore property and its
uses.
假定你的svn status有如下输出:
$ svn status calc
 M     calc/button.c
?      calc/calculator
?      calc/data.c
?      calc/debug_log
?      calc/debug_log.1
?      calc/debug_log.2.gz
?      calc/debug_log.3.gz
In this example, you have made some property modifications
to button.c, but in your working copy, you
also have some unversioned files: the latest
calculator program that you've compiled
from your source code, a source file named
data.c, and a set of debugging output log
files. Now, you know that your build system always results in
the calculator program being generated.
[12]
And you know that your test suite always leaves those debugging
log files lying around. These facts are true for all working
copies of this project, not just your own. And you know that
you aren't interested in seeing those things every time you run
svn status, and you are pretty sure that
nobody else is interested in them either. So you use
svn propedit svn:ignore calc to add some
ignore patterns to the calc directory. For
example, you might add this as the new value of the
svn:ignore property:
calculator
debug_log*
当你添加完这些属性,你会在calc目录有一个本地修改,但是注意你的svn status输出有什么其他的不同:
$ svn status
 M     calc
 M     calc/button.c
?      calc/data.c
Now, all that cruft is missing from the output! Your
calculator compiled program and all those
logfiles are still in your working copy; Subversion just isn't
constantly reminding you that they are present and unversioned.
And now with all the uninteresting noise removed from the
display, you are left with more intriguing items—such as
that source code file data.c that you
probably forgot to add to version control.
当然,不仅仅只有这种简略的工作拷贝状态输出,如果想查看被忽略的文件,可以使用Subversion的--no-ignore选项:
$ svn status --no-ignore
 M     calc
 M     calc/button.c
I      calc/calculator
?      calc/data.c
I      calc/debug_log
I      calc/debug_log.1
I      calc/debug_log.2.gz
I      calc/debug_log.3.gz
我们在前面提到过,svn add和svn import也会使用这个忽略模式列表,这两个操作都包括了询问Subversion来开始管理一组文件和目录。比强制用户挑拣目录树中那个文件要纳入版本控制的方式更好,Subversion使用忽略模式来检测那个文件不应该在大的迭代添加和导入操作中进入版本控制系统。再次说明,操作Subversion文件和目录时你可以使用--no-ignore选项忽略这个忽略列表。
提示
Even if svn:ignore is set, you may run
into problems if you use shell wildcards in a command. Shell
wildcards are expanded into an explicit list of targets before
Subversion operates on them, so running svn
SUBCOMMAND * is just like
running svn SUBCOMMAND
file1 file2 file3 …. In the case of the
svn add command, this has an effect similar
to passing the --no-ignore option. So
instead of using a wildcard, use svn add --force
. to do a bulk scheduling of unversioned things for
addition. The explicit target will ensure that the current
directory isn't overlooked because of being already under
version control, and the --force option will
cause Subversion to crawl through that directory, adding
unversioned files while still honoring the
svn:ignore property and
global-ignores runtime configuration
variable. Be sure to also provide the --depth
files option to the svn add
command if you don't want a fully recursive crawl for things
to add.
Subversion具备添加关键字的能力—一些有用的,关于版本化的文件动态信息的片断—不必直接添加到文件本身。关键字通常会用来描述文件最后一次修改的一些信息,因为这些信息每次都有改变,更重要的一点,这是在文件修改之后,除了版本控制系统,对于任何企图保持数据最新的过程都是一场混乱,作为人类作者,信息变得陈旧是不可避免的。
举个例子,你有一个文档希望显示最后修改的日期,你需要麻烦每个作者提交之前做这件事情,也要修改文档的一部分来描述何时作的修改,但是迟早会有人忘记做这件事,不选择简单的告诉Subversion来执行替换LastChangedDate关键字的操作,你通过在目标位置放置一个keyword anchor来控制关键字插入的位置,这个anchor只是一个格式为$KeywordName$字符串。
所有作为anchor出现在文件里的关键字是大小写敏感的:为了关键字的扩展,你必须使用正确的大写,你必须考虑svn:keywords的属性值也是大小写敏感—特定的关键字名会忽略大小写,但是这个特性已经被废弃了。
Subversion定义了用来替换的关键字列表,这个列表保存了如下五个关键字,有一些也包括了可用的别名:
-
Date -
This keyword describes the last time the file was known to have been changed in the repository, and is of the form
$Date: 2006-07-22 21:42:37 -0700 (Sat, 22 Jul 2006) $. It may also be specified asLastChangedDate. Unlike theIdkeyword, which uses UTC, theDatekeyword displays dates using the local time zone. -
Revision -
这个关键字描述了这个文件最后一次修改的修订版本,看起来像
$Revision: 144 $,也可以通过LastChangedRevision或者Rev引用。 -
Author -
这个关键字描述了最后一个修改这个文件的用户,看起来类似
$Author: harry $,也可以用LastChangedBy来指定。 -
HeadURL -
这个关键字描述了这个文件在版本库最新版本的完全URL,看起来类似
$HeadURL: http://svn.collab.net/repos/trunk/README $,可以缩写为URL。 -
Id -
This keyword is a compressed combination of the other keywords. Its substitution looks something like
$Id: calc.c 148 2006-07-28 21:30:43Z sally $, and is interpreted to mean that the filecalc.cwas last changed in revision 148 on the evening of July 28, 2006 by the usersally. The date displayed by this keyword is in UTC, unlike that of theDatekeyword (which uses the local time zone).
Several of the previous descriptions use the phrase “last known” or similar wording. Keep in mind that keyword expansion is a client-side operation, and your client “knows” only about changes that have occurred in the repository when you update your working copy to include those changes. If you never update your working copy, your keywords will never expand to different values even if those versioned files are being changed regularly in the repository.
Simply adding keyword anchor text to your file does nothing special. Subversion will never attempt to perform textual substitutions on your file contents unless explicitly asked to do so. After all, you might be writing a document [13] about how to use keywords, and you don't want Subversion to substitute your beautiful examples of unsubstituted keyword anchors!
To tell Subversion whether to substitute keywords
on a particular file, we again turn to the property-related
subcommands. The svn:keywords property,
when set on a versioned file, controls which keywords will
be substituted on that file. The value is a space-delimited
list of the keyword names or aliases found in the previous
table.
举个例子,假定你有一个版本化的文件weather.txt,内容如下:
Here is the latest report from the front lines. $LastChangedDate$ $Rev$ Cumulus clouds are appearing more frequently as summer approaches.
当没有svn:keywords属性设置到这个文件,Subversion不会有任何特别操作,现在让我们允许LastChangedDate关键字的替换。
$ svn propset svn:keywords "Date Author" weather.txt property 'svn:keywords' set on 'weather.txt' $
Now you have made a local property modification on the
weather.txt file. You will see no
changes to the file's contents (unless you made some of your
own prior to setting the property). Notice that the file
contained a keyword anchor for the Rev
keyword, yet we did not include that keyword in the property
value we set. Subversion will happily ignore requests to
substitute keywords that are not present in the file and
will not substitute keywords that are not present in the
svn:keywords property value.
Immediately after you commit this property change,
Subversion will update your working file with the new
substitute text. Instead of seeing your keyword anchor
$LastChangedDate$, you'll see its
substituted result. That result also contains the name of
the keyword and continues to be bounded by the dollar sign
($) characters. And as we predicted, the
Rev keyword was not substituted because
we didn't ask for it to be.
Note also that we set the svn:keywords
property to Date Author, yet the keyword
anchor used the alias $LastChangedDate$
and still expanded correctly:
Here is the latest report from the front lines. $LastChangedDate: 2006-07-22 21:42:37 -0700 (Sat, 22 Jul 2006) $ $Rev$ Cumulus clouds are appearing more frequently as summer approaches.
If someone else now commits a change to
weather.txt, your copy of that file
will continue to display the same substituted keyword value
as before—until you update your working copy. At that
time, the keywords in your weather.txt
file will be resubstituted with information that
reflects the most recent known commit to that file.
Subversion 1.2 introduced a new variant of the keyword
syntax, which brought additional, useful—though perhaps
atypical—functionality. You can now tell Subversion
to maintain a fixed length (in terms of the number of bytes
consumed) for the substituted keyword. By using a
double colon (::) after the keyword name,
followed by a number of space characters, you define that
fixed width. When Subversion goes to substitute your
keyword for the keyword and its value, it will essentially
replace only those space characters, leaving the overall
width of the keyword field unchanged. If the substituted
value is shorter than the defined field width, there will be
extra padding characters (spaces) at the end of the
substituted field; if it is too long, it is truncated with a
special hash (#) character just before
the final dollar sign terminator.
例如,你有一篇文档,其中一段是一些反映Subversion关键字的表格数据,使用原始的Subversion关键字替换语法,你的文件或许像这样:
$Rev$: Revision of last commit $Author$: Author of last commit $Date$: Date of last commit
现在,表格看起来佷漂亮,但是当你提交文件(当然,关键字替换功能已打开),你会看到:
$Rev: 12 $: Revision of last commit $Author: harry $: Author of last commit $Date: 2006-03-15 02:33:03 -0500 (Wed, 15 Mar 2006) $: Date of last commit
The result is not so beautiful. And you might be tempted to then adjust the file after the substitution so that it again looks tabular. But that holds only as long as the keyword values are the same width. If the last committed revision rolls into a new place value (say, from 99 to 100), or if another person with a longer username commits the file, stuff gets all crooked again. However, if you are using Subversion 1.2 or better, you can use the new fixed-length keyword syntax and define some field widths that seem sane so your file might look like this:
$Rev:: $: Revision of last commit $Author:: $: Author of last commit $Date:: $: Date of last commit
You commit this change to your file. This time,
Subversion notices the new fixed-length keyword syntax and
maintains the width of the fields as defined by the padding
you placed between the double colon and the trailing dollar
sign. After substitution, the width of the fields is
completely unchanged—the short values for
Rev and Author are
padded with spaces, and the long Date
field is truncated by a hash character:
$Rev:: 13 $: Revision of last commit $Author:: harry $: Author of last commit $Date:: 2006-03-15 0#$: Date of last commit
固定长度关键字在执行复杂文件格式的替换中非常易用,也可以处理那些很难通过其他程序(例如Microsoft Office文档)进行修改的文件。
警告
Be aware that because the width of a keyword field is measured in bytes, the potential for corruption of multibyte values exists. For example, a username that contains some multibyte UTF-8 characters might suffer truncation in the middle of the string of bytes that make up one of those characters. The result will be a mere truncation when viewed at the byte level, but will likely appear as a string with an incorrect or garbled final character when viewed as UTF-8 text. It is conceivable that certain applications, when asked to load the file, would notice the broken UTF-8 text and deem the entire file corrupt, refusing to operate on the file altogether. So, when limiting keywords to a fixed size, choose a size that allows for this type of byte-wise expansion.
By default, most Subversion operations on directories act in a recursive manner. For example, svn checkout creates a working copy with every file and directory in the specified area of the repository, descending recursively through the repository tree until the entire structure is copied to your local disk. Subversion 1.5 introduces a feature called sparse directories (or shallow checkouts) that allows you to easily check out a working copy—or a portion of a working copy—more shallowly than full recursion, with the freedom to bring in previously ignored files and subdirectories at a later time.
For example, say we have a repository with a tree of files and directories with names of the members of a human family with pets. (It's an odd example, to be sure, but bear with us.) A regular svn checkout operation will give us a working copy of the whole tree:
$ svn checkout file:///var/svn/repos mom A mom/son A mom/son/grandson A mom/daughter A mom/daughter/granddaughter1 A mom/daughter/granddaughter1/bunny1.txt A mom/daughter/granddaughter1/bunny2.txt A mom/daughter/granddaughter2 A mom/daughter/fishie.txt A mom/kitty1.txt A mom/doggie1.txt Checked out revision 1. $
Now, let's check out the same tree again, but this time, we'll ask Subversion to give us only the top-most directory with none of its children at all:
$ svn checkout file:///var/svn/repos mom-empty --depth empty Checked out revision 1 $
Notice that we added to our original svn
checkout command line a new --depth
option. This option is present on many of Subversion's
subcommands and is similar to the
--non-recursive (-N) and
--recursive (-R) options. In
fact, it combines, improves upon, supercedes, and ultimately
obsoletes these two older options. For starters, it expands the
supported degrees of depth specification available to users,
adding some previously unsupported (or inconsistently supported)
depths. Here are the depth values that you can request for a
given Subversion operation:
-
--depth empty -
Include only the immediate target of the operation, not any of its file or directory children.
-
--depth files -
Include the immediate target of the operation and any of its immediate file children.
-
--depth immediates -
Include the immediate target of the operation and any of its immediate file or directory children. The directory children will themselves be empty.
-
--depth infinity -
Include the immediate target, its file and directory children, its children's children, and so on to full recursion.
Of course, merely combining two existing options into one hardly constitutes a new feature worthy of a whole section in our book. Fortunately, there is more to this story. This idea of depth extends not just to the operations you perform with your Subversion client, but also as a description of a working copy citizen's ambient depth, which is the depth persistently recorded by the working copy for that item. Its key strength is this very persistence—the fact that it is sticky. The working copy remembers the depth you've selected for each item in it until you later change that depth selection; by default, Subversion commands operate on the working copy citizens present, regardless of their selected depth settings.
提示
You can check the recorded ambient depth of a working copy using the svn info command. If the ambient depth is anything other than infinite recursion, svn info will display a line describing that depth value:
$ svn info mom-immediates | grep '^Depth:'
Depth: immediates
$
Our previous examples demonstrated checkouts of infinite depth (the default for svn checkout) and empty depth. Let's look now at examples of the other depth values:
$ svn checkout file:///var/svn/repos mom-files --depth files
A    mom-files/kitty1.txt
A    mom-files/doggie1.txt
Checked out revision 1.
$ svn checkout file:///var/svn/repos mom-immediates --depth immediates
A    mom-immediates/son
A    mom-immediates/daughter
A    mom-immediates/kitty1.txt
A    mom-immediates/doggie1.txt
Checked out revision 1.
$
As described, each of these depths is something more than only-the-target, but something less than full recursion.
We've used svn checkout as an example
here, but you'll find the --depth option
present on many other Subversion commands, too. In those other
commands, depth specification is a way to limit the scope of an
operation to some depth, much like the way the older
--non-recursive (-N) and
--recursive (-R) options
behave. This means that when operating on a working copy of
some depth, while requesting an operation of a shallower depth,
the operation is limited to that shallower depth. In fact, we
can make an even more general statement: given a working copy of
any arbitrary—even mixed—ambient depth, and a
Subversion command with some requested operational depth, the
command will maintain the ambient depth of the working copy
members while still limiting the scope of the operation to the
requested (or default) operational depth.
In addition to the --depth option, the
svn update and svn switch
subcommands also accept a second depth-related option:
--set-depth. It is with this option that you
can change the sticky depth of a working copy item. Watch what
happens as we take our empty-depth checkout and gradually
telescope it deeper using svn update
--set-depth:
$ svn update --set-depth files mom-empty
A    mom-empty/kittie1.txt
A    mom-empty/doggie1.txt
Updated to revision 1.
$ svn update --set-depth immediates mom-empty
A    mom-empty/son
A    mom-empty/daughter
Updated to revision 1.
$ svn update --set-depth infinity mom-empty
A    mom-empty/son/grandson
A    mom-empty/daughter/granddaughter1
A    mom-empty/daughter/granddaughter1/bunny1.txt
A    mom-empty/daughter/granddaughter1/bunny2.txt
A    mom-empty/daughter/granddaughter2
A    mom-empty/daughter/fishie1.txt
Updated to revision 1.
$
As we gradually increased our depth selection, the repository gave us more pieces of our tree.
In our example, we operated only on the root of our working copy, changing its ambient depth value. But we can independently change the ambient depth value of any subdirectory inside the working copy, too. Careful use of this ability allows us to flesh out only certain portions of the working copy tree, leaving other portions absent altogether (hence the “sparse” bit of the feature's name). Here's an example of how we might build out a portion of one branch of our family's tree, enable full recursion on another branch, and keep still other pieces pruned (absent from disk).
$ rm -rf mom-empty
$ svn checkout file:///var/svn/repos mom-empty --depth empty
Checked out revision 1.
$ svn update --set-depth empty mom-empty/son
A    mom-empty/son
Updated to revision 1.
$ svn update --set-depth empty mom-empty/daughter
A    mom-empty/daughter
Updated to revision 1.
$ svn update --set-depth infinity mom-empty/daughter/granddaughter1
A    mom-empty/daughter/granddaughter1
A    mom-empty/daughter/granddaughter1/bunny1.txt
A    mom-empty/daughter/granddaughter1/bunny2.txt
Updated to revision 1.
$
Fortunately, having a complex collection of ambient depths
in a single working copy doesn't complicate the way you interact
with that working copy. You can still make, revert, display,
and commit local modifications in your working copy without
providing any new options (including --depth or
--set-depth) to the relevant subcommands. Even
svn update works as it does elsewhere when no
specific depth is provided—it updates the working copy
targets that are present while honoring their sticky
depths.
You might at this point be wondering, “So what? When
would I use this?” One scenario where this feature
finds utility is tied to a particular repository layout,
specifically where you have many related or codependent
projects or software modules living as siblings in a single
repository location (trunk/project1,
trunk/project2,
trunk/project3, and so on). In such
scenarios, it might be the case that you personally care only
about a handful of those projects—maybe some primary
project and a few other modules on which it depends. You can
check out individual working copies of all of these things, but
those working copies are disjoint and, as a result, it can be
cumbersome to perform operations across several or all of them
at the same time. The alternative is to use the sparse
directories feature, building out a single working copy that
contains only the modules you care about. You'd start with an
empty-depth checkout of the common parent directory of the
projects, and then update with infinite depth only the items you
wish to have, like we demonstrated in the previous example.
Think of it like an opt-in system for working copy
citizens.
Subversion 1.5's implementation of shallow checkouts is good but does not support a couple of interesting behaviors. First, you cannot de-telescope a working copy item. Running svn update --set-depth empty on an infinite-depth working copy will not have the effect of discarding everything but the top-most directory—it will simply error out. Secondly, there is no depth value to indicate that you wish an item to be explicitly excluded. You have to do implicit exclusion of an item by including everything else.
Subversion's copy-modify-merge version control model lives and dies on its data merging algorithms—specifically on how well those algorithms perform when trying to resolve conflicts caused by multiple users modifying the same file concurrently. Subversion itself provides only one such algorithm: a three-way differencing algorithm that is smart enough to handle data at a granularity of a single line of text. Subversion also allows you to supplement its content merge processing with external differencing utilities (as described in “外置 diff3”一节), some of which may do an even better job, perhaps providing granularity of a word or a single character of text. But common among those algorithms is that they generally work only on text files. The landscape starts to look pretty grim when you start talking about content merges of non-textual file formats. And when you can't find a tool that can handle that type of merging, you begin to run into problems with the copy-modify-merge model.
让我们看一个使用这个模型的真实例子,Harry和Sally是同一个项目的图形设计师,汽车技工的间接营销。海报的设计一个小车,需要一些主要部分的工作,使用PNG文件格式。海报的布局几乎完成,Harry和Sally都看上了一个从损坏小车得到的特别照片—一个1967的淡蓝色的Ford Mustang,挡泥板有一些溅迹。
Now, as is common in graphic design work, there's a change
in plans, which causes the car's color to be a concern. So Sally
updates her working copy to HEAD, fires up
her photo-editing software, and sets about tweaking the image so
that the car is now cherry red. Meanwhile, Harry, feeling
particularly inspired that day, decides that the image would
have greater impact if the car also appears to have suffered
greater impact. He, too, updates to HEAD,
and then draws some cracks on the vehicle's windshield. He
manages to finish his work before Sally finishes hers, and after
admiring the fruits of his undeniable talent, commits the
modified image. Shortly thereafter, Sally is finished with the
car's new finish and tries to commit her changes. But, as
expected, Subversion fails the commit, informing Sally that
her version of the image is now out of date.
Here's where the difficulty sets in. If Harry and Sally were making changes to a text file, Sally would simply update her working copy, receiving Harry's changes in the process. In the worst possible case, they would have modified the same region of the file, and Sally would have to work out by hand the proper resolution to the conflict. But these aren't text files—they are binary images. And while it's a simple matter to describe what one would expect the results of this content merge to be, there is precious little chance that any software exists that is smart enough to examine the common baseline image that each of these graphic artists worked against, the changes that Harry made, and the changes that Sally made, and then spit out an image of a busted-up red Mustang with a cracked windshield!
Of course, things would have gone more smoothly if Harry and Sally had serialized their modifications to the image—if, say, Harry had waited to draw his windshield cracks on Sally's now-red car, or if Sally had tweaked the color of a car whose windshield was already cracked. As is discussed in “拷贝-修改-合并 方案”一节, most of these types of problems go away entirely where perfect communication between Harry and Sally exists. [14] But as one's version control system is, in fact, one form of communication, it follows that having that software facilitate the serialization of nonparallelizable editing efforts is no bad thing. This is where Subversion's implementation of the lock-modify-unlock model steps into the spotlight. This is where we talk about Subversion's locking feature, which is similar to the “reserved checkouts” mechanisms of other version control systems.
Subversion 的锁定特性为两个主要目的服务:
-
顺序访问资源。允许用户得到一个排他的修改文件权,这个用户可以确定不可合并的修改不会被浪费—他对这个修改的提交会成功。
-
辅助交流。通过要求用户对某个版本化对象串行工作,用户可以知道对象正在被别人修改,这样可以防止浪费精力和时间去修改一个不可合并和提交的对象。
When referring to Subversion's locking feature, one is actually talking about a fairly diverse collection of behaviors, which include the ability to lock a versioned file [15] (claiming the exclusive right to modify the file), to unlock that file (yielding that exclusive right to modify), to see reports about which files are locked and by whom, to annotate files for which locking before editing is strongly advised, and so on. In this section, we'll cover all of these facets of the larger locking feature.
In the Subversion repository, a lock is a piece of metadata that grants exclusive access to one user to change a file. This user is said to be the lock owner. Each lock also has a unique identifier, typically a long string of characters, known as the lock token. The repository manages locks, ultimately handling their creation, enforcement, and removal. If any commit transaction attempts to modify or delete a locked file (or delete one of the parent directories of the file), the repository will demand two pieces of information—that the client performing the commit be authenticated as the lock owner, and that the lock token has been provided as part of the commit process as a sort of proof that client knows which lock it is using.
To demonstrate lock creation, let's refer back to our example of multiple graphic designers working on the same binary image files. Harry has decided to change a JPEG image. To prevent other people from committing changes to the file while he is modifying it (as well as alerting them that he is about to change it), he locks the file in the repository using the svn lock command.
$ svn lock banana.jpg -m "Editing file for tomorrow's release."
'banana.jpg' locked by user 'harry'.
$
There are a number of new things demonstrated in the
previous example. First, notice that Harry passed the
--message (-m) option to
svn lock. Similar to svn
commit, the svn lock command can
take comments (either via --message
(-m) or --file
(-F) to describe the reason for locking the
file. Unlike svn commit, however,
svn lock will not demand a message by
launching your preferred text editor. Lock comments are
optional, but still recommended to aid communication.
Secondly, the lock attempt succeeded. This means that the file wasn't already locked, and that Harry had the latest version of the file. If Harry's working copy of the file had been out of date, the repository would have rejected the request, forcing Harry to svn update and reattempt the locking command. The locking command would also have failed if the file had already been locked by someone else.
就像你看到的,svn lock打印了锁定成功的确认信息。此时,通过svn status和svn info的输出我们可以看到文件已经锁定。
$ svn status
     K banana.jpg

$ svn info banana.jpg
Path: banana.jpg
Name: banana.jpg
URL: http://svn.example.com/repos/project/banana.jpg
Repository UUID: edb2f264-5ef2-0310-a47a-87b0ce17a8ec
Revision: 2198
Node Kind: file
Schedule: normal
Last Changed Author: frank
Last Changed Rev: 1950
Last Changed Date: 2006-03-15 12:43:04 -0600 (Wed, 15 Mar 2006)
Text Last Updated: 2006-06-08 19:23:07 -0500 (Thu, 08 Jun 2006)
Properties Last Updated: 2006-06-08 19:23:07 -0500 (Thu, 08 Jun 2006)
Checksum: 3b110d3b10638f5d1f4fe0f436a5a2a5
Lock Token: opaquelocktoken:0c0f600b-88f9-0310-9e48-355b44d4a58e
Lock Owner: harry
Lock Created: 2006-06-14 17:20:31 -0500 (Wed, 14 Jun 2006)
Lock Comment (1 line):
Editing file for tomorrow's release.

$
The fact that the svn info command,
which does not contact the repository when run against working
copy paths, can display the lock token reveals an important
piece of information about those tokens: they are cached in
the working copy. The presence of the lock token is critical.
It gives the working copy authorization to make use of the
lock later on. Also, the svn status
command shows a K next to the file (short
for locKed), indicating that the lock token is present.
现在Harry已经锁定了banana.jpg,Sally不能修改或删除这个文件:
$ svn delete banana.jpg
D         banana.jpg
$ svn commit -m "Delete useless file."
Deleting       banana.jpg
svn: Commit failed (details follow):
svn: Server sent unexpected return value (423 Locked) in response to DELETE\
 request for '/repos/project/!svn/wrk/64bad3a9-96f9-0310-818a-df4224ddc35d/\
banana.jpg'
$
But Harry, after touching up the banana's shade of yellow, is able to commit his changes to the file. That's because he authenticates as the lock owner and also because his working copy holds the correct lock token:
$ svn status
M    K banana.jpg
$ svn commit -m "Make banana more yellow"
Sending        banana.jpg
Transmitting file data .
Committed revision 2201.
$ svn status
$
Notice that after the commit is finished, svn
status shows that the lock token is no longer
present in working copy. This is the standard behavior of
svn commit—it searches the working
copy (or list of targets, if you provide such a list) for
local modifications and sends all the lock tokens it
encounters during this walk to the server as part of the
commit transaction. After the commit completes successfully,
all of the repository locks that were mentioned are
released—even on files that weren't
committed. This is meant to discourage users from
being sloppy about locking or from holding locks for too long.
If Harry haphazardly locks 30 files in a directory named
images because he's unsure of which files
he needs to change, yet changes only 4 of those files, when he
runs svn commit images, the process will
still release all 30 locks.
自动释放锁定的特性可以通过svn commit的--no-unlock选项关闭,当你要提交文件,同时期望继续修改而必须保留锁定时非常有用。这个特性也可以半永久性的设定,方法是设置运行中config文件(见“运行配置区”一节)的no-unlock = yes。
当然,锁定一个文件不会强制一个人要提交修改,任何时候都可以通过运行svn unlock命令释放锁定:
$ svn unlock banana.c
'banana.c' unlocked.
最明显的方式就是因为锁定而不能提交一个文件,最简单的方式是svn status --show-updates:
$ svn status -u
M              23   bar.c
M    O         32   raisin.jpg
       *       72   foo.h
Status against revision:     105
$
In this example, Sally can see not only that her copy of
foo.h is out of date, but that one of the
two modified files she plans to commit is locked in the
repository. The O symbol stands for
“Other,” meaning that a lock exists on the file
and was created by somebody else. If she were to attempt a
commit, the lock on raisin.jpg would
prevent it. Sally is left wondering who made the lock, when,
and why. Once again, svn info has the
answers:
$ svn info http://svn.example.com/repos/project/raisin.jpg
Path: raisin.jpg
Name: raisin.jpg
URL: http://svn.example.com/repos/project/raisin.jpg
Repository UUID: edb2f264-5ef2-0310-a47a-87b0ce17a8ec
Revision: 105
Node Kind: file
Last Changed Author: sally
Last Changed Rev: 32
Last Changed Date: 2006-01-25 12:43:04 -0600 (Sun, 25 Jan 2006)
Lock Token: opaquelocktoken:fc2b4dee-98f9-0310-abf3-653ff3226e6b
Lock Owner: harry
Lock Created: 2006-02-16 13:29:18 -0500 (Thu, 16 Feb 2006)
Lock Comment (1 line):
Need to make a quick tweak to this image.
$
就像svn info可以检验工作拷贝的对象,它也可以检验版本库的对象,如果svn info的主要参数是工作拷贝路径,所有工作拷贝的缓存信息都会显示,发现了锁定就意味着工作拷贝拥有锁定令牌(如果一个文件被另一个用户在另一个工作拷贝锁定,工作拷贝路径上运行svn info不会显示锁定信息)。如果svn info的主参数是URL,就会反映版本库中最新版本的对象信息,任何对锁定的提及描述了当前对象的锁定。
So in this particular example, Sally can see that Harry locked the file on February 16th to “make a quick tweak.” It being June, she suspects that he probably forgot all about the lock. She might phone Harry to complain and ask him to release the lock. If he's unavailable, she might try to forcibly break the lock herself or ask an administrator to do so.
A repository lock isn't sacred—in Subversion's default configuration state, locks can be released not only by the person who created them, but by anyone. When somebody other than the original lock creator destroys a lock, we refer to this as breaking the lock.
从管理员的位子上很容易打破锁定,svnlook和svnadmin程序都有能力从版本库直接显示和删除锁定。(关于这些工具的信息可以看“管理员的工具箱”一节。)
$ svnadmin lslocks /var/svn/repos
Path: /project2/images/banana.jpg
UUID Token: opaquelocktoken:c32b4d88-e8fb-2310-abb3-153ff1236923
Owner: frank
Created: 2006-06-15 13:29:18 -0500 (Thu, 15 Jun 2006)
Expires:
Comment (1 line):
Still improving the yellow color.

Path: /project/raisin.jpg
UUID Token: opaquelocktoken:fc2b4dee-98f9-0310-abf3-653ff3226e6b
Owner: harry
Created: 2006-02-16 13:29:18 -0500 (Thu, 16 Feb 2006)
Expires:
Comment (1 line):
Need to make a quick tweak to this image.

$ svnadmin rmlocks /var/svn/repos /project/raisin.jpg
Removed lock on '/project/raisin.jpg'.
$
The more interesting option is allowing users to break
each other's locks over the network. To do this, Sally simply
needs to pass the --force to the svn
unlock command:
$ svn status -u
M              23   bar.c
M    O         32   raisin.jpg
       *       72   foo.h
Status against revision:     105
$ svn unlock raisin.jpg
svn: 'raisin.jpg' is not locked in this working copy
$ svn info raisin.jpg | grep URL
URL: http://svn.example.com/repos/project/raisin.jpg
$ svn unlock http://svn.example.com/repos/project/raisin.jpg
svn: Unlock request failed: 403 Forbidden (http://svn.example.com)
$ svn unlock --force http://svn.example.com/repos/project/raisin.jpg
'raisin.jpg' unlocked.
$
Sally初始的unlock命令失败了,因为她直接在自己的工作拷贝上运行了svn unlock,而这里没有锁定令牌。为了直接从版本库删除锁定,她需要给svn unlock传递URL参数,她的这一次尝试又失败了,因为她不是锁定的拥有者(也没有锁定令牌)。当她使用了--force选项后,认证和授权的要求被忽略了,远程的锁定被打破了。
当然,简单的打破锁定也许还不够,在这个例子里,Sally不仅想要打破Harry遗忘的锁定,她也希望自己重新锁定。她可以通过运行svn unlock --force紧接着svn lock,但是有可能有人在这两次命令之间锁定了文件,最简单的方式是窃取这个锁定,将打破和重新锁定变成一种原子操作,为此需要运行svn lock加--force选项:
$ svn lock raisin.jpg
svn: Lock request failed: 423 Locked (http://svn.example.com)
$ svn lock --force raisin.jpg
'raisin.jpg' locked by user 'sally'.
$
在任何情况下,无论锁定被打破还是窃取,Harry都会感到惊讶。Harry的工作拷贝还保留有原来的锁定令牌,但是锁定已经不存在了,锁定令牌可以说已经死掉了。锁定令牌指代的锁定被打破(版本库中不再存在)或者是窃取了(被另一个锁定代替了),任何一种情况下,Harry都可以使用svn status询问版本库:
$ svn status
     K raisin.jpg
$ svn status -u
     B         32   raisin.jpg
$ svn update
  B  raisin.jpg
$ svn status
$
如果版本库锁定被打破了,svn status --show-updates会在文件旁边显示一个B (Broken)。如果有一个新的锁,就会显示一个T (sTolen)符号。最终,svn update会注意到所有死掉的锁定并且把它们从工作拷贝中删除掉。
我们已经见到了如何利用svn lock和svn unlock来创建、释放、打破和窃取锁定,这就满足了顺序访问文件的要求,但是浪费时间这个大问题该如何呢?
For example, suppose Harry locks an image file and then begins editing it. Meanwhile, miles away, Sally wants to do the same thing. She doesn't think to run svn status --show-updates, so she has no idea that Harry has already locked the file. She spends hours editing the file, and when she tries to commit her change, she discovers that either the file is locked or that she's out of date. Regardless, her changes aren't mergeable with Harry's. One of these two people has to throw away their work, and a lot of time has been wasted.
Subversion's solution to this problem is to provide a
mechanism to remind users that a file ought to be locked
before the editing begins. The mechanism
is a special property: svn:needs-lock. If
that property is attached to a file (regardless of its value,
which is irrelevant), then Subversion will try to use
filesystem-level permissions to make the file read-only—unless,
of course, the user has explicitly locked the file.
When a lock token is present (as a result of running
svn lock), the file becomes read-write.
When the lock is released, the file becomes read-only
again.
根据这个原理,如果一个图像文件有这个属性,Sally打开编辑文件就会立刻注意到有些特别,大多数程序会在打开只读文件时立刻警告,至少所有的程序会防止她保存修改,这提醒了她编辑之前需要锁定文件,这样她就发现了原来存在的锁定:
$ /usr/local/bin/gimp raisin.jpg
gimp: error: file is read-only!
$ ls -l raisin.jpg
-r--r--r--   1 sally   sally   215589 Jun  8 19:23 raisin.jpg
$ svn lock raisin.jpg
svn: Lock request failed: 423 Locked (http://svn.example.com)
$ svn info http://svn.example.com/repos/project/raisin.jpg | grep Lock
Lock Token: opaquelocktoken:fc2b4dee-98f9-0310-abf3-653ff3226e6b
Lock Owner: harry
Lock Created: 2006-06-08 07:29:18 -0500 (Thu, 08 June 2006)
Lock Comment (1 line):
Making some tweaks.  Locking for the next two hours.
$
提示
Users and administrators alike are encouraged to attach
the svn:needs-lock property to any file
that cannot be contextually merged. This is the primary
technique for encouraging good locking habits and preventing
wasted effort.
Note that this property is a communication tool that works independently from the locking system. In other words, any file can be locked, whether or not this property is present. And conversely, the presence of this property doesn't make the repository require a lock when committing.
这个系统并不是毫无瑕疵,即使有这个属性,只读提醒也有可能失效。有些程序“偷偷的篡改了”文件的只读属性,悄无声息的允许用户编辑和保存文件,不幸的是,Subversion对此无能为力—即使到了现今,还是没有任何工具能够代替人与人的良好交流。[16]
Sometimes it is useful to construct a working copy that is made out of a number of different checkouts. For example, you may want different subdirectories to come from different locations in a repository or perhaps from different repositories altogether. You could certainly set up such a scenario by hand—using svn checkout to create the sort of nested working copy structure you are trying to achieve. But if this layout is important for everyone who uses your repository, every other user will need to perform the same checkout operations that you did.
Fortunately, Subversion provides support for
externals definitions. An externals
definition is a mapping of a local directory to the
URL—and ideally a particular revision—of a versioned
directory. In Subversion, you declare externals definitions in
groups using the svn:externals property. You
can create or modify this property using svn
propset or svn propedit (see “操作属性”一节). It can be set on any
versioned directory, and its value describes both the external
repository location and the client-side directory to which that
location should be checked out.
The convenience of the svn:externals
property is that once it is set on a versioned directory,
everyone who checks out a working copy with that directory also
gets the benefit of the externals definition. In other words,
once one person has made the effort to define the nested working
copy structure, no one else has to bother—Subversion will,
after checking out the original working copy, automatically also
check out the external working copies.
警告
外部定义的相对目标子目录不需要存在于你的或其它用户的系统中—Subversion会在检出工作拷贝时创建这些文件。实际上,你一定不要使用外部定义来产生已经在版本控制的路径。
You also get in the externals definition design all the
regular benefits of Subversion properties. The definitions are
versioned. If you need to change an externals definition, you
can do so using the regular property modification subcommands.
When you commit a change to the svn:externals
property, Subversion will synchronize the checked-out items
against the changed externals definition when you next run
svn update. The same thing will happen when
others update their working copies and receive your changes to
the externals definition.
提示
因为svn:externals的值是多行的,所以我们强烈建议使用svn propedit,而不是使用svn propset。
Subversion releases prior to 1.5 honor an externals definition format that is a multiline table of subdirectories (relative to the versioned directory on which the property is set), optional revision flags, and fully qualified, absolute Subversion repository URLs. An example of this might looks as follows:
$ svn propget svn:externals calc
third-party/sounds             http://svn.example.com/repos/sounds
third-party/skins -r148        http://svn.example.com/skinproj
third-party/skins/toolkit -r21 http://svn.example.com/skin-maker
When someone checks out a working copy of the
calc directory referred to in the previous
example, Subversion also continues to check out the items found
in its externals definition.
$ svn checkout http://svn.example.com/repos/calc
A  calc
A  calc/Makefile
A  calc/integer.c
A  calc/button.c
Checked out revision 148.

Fetching external item into calc/third-party/sounds
A  calc/third-party/sounds/ding.ogg
A  calc/third-party/sounds/dong.ogg
A  calc/third-party/sounds/clang.ogg
…
A  calc/third-party/sounds/bang.ogg
A  calc/third-party/sounds/twang.ogg
Checked out revision 14.

Fetching external item into calc/third-party/skins
…
As of Subversion 1.5, though, a new format of the
svn:externals property is supported.
Externals definitions are still multiline, but the order and
format of the various pieces of information has changed. The
new syntax more closely mimics the order of arguments you might
pass to svn checkout: the optional revision
flags come first, then the external Subversion repository URL,
and finally the relative local subdirectory. Notice, though,
that this time we didn't say “fully qualified, absolute
Subversion repository URLs.” That's because the new
format supports relative URLs and URLs that carry peg revisions.
The previous example of an externals definition might, in
Subversion 1.5, look like the following:
$ svn propget svn:externals calc
      http://svn.example.com/repos/sounds third-party/sounds
-r148 http://svn.example.com/skinproj third-party/skins
-r21  http://svn.example.com/skin-maker third-party/skins/toolkit
Or, making use of the peg revision syntax (which we describe in detail in “Peg和实施修订版本”一节), it might appear as:
$ svn propget svn:externals calc
http://svn.example.com/repos/sounds third-party/sounds
http://svn.example.com/skinproj@148 third-party/skins
http://svn.example.com/skin-maker@21 third-party/skins/toolkit
提示
You should seriously consider using explicit revision numbers in all of your externals definitions. Doing so means that you get to decide when to pull down a different snapshot of external information, and exactly which snapshot to pull. Besides avoiding the surprise of getting changes to third-party repositories that you might not have any control over, using explicit revision numbers also means that as you backdate your working copy to a previous revision, your externals definitions will also revert to the way they looked in that previous revision, which in turn means that the external working copies will be updated to match the way they looked back when your repository was at that previous revision. For software projects, this could be the difference between a successful and a failed build of an older snapshot of your complex codebase.
For most repositories, these three ways of formatting the
external definitions have the same ultimate effect. They all
bring the same benefits. Unfortunately, they all bring the same
annoyances, too. Since the definitions shown use absolute URLs,
moving or copying a directory to which they are attached will
not affect what gets checked out as an external (though the
relative local target subdirectory will, of course, move with
renamed directory). This can be confusing—even
frustrating—in certain situations. For example, say you
have a top-level directory named
my-project, and you've created an externals
definition on one of its subdirectories
(my-project/some-dir) that tracks the
latest revision of another of its subdirectories
(my-project/external-dir).
$ svn checkout http://svn.example.com/projects .
A    my-project
A    my-project/some-dir
A    my-project/external-dir
…
Fetching external item into 'my-project/some-dir/subdir'
Checked out external at revision 11.

Checked out revision 11.
$ svn propget svn:externals my-project/some-dir
subdir http://svn.example.com/projects/my-project/external-dir

$
现在你使用svn move将目录my-project改名,此刻,你的外部定义还是指向my-project目录,即使这个目录已经不存在了。
$ svn move -q my-project renamed-project
$ svn commit -m "Rename my-project to renamed-project."
Deleting       my-project
Adding         my-renamed-project

Committed revision 12.
$ svn update

Fetching external item into 'renamed-project/some-dir/subdir'
svn: Target path does not exist
$
Also, absolute URLs can cause problems with repositories
that are available via multiple URL schemes. For example, if
your Subversion server is configured to allow everyone to check
out the repository over http:// or
http://, but only allow commits to come in
via http://, you have an interesting problem
on your hands. If your externals definitions use the
http:// form of the repository URLs, you
won't be able to commit anything from the working copies created
by those externals. On the other hand, if they use the
http:// form of the URLs, anyone who might
be checking out via http:// because their
client doesn't support http:// will be
unable to fetch the external items. Be aware, too, that if you
need to re-parent your working copy (using svn switch
--relocate), externals definitions will
not also be re-parented.
Subversion 1.5 takes a huge step in relieving these frustrations. As mentioned earlier, the URLs used in the new externals definition format can be relative, and Subversion provides syntax magic for specifying multiple flavors of URL relativity.
- ../
-
Relative to the URL of the directory on which the
svn:externalsproperty is set. - ^/
-
Relative to the root of the repository in which the
svn:externalsproperty is versioned. - //
-
Relative to the scheme of the URL of the directory on which the
svn:externalsproperty is set. - /
-
Relative to the root URL of the server on which the
svn:externalsproperty is versioned.
So, looking a fourth time at our previous externals definition example, and making use of the new absolute URL syntax in various ways, we might now see:
$ svn propget svn:externals calc
^/sounds third-party/sounds
/skinproj@148 third-party/skins
//svn.example.com/skin-maker@21 third-party/skins/toolkit
The support that exists for externals definitions in
Subversion remains less than ideal, though. An externals
definition can only point to directories, not files. Also, the
local subdirectory part of the definition cannot contain
.. parent directory indicators (such as
../../skins/myskin). Perhap most
disappointinly, the working copies created via the externals
definition support are still disconnected from the primary
working copy (on whose versioned directories the
svn:externals property was actually set).
And Subversion still only truly operates on nondisjoint working
copies. So, for example, if you want to commit changes that
you've made in one or more of those external working copies, you
must run svn commit explicitly on those
working copies—committing on the primary working copy will
not recurse into any external ones.
We've already mentioned some of the additional shortcomings
of the old svn:externals format and how the
new Subversion 1.5 format improves upon it. But be careful when
making use of the new format that you don't inadvertantly cause
problems for other folks accessing your repository who are using
older Subversion clients. While Subversion 1.5 clients will
continue to recognize and support the original externals
definition format, older clients will not
be able to correctly parse the new format.
Besides the svn checkout, svn
update, svn switch, and
svn export commands which actually manage the
disjoint (or disconnected) subdirectories
into which externals are checked out, the svn
status command also recognizes externals definitions.
It displays a status code of X for the
disjoint external subdirectories, and then recurses into those
subdirectories to display the status of the external items
themselves. You can pass the
--ignore-externals option to any of these
subcommands to disable externals definition processing.
We copy, move, rename, and completely replace files and directories on our computers all the time. And your version control system shouldn't get in the way of your doing these things with your version-controlled files and directories, either. Subversion's file management support is quite liberating, affording almost as much flexibility for versioned files as you'd expect when manipulating your unversioned ones. But that flexibility means that across the lifetime of your repository, a given versioned object might have many paths, and a given path might represent several entirely different versioned objects. This introduces a certain level of complexity to your interactions with those paths and objects.
Subversion is pretty smart about noticing when an object's version history includes such “changes of address.” For example, if you ask for the revision history log of a particular file that was renamed last week, Subversion happily provides all those logs—the revision in which the rename itself happened, plus the logs of relevant revisions both before and after that rename. So, most of the time, you don't even have to think about such things. But occasionally, Subversion needs your help to clear up ambiguities.
The simplest example of this occurs when a directory or file
is deleted from version control, and then a new directory or
file is created with the same name and added to version control.
The thing you deleted and the thing you later added aren't the
same thing. They merely happen to have had the same
path—/trunk/object, for example.
What, then, does it mean to ask Subversion about the history of
/trunk/object? Are you asking about the
thing currently at that location, or the old thing you deleted
from that location? Are you asking about the operations that
have happened to all the objects that have
ever lived at that path? Subversion needs a hint about what you
really want.
And thanks to moves, versioned object history can get far
more twisted than that, even. For example, you might have a
directory named concept, containing some
nascent software project you've been toying with. Eventually,
though, that project matures to the point that the idea seems to
actually have some wings, so you do the unthinkable and decide
to give the project a name.
[17]
Let's say you called your software Frabnaggilywort. At this
point, it makes sense to rename the directory to reflect the
project's new name, so concept is renamed
to frabnaggilywort. Life goes on,
Frabnaggilywort releases a 1.0 version and is downloaded and
used daily by hordes of people aiming to improve their
lives.
这是一个美好的故事,但是没有在这里结束,作为主办人,你一定想到了另一件事,所以你创建了一个目录叫做concept,周期重新开始。实际上,这个循环在几年里开始了多次,每一个想法从使用旧的concept目录开始,然后有时在想法成熟之后重新命名,有时你放弃了这个注意而删除了这个目录。或者更加变态一点,或许你把concept改成其他名字之后又因为一些原因重新改回concept。
In scenarios like these, attempting to instruct Subversion to work with these re-used paths can be a little like instructing a motorist in Chicago's West Suburbs to drive east down Roosevelt Road and turn left onto Main Street. In a mere 20 minutes, you can cross “Main Street” in Wheaton, Glen Ellyn, and Lombard. And no, they aren't the same street. Our motorist—and our Subversion—need a little more detail in order to do the right thing.
In version 1.1, Subversion introduced a way for you to tell
it exactly which Main Street you meant. It's called the
peg revision, and it is provided to
Subversion for the sole purpose of identifying a unique line of
history. Because at most, one versioned object may occupy a path
at any given time—or, more precisely, in any one
revision—the combination of a path and a peg revision is
all that is needed to refer to a specific line of history. Peg
revisions are specified to the Subversion command-line client
using at syntax, so called because the
syntax involves appending an “at sign”
(@) and the peg revision to the end of the
path with which the revision is associated.
But what of the --revision
(-r) of which we've spoken so much in this
book? That revision (or set of revisions) is called the
operative revision (or
operative revision range). Once a
particular line of history has been identified using a path and
peg revision, Subversion performs the requested operation using
the operative revision(s). To map this to our Chicagoland
streets analogy, if we are told to go to 606 N. Main Street in
Wheaton,
[18]
we can think of “Main Street” as our path and
“Wheaton” as our peg revision. These two pieces of
information identify a unique path that can be travelled (north or
south on Main Street), and they keep us from travelling up and
down the wrong Main Street in search of our destination. Now we
throw in “606 N.” as our operative revision of
sorts, and we know exactly where to
go.
Say that long ago we created our repository, and in revision 1
added our first concept directory, plus an
IDEA file in that directory talking about
the concept. After several revisions in which real code was
added and tweaked, we, in revision 20, renamed this directory to
frabnaggilywort. By revision 27, we had a
new concept, a new concept directory to
hold it, and a new IDEA file to describe
it. And then 5 years and 20 thousand revisions flew by,
just like they would in any good romance story.
Now, years later, we wonder what the
IDEA file looked like back in revision 1.
But Subversion needs to know if we are asking about how the
current file looked back in revision 1, or
if we are asking for the contents of whatever file lived at
concepts/IDEA in revision 1. Certainly
those questions have different answers, and because of peg
revisions, you can ask question. To find out how the
current IDEA file looked in that old
revision, you run:
$ svn cat -r 1 concept/IDEA
svn: Unable to find repository location for 'concept/IDEA' in revision 1
Of course, in this example, the current
IDEA file didn't exist yet in revision 1,
so Subversion gives an error. The previous command is shorthand
for a longer notation which explicitly lists a peg revision.
The expanded notation is:
$ svn cat -r 1 concept/IDEA@BASE
svn: Unable to find repository location for 'concept/IDEA' in revision 1
当执行时,它包含期望的结果。
The perceptive reader is probably wondering at this point if
the peg revision syntax causes problems for working copy paths
or URLs that actually have at signs in them. After
all, how does svn know whether
news@11 is the name of a directory in my
tree or just a syntax for “revision 11 of
news”? Thankfully, while
svn will always assume the latter, there is a
trivial workaround. You need only append an at sign to the
end of the path, such as news@11@.
svn cares only about the last at sign in
the argument, and it is not considered illegal to omit a literal
peg revision specifier after that at sign. This workaround
even applies to paths that end in an at sign—you would
use filename@@ to talk about a file named
filename@.
然后让我们询问另一个问题—在修订版本1 ,占据concepts/IDEA路径的文件的内容到底是什么?我们会使用一个明确的peg修订版本来帮助我们完成。
$ svn cat concept/IDEA@1
The idea behind this project is to come up with a piece of software
that can frab a naggily wort.  Frabbing naggily worts is tricky
business, and doing it incorrectly can have serious ramifications, so
we need to employ over-the-top input validation and data verification
mechanisms.
注意我们这一次没有提供操作修订版本,那是因为如果没有指定操作修订版本,Subversion假定缺省的操作修订版本是peg修订版本。
As you can see, the output from our operation appears to be
correct. The text even mentions frabbing naggily worts, so this
is almost certainly the file that describes the software now
called Frabnaggilywort. In fact, we can verify this using the
combination of an explicit peg revision and explicit operative
revision. We know that in HEAD, the
Frabnaggilywort project is located in the
frabnaggilywort directory. So we specify
that we want to see how the line of history identified in
HEAD as the path
frabnaggilywort/IDEA looked in revision
1.
$ svn cat -r 1 frabnaggilywort/IDEA@HEAD
The idea behind this project is to come up with a piece of software
that can frab a naggily wort.  Frabbing naggily worts is tricky
business, and doing it incorrectly can have serious ramifications, so
we need to employ over-the-top input validation and data verification
mechanisms.
而且peg修订版本和实施修订版本也不需要这样琐碎,举个例子,我们的frabnaggilywort已经在HEAD删除,但我们知道在修订版本20它是存在的,我们希望知道IDEA从修订版本4到10的区别,我们可以使用peg修订版本20和IDEA文件的修订版本20的URL的组合,然后使用4到10作为我们的实施修订版本范围。
$ svn diff -r 4:10 http://svn.red-bean.com/projects/frabnaggilywort/IDEA@20
Index: frabnaggilywort/IDEA
===================================================================
--- frabnaggilywort/IDEA	(revision 4)
+++ frabnaggilywort/IDEA	(revision 10)
@@ -1,5 +1,5 @@
-The idea behind this project is to come up with a piece of software
-that can frab a naggily wort.  Frabbing naggily worts is tricky
-business, and doing it incorrectly can have serious ramifications, so
-we need to employ over-the-top input validation and data verification
-mechanisms.
+The idea behind this project is to come up with a piece of
+client-server software that can remotely frab a naggily wort.
+Frabbing naggily worts is tricky business, and doing it incorrectly
+can have serious ramifications, so we need to employ over-the-top
+input validation and data verification mechanisms.
幸运的是,几乎所有的人不会面临如此复杂的情形,但是如果是,记住peg修订版本是帮助Subversion清除混淆的额外提示。
It is commonplace for a developer to find himself working at any given time on multiple different, distinct changes to a particular bit of source code. This isn't necessarily due to poor planning or some form of digital masochism. A software engineer often spots bugs in his peripheral vision while working on some nearby chunk of source code. Or perhaps he's halfway through some large change when he realizes the solution he's working on is best committed as several smaller logical units. Often, these logical units aren't nicely contained in some module, safely separated from other changes. The units might overlap, modifying different files in the same module, or even modifying different lines in the same file.
There are various work methodologies that developers can employ to keep these logical changes organized. Some use separate working copies of the same repository to hold each individual change in progress. Others might choose to create short-lived feature branches in the repository and use a single working copy that is constantly switched to point to one such branch or another. Still others use diff and patch tools to back up and restore uncommitted changes to and from patchfiles associated with each change. Each of these methods has its pros and cons, and to a large degree, the details of the changes being made heavily influence the methodology used to distinguish them.
Subversion 1.5 brings a new changelists feature that adds yet another method to the mix. Changelists are basically arbitrary labels applied to working copy files for the express purpose of associating multiple files together. Users of many of Google's software offerings are familiar with this concept already. For example, Gmail doesn't provide the traditional folders-based email organization mechanism. In Gmail, you apply arbitrary labels to emails, and multiple emails can be said to be part of the same group if they happen to share a particular label. Viewing only a group of similarly labeled emails then becomes a simple user interface trick. Many other Web 2.0 sites have similar mechanisms—consider the “tags” used by sites such as YouTube and Flickr, “categories” applied to blog posts, and so on. Folks understand today that organization of data is critical, but that how that data is organized needs to be a flexible concept. The old files-and-folders paradigm is too rigid for some applications.
Subversion's changelist support allows you to create changelists by applying labels to files you want to be associated with that changelist, remove those labels, and limit the scope of the files on which its subcommands operate to only those bearing a particular label. In this section, we'll look in detail at how to do these things.
You can create, modify, and delete changelists using the svn changelist command. More accurately, you use this command to set or unset the changelist association of a particular working copy file. A changelist is effectively created the first time you label a file with that changelist; it is deleted when you remove that label from the last file that had it. Let's examine a usage scenario that demonstrates these concepts.
Harry is fixing some bugs in the calculator application's mathematics logic. His work leads him to change a couple of files:
$ svn status
M      integer.c
M      mathops.c
$
While testing his bug fix, Harry notices that his changes
bring to light a tangentially related bug in the user
interface logic found in button.c. Harry
decides that he'll go ahead and fix that bug, too, as a
separate commit from his math fixes. Now, in a small working
copy with only a handful of files and few logical changes,
Harry can probably keep his two logical change groupings
mentally organized without any problem. But today he's going
to use Subversion's changelists feature as a special favor to
the authors of this book.
Harry first creates a changelist and associates with it the two files he's already changed. He does this by using the svn changelist command to assign the same arbitrary changelist name to those files:
$ svn changelist math-fixes integer.c mathops.c
Path 'integer.c' is now a member of changelist 'math-fixes'.
Path 'mathops.c' is now a member of changelist 'math-fixes'.
$ svn status

--- Changelist 'math-fixes':
M      integer.c
M      mathops.c
$
As you can see, the output of svn status reflects this new grouping.
Harry now sets off to fix the secondary UI problem. Since he knows which file he'll be changing, he assigns that path to a changelist, too. Unfortunately, Harry careless assigns this third file to the same changelist as the previous two files:
$ svn changelist math-fix button.c
Path 'button.c' is now a member of changelist 'math-fixes'.
$ svn status

--- Changelist 'math-fixes':
       button.c
M      integer.c
M      mathops.c
$
Fortunately, Harry catches his mistake. At this point, he
has two options. He can remove the changelist association
from button.c, and then assign a
different changelist name:
$ svn changelist --remove button.c
Path 'button.c' is no longer a member of a changelist.
$ svn changelist ui-fix button.c
Path 'button.c' is now a member of changelist 'ui-fix'.
$
Or, he can skip the removal and just assign a new
changelist name. In this case, Subversion will first warn
Harry that button.c is being removed from
the first changelist:
$ svn changelist ui-fix button.c
svn: warning: Removing 'button.c' from changelist 'math-fixes'.
Path 'button.c' is now a member of changelist 'ui-fix'.
$ svn status

--- Changelist 'ui-fix':
       button.c

--- Changelist 'math-fixes':
M      integer.c
M      mathops.c
$
Harry now has two distinct changelists present in his
working copy, and svn status will group its
output according to these changelist determinations. Notice
that even though Harry hasn't yet modified
button.c, it still shows up in the output
of svn status as interesting because it has
a changelist assignment. Changelists can be added to and
removed from files at any time, regardless of whether they
contain local modifications.
Harry now fixes the user interface problem in
button.c.
$ svn status

--- Changelist 'ui-fix':
M      button.c

--- Changelist 'math-fixes':
M      integer.c
M      mathops.c
$
The visual grouping that Harry sees in the output of
svn status as shown in our previous section
is nice, but not entirely useful. The
status command is but one of many
operations that he might wish to perform on his working copy.
Fortunately, many of Subversion's other operations understand
how to operate on changelists via the use of the
--changelist option.
When provided with a --changelist option,
Subversion commands will limit the scope of their operation to
only those files to which a particular changelist name is
assigned. If Harry now wants to see the actual changes he's
made to the files in his math-fixes
changelist, he could explicitly list only
the files that make up that changelist on the svn
diff command line.
$ svn diff integer.c mathops.c
Index: integer.c
===================================================================
--- integer.c	(revision 1157)
+++ integer.c	(working copy)
…
Index: mathops.c
===================================================================
--- mathops.c	(revision 1157)
+++ mathops.c	(working copy)
…
$
That works okay for a few files, but what if Harry's change touched 20 or 30 files? That would be an annoyingly long list of explicitly named files. Now that he's using changelists, though, Harry can avoid explicitly listing the set of files in his changelist from now on, and instead provide just the changelist name:
$ svn diff --changelist math-fixes
Index: integer.c
===================================================================
--- integer.c	(revision 1157)
+++ integer.c	(working copy)
…
Index: mathops.c
===================================================================
--- mathops.c	(revision 1157)
+++ mathops.c	(working copy)
…
$
And when it's time to commit, Harry can again use the
--changelist option to limit the scope of the
commit to files in a certain changelist. He might commit his
user interface fix by doing the following:
$ svn ci -m "Fix a UI bug found while working on math logic." \
      --changelist ui-fix
Sending        button.c
Transmitting file data .
Committed revision 1158.
$
In fact, the svn commit command
provides a second changelists-related option:
--keep-changelists. Normally, changelist
assignments are removed from files after they are committed.
But if --keep-changelists is provided,
Subversion will leave the changelist assignment on the
committed (and now unmodified) files. In any case, committing
files assigned to one changelist leaves other changelists
undisturbed.
$ svn status

--- Changelist 'math-fixes':
M      integer.c
M      mathops.c
$
注意
The --changelist option acts only as a
filter for Subversion command targets, and will not add
targets to an operation. For example, on a commit operation
specified as svn commit /path/to/dir, the
target is the directory /path/to/dir
and its children (to infinite depth). If you then add a
changelist specifier to that command, only those files in
and under /path/to/dir that are
assigned that changelist name will be considered as targets
of the commit—the commit will not include files
located elsewhere (such is in
/path/to/another-dir), regardless of
their changelist assignment, even if they are part of the
same working copy as the operation's target(s).
Even the svn changelist command accepts
the --changelist option. This allows you to
quickly and easily rename or remove a changelist:
$ svn changelist math-bugs --changelist math-fixes --depth infinity .
svn: warning: Removing 'integer.c' from changelist 'math-fixes'.
Path 'integer.c' is now a member of changelist 'math-bugs'.
svn: warning: Removing 'mathops.c' from changelist 'math-fixes'.
Path 'mathops.c' is now a member of changelist 'math-bugs'.
$ svn changelist --remove --changelist math-bugs --depth infinity .
Path 'integer.c' is no longer a member of a changelist.
Path 'mathops.c' is no longer a member of a changelist.
$
Finally, you can specify multiple instances of the
--changelist option on a single command
line. Doing so limits the operation you are performing to
files found in any of the specified changesets.
Subversion's changelist feature is a handy tool for grouping working copy files, but it does have a few limitations. Changelists are artifacts of a particular working copy, which means that changelist assignments cannot be propagated to the repository or otherwise shared with other users. Changelists can only be assigned to files—Subversion doesn't currently support the use of changelists with directories. Finally, you can have at most one changelist assignment on a given working copy file. Here is where the blog post category and photo service tag analogies break down—if you find yourself needing to assign a file to multiple changelists, you're out of luck.
在某些情况下,你需要理解Subversion客户端如何与服务器通讯。Subversion网络层是抽象的,意味着Subversion客户端不管其操作的对象都会使用相同的行为方式,不管是使用HTTP协议(http://)与Apache HTTP服务器通讯或是使用自定义Subversion协议(svn://)与svnserve通讯,基本的网络模型是相同的。在本小节,我们要解释网络模型基础,包括Subversion如何管理认证和授权信息。
Subversion客户端花费大量的时间来管理工作拷贝,当它需要远程版本库的信息,它会做一个网络请求,然后服务器给一个恰当的回答,具体的网络协议细节对用户不可见,客户端尝试去访问一个URL,根据URL模式的不同,会使用特定的协议与服务器联系(见版本库的URL)。
提示
用户可以运行svn --version来查看客户端可以使用的URL模式和协议。
When the server process receives a client request, it often demands that the client identify itself. It issues an authentication challenge to the client, and the client responds by providing credentials back to the server. Once authentication is complete, the server responds with the original information that the client asked for. Notice that this system is different from systems such as CVS, where the client pre-emptively offers credentials (“logs in”) to the server before ever making a request. In Subversion, the server “pulls” credentials by challenging the client at the appropriate moment, rather than the client “pushing” them. This makes certain operations more elegant. For example, if a server is configured to allow anyone in the world to read a repository, then the server will never issue an authentication challenge when a client attempts to svn checkout.
If the particular network requests issued by the client
result in a new revision being created in the repository,
(e.g., svn commit), then Subversion uses the
authenticated username associated with those requests as the
author of the revision. That is, the authenticated user's
name is stored as the value of the
svn:author property on the new revision
(see “Subversion Properties”一节). If
the client was not authenticated (in other words, if the server
never issued an authentication challenge), then the revision's
svn:author property is empty.
Many servers are configured to require authentication on
every request. This would be a big annoyance to users if
they were forced to type their passwords over and over again.
Fortunately, the Subversion client has a remedy for
this—a built-in system for caching authentication
credentials on disk. By default, whenever the command-line
client successfully responds to a server's authentication
challenge, it saves the credentials in the user's private
runtime configuration area
(~/.subversion/auth/ on Unix-like systems
or %APPDATA%/Subversion/auth/ on Windows;
see “运行配置区”一节 for more details
about the runtime configuration system). Successful
credentials are cached on disk and keyed on a combination of the
server's hostname, port, and authentication realm.
当客户端接收到一个认证请求,它会首先查找用户磁盘中的认证凭证缓存,如果没有发现,或者是缓存的凭证认证失败,客户端会提示用户提供需要的信息。
十分关心安全的人们一定会想“把密码缓存在磁盘?太可怕了,永远不要这样做!”
Subversion开发者认识到这种关注的正确性,所以Subversion使用操作系统和环境提供的机制来减少泄露这些信息的风险,下面是在大多数平台上这种含义的列表:
-
在Windows 2000或更新的系统上,Subversion客户端使用标准Windows加密服务来加密磁盘上的密码。因为加密密钥是Windows管理的,与用户的登陆凭证相关,只有用户可以解密密码。(注意:如果用户的Windows账户密码被管理员重置,所有的缓存密码就不可以解密了,此时Subversion客户端就会当它们根本不存在,在需要时继续询问密码。)
-
类似的,在Mac OS X,Subversion客户端在登陆keyring(使用Keychain管理)保存了所有的版本库密码,使用户用帐号密码保护。用户选择的设置可以强加额外的政策,例如在需要用户密码时要求输入用户帐号密码。
-
对于其他类Unix系统,没有标准的加密服务。然而
auth/缓存区只有用户(拥有者)可以访问,而不是全世界都可以,操作系统的访问许可可以保护密码文件。
当然,对于真正的妄想狂,没有任何机制是完美的。这类人希望用无限的安全来牺牲便利性,Subversion提供了各种方法来完全关闭凭证缓存。
你可以关闭凭证缓存,只需要一个简单的命令,使用参数--no-auth-cache:
$ svn commit -F log_msg.txt --no-auth-cache
Authentication realm: <svn://host.example.com:3690> example realm
Username:  joe
Password for 'joe':

Adding         newfile
Transmitting file data .
Committed revision 2324.

# password was not cached, so a second commit still prompts us

$ svn delete newfile
$ svn commit -F new_msg.txt
Authentication realm: <svn://host.example.com:3690> example realm
Username:  joe
…
Or, if you want to disable credential caching permanently,
you can edit the config file in your
runtime configuration area and set the
store-auth-creds option to
no. This will prevent the storing of
credentials used in any Subversion interactions you perform on
the affected computer. This can be extended to cover all
users on the computer, too, by modifying the system-wide
runtime configuration area (described in “配置区布局”一节).
[auth]
store-auth-creds = no
有时候,用户希望从磁盘缓存删除特定的凭证,为此你可以浏览到auth/区域,删除特定的缓存文件,凭证都是作为一个单独的文件缓存,如果你打开每一个文件,你会看到键和值,svn:realmstring描述了这个文件关联的特定服务器的域:
$ ls ~/.subversion/auth/svn.simple/
5671adf2865e267db74f09ba6f872c28
3893ed123b39500bca8a0b382839198e
5c3c22968347b390f349ff340196ed39

$ cat ~/.subversion/auth/svn.simple/5671adf2865e267db74f09ba6f872c28

K 8
username
V 3
joe
K 8
password
V 4
blah
K 15
svn:realmstring
V 45
<http://svn.domain.com:443> Joe's repository
END
一旦你定位了正确的缓存文件,只需要删除它。
One last word about svn's
authentication behavior, specifically regarding the
--username and --password
options. Many client subcommands accept these options, but it
is important to understand using these options does
not automatically send credentials to the
server. As discussed earlier, the server “pulls”
credentials from the client when it deems necessary; the
client cannot “push” them at will. If a username
and/or password are passed as options, they will only be
presented to the server if the server requests them. These
options are typically used to authenticate as a different user
than Subversion would have chosen by default (such as your
system login name) or when trying to avoid interactive
prompting (such as when calling svn from a
script).
注意
A common mistake is to misconfigure a server so
that it never issues an authentication challenge. When
users pass --username and
--password options to the client, they're
surprised to see that they're never used; i.e., new
revisions still appear to have been committed
anonymously!
这里是Subversion客户端在收到认证请求的时候的行为方式最终总结:
-
First, the client checks whether the user specified any credentials as command-line options (
--usernameand/or--password). If so, the client will try to use those credentials to authenticate against the server. -
If no command-line credentials were provided, or the provided ones were invalid, the client looks up the server's hostname, port, and realm in the runtime configuration's
auth/area, to see if appropriate credentials are cached there. If so, it attempts to use those credentials to authenticate. -
Finally, if the previous mechanisms failed to successfully authenticate the user against the server, the client resorts to interactively prompting the user for valid credentials (unless instructed not to do so via the
--non-interactiveoption or its client-specific equivalents).
If the client successfully authenticates by any of these methods, it will attempt to cache the credentials on disk (unless the user has disabled this behavior, as mentioned earlier).
[8] 如果你熟悉XML,其实这就是XML的"Name"语法的ASCII子集。
[9] 修正提交日志信息的拼写错误,文法错误和“简单的错误”是--revprop选项最常见用例。
[10] 你认为那样过于粗狂?在同一个时代里,WordPerfect也使用.DOC作为它们私有文件格式的扩展名!
[11] The Windows filesystems use file extensions (such as
.EXE, .BAT, and
.COM) to denote executable
files.
[12] 这不是编译系统的基本功能吗?
[13] … 或者可能是一本书的一个小节 …
[14] Communication wouldn't have been such bad medicine for Harry and Sally's Hollywood namesakes, either, for that matter.
[15] Subversion目前不允许锁定目录。
[16] 除非是,或许一个经典的火神精神融合。
[17] “你不是被期望去命名它,一旦你取了名字,你开始与之联系在一起。” — Mike Wazowski
[18] 606 N. Main Street, Wheaton, Illinois, is the home of the Wheaton History Center. It seemed appropriate….
|
“君子务本” |
||
| --孔子 | ||
Branching, tagging, and merging are concepts common to almost all version control systems. If you're not familiar with these ideas, we provide a good introduction in this chapter. If you are familiar, then hopefully you'll find it interesting to see how Subversion implements them.
分支是版本控制的基础组成部分,如果你允许Subversion来管理你的数据,这个特性将是你所必须依赖的,这一章假定你已经熟悉了Subversion的基本概念(第 1 章 基本概念)。
Suppose it's your job to maintain a document for a division in your company—a handbook of some sort. One day a different division asks you for the same handbook, but with a few parts “tweaked” for them, since they do things slightly differently.
What do you do in this situation? You do the obvious: make a second copy of your document and begin maintaining the two copies separately. As each department asks you to make small changes, you incorporate them into one copy or the other.
You often want to make the same change to both copies. For example, if you discover a typo in the first copy, it's very likely that the same typo exists in the second copy. The two documents are almost the same, after all; they differ only in small, specific ways.
这是分支的基本概念—正如它的名字,开发的一条线独立于另一条线,如果回顾历史,可以发现两条线分享共同的历史,一个分支总是从一个备份开始的,从那里开始,发展自己独有的历史(见 图 4.1 “分支与开发”)。
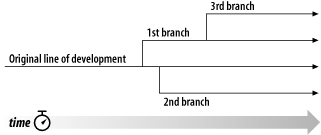
Subversion允许你并行的维护文件和目录的分支,它允许你通过拷贝数据建立分支,记住,分支互相联系,它也帮助你从一个分支复制修改到另一个分支。最终,它可以让你的工作拷贝反映到不同的分支上,所以你在日常工作可以“混合和比较”不同的开发线。
At this point, you should understand how each commit creates an entire new filesystem tree (called a “revision”) in the repository. If you don't, go back and read about revisions in “修订版本”一节.
对于本章节,我们会回到第 1 章 基本概念的同一个例子,还记得你和你的合作者Sally分享一个包含两个项目的版本库,paint和calc。注意图 4.2 “开始规划版本库”,然而,现在每个项目的都有一个trunk和branches子目录,它们存在的理由很快就会清晰起来。

像以前一样,假定Sally和你都有“calc”项目的一份拷贝,更准确地说,你有一份/calc/trunk的工作拷贝,这个项目的所有的文件在这个子目录里,而不是在/calc下,因为你的小组决定使用/calc/trunk作为开发使用的“主线”。
Let's say that you've been given the task of implementing a
large software feature. It will take a long time to write, and
will affect all the files in the project. The immediate problem
is that you don't want to interfere with Sally, who is in the
process of fixing small bugs here and there. She's depending on
the fact that the latest version of the project (in
/calc/trunk) is always usable. If you
start committing your changes bit-by-bit, you'll surely break
things for Sally (and other team members as well).
One strategy is to crawl into a hole: you and Sally can stop
sharing information for a week or two. That is, start gutting
and reorganizing all the files in your working copy, but don't
commit or update until you're completely finished with the task.
There are a number of problems with this, though. First, it's
not very safe. Most people like to save their work to the
repository frequently, should something bad accidentally happen
to their working copy. Second, it's not very flexible. If you
do your work on different computers (perhaps you have a working
copy of /calc/trunk on two different
machines), you'll need to manually copy your changes back and
forth or just do all the work on a single computer. By that
same token, it's difficult to share your changes-in-progress
with anyone else. A common software development “best
practice” is to allow your peers to review your work as
you go. If nobody sees your intermediate commits, you lose
potential feedback and may end up going down the wrong path for
weeks before another person on your team notices. Finally, when
you're finished with all your changes, you might find it very
difficult to re-merge your final work with the rest of the
company's main body of code. Sally (or others) may have made
many other changes in the repository that are difficult to
incorporate into your working copy—especially if you
run svn update after weeks of
isolation.
The better solution is to create your own branch, or line of development, in the repository. This allows you to save your half-broken work frequently without interfering with others, yet you can still selectively share information with your collaborators. You'll see exactly how this works as we go.
建立分支非常的简单—使用svn copy命令给你的工程做个拷贝,Subversion不仅可以拷贝单个文件,也可以拷贝整个目录,在目前情况下,你希望作/calc/trunk的拷贝,新的拷贝应该在哪里?在你希望的任何地方—它只是在于项目的政策,我们假设你们项目的政策是在/calc/branches建立分支,并且你希望把你的分支叫做my-calc-branch,你希望建立一个新的目录/calc/branches/my-calc-branch,作为/calc/trunk的拷贝开始它的生命周期。
You may already have seen svn copy used to copy one file to another within a working copy. But it can also be used to do a “remote” copy entirely within the repository. Just copy one URL to another:
$ svn copy http://svn.example.com/repos/calc/trunk \
           http://svn.example.com/repos/calc/branches/my-calc-branch \
      -m "Creating a private branch of /calc/trunk."

Committed revision 341.
This command causes a near-instantaneous commit in the
repository, creating a new directory in revision 341. The new
directory is a copy of /calc/trunk. This
is shown in
图 4.3 “版本库与复制”.
[19]
While it's also possible to create a branch by
using svn copy to duplicate a directory
within the working copy, this technique isn't recommended. It
can be quite slow, in fact! Copying a directory on the
client side is a linear-time operation, in that it actually
has to duplicate every file and subdirectory on local disk.
Copying a directory on the server, however, is a constant-time
operation, and it's the way most people create
branches.
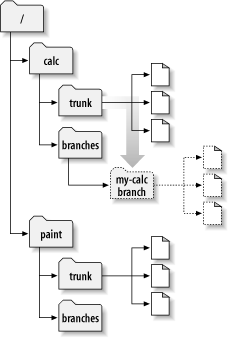
现在你已经在项目里建立分支了,你可以取出一个新的工作拷贝来开始使用:
$ svn checkout http://svn.example.com/repos/calc/branches/my-calc-branch
A  my-calc-branch/Makefile
A  my-calc-branch/integer.c
A  my-calc-branch/button.c
Checked out revision 341.
There's nothing special about this working copy; it simply
mirrors a different directory in the repository. When you
commit changes, however, Sally won't see them when she
updates, because her working copy is of
/calc/trunk. (Be sure to read “使用分支”一节 later in this chapter: the
svn switch command is an alternate way of
creating a working copy of a branch.)
我们假定本周就要过去了,如下的提交发生:
-
你修改了
/calc/branches/my-calc-branch/button.c,生成修订版本342。 -
你修改了
/calc/branches/my-calc-branch/integer.c,生成修订版本343。 -
Sally修改了
/calc/trunk/integer.c,生成了修订版本344。
There are now two independent lines of development (shown
in 图 4.4 “一个文件的分支历史”) happening on
integer.c.
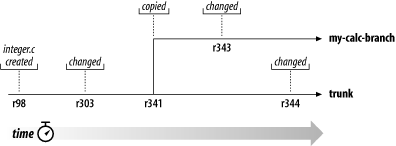
当你看到integer.c的改变时,你会发现很有趣:
$ pwd
/home/user/my-calc-branch

$ svn log -v integer.c
------------------------------------------------------------------------
r343 | user | 2002-11-07 15:27:56 -0600 (Thu, 07 Nov 2002) | 2 lines
Changed paths:
   M /calc/branches/my-calc-branch/integer.c

* integer.c:  frozzled the wazjub.

------------------------------------------------------------------------
r341 | user | 2002-11-03 15:27:56 -0600 (Thu, 07 Nov 2002) | 2 lines
Changed paths:
   A /calc/branches/my-calc-branch (from /calc/trunk:340)

Creating a private branch of /calc/trunk.

------------------------------------------------------------------------
r303 | sally | 2002-10-29 21:14:35 -0600 (Tue, 29 Oct 2002) | 2 lines
Changed paths:
   M /calc/trunk/integer.c

* integer.c:  changed a docstring.

------------------------------------------------------------------------
r98 | sally | 2002-02-22 15:35:29 -0600 (Fri, 22 Feb 2002) | 2 lines
Changed paths:
   A /calc/trunk/integer.c

* integer.c:  adding this file to the project.

------------------------------------------------------------------------
注意,Subversion追踪分支上的integer.c的历史,包括所有的操作,甚至追踪到拷贝之前。这表示了建立分支也是历史中的一次事件,因为在拷贝整个/calc/trunk/时已经拷贝了一份integer.c。现在看Sally在她的工作拷贝运行同样的命令:
$ pwd
/home/sally/calc

$ svn log -v integer.c
------------------------------------------------------------------------
r344 | sally | 2002-11-07 15:27:56 -0600 (Thu, 07 Nov 2002) | 2 lines
Changed paths:
   M /calc/trunk/integer.c

* integer.c:  fix a bunch of spelling errors.

------------------------------------------------------------------------
r303 | sally | 2002-10-29 21:14:35 -0600 (Tue, 29 Oct 2002) | 2 lines
Changed paths:
   M /calc/trunk/integer.c

* integer.c:  changed a docstring.

------------------------------------------------------------------------
r98 | sally | 2002-02-22 15:35:29 -0600 (Fri, 22 Feb 2002) | 2 lines
Changed paths:
   A /calc/trunk/integer.c

* integer.c:  adding this file to the project.

------------------------------------------------------------------------
Sally sees her own revision 344 change, but not the change you made in revision 343. As far as Subversion is concerned, these two commits affected different files in different repository locations. However, Subversion does show that the two files share a common history. Before the branch copy was made in revision 341, the files used to be the same file. That's why you and Sally both see the changes made in revisions 303 and 98.
There are two important lessons that you should remember from this section. First, Subversion has no internal concept of a branch—it knows only how to make copies. When you copy a directory, the resulting directory is only a “branch” because you attach that meaning to it. You may think of the directory differently, or treat it differently, but to Subversion it's just an ordinary directory that happens to carry some extra historical information.
Second, because of this copy mechanism, Subversion's
branches exist as normal filesystem
directories in the repository. This is different
from other version control systems, where branches are
typically defined by adding
extra-dimensional “labels” to collections of
files. The location of your branch directory doesn't matter
to Subversion. Most teams follow a convention of putting all
branches into a /branches directory, but
you're free to invent any policy you wish.
现在你与Sally在同一个项目的并行分支上工作:你在私有分支上,而Sally在主干(trunk)或者叫做开发主线上。
由于有众多的人参与项目,大多数人拥有主干拷贝是很正常的,任何人如果进行一个长周期的修改会使得主干陷入混乱,所以通常的做法是建立一个私有分支,提交修改到自己的分支,直到这阶段工作结束。
所以,好消息就是你和Sally不会互相打扰,坏消息是有时候分离会太远。记住“闭门造车”策略的问题,当你完成你的分支后,可能因为太多冲突,已经无法轻易合并你的分支和主干的修改。
Instead, you and Sally might continue to share changes as you work. It's up to you to decide which changes are worth sharing; Subversion gives you the ability to selectively “copy” changes between branches. And when you're completely finished with your branch, your entire set of branch changes can be copied back into the trunk. In Subversion terminology, the general act of replicating changes from one branch to another is called merging, and it is performed using various invocations of the svn merge command.
In the examples that follow, we're assuming that both your Subversion client and server are running Subversion 1.5 (or later). If either client or server is older than version 1.5, then things are more complicated: the system won't track changes automatically, and you'll have to use painful manual methods to achieve similar results. That is, you'll always need to use the detailed merge syntax to specify specific ranges of revisions to replicate (See “Merge Syntax: Full Disclosure”一节 later in this chapter), and take special care to keep track of what's already been merged and what hasn't. For this reason, we strongly recommend making sure that your client and server are at least version 1.5 or later.
Before we get too far in, we should warn you that there's going to be a lot of discussion of “changes” in the pages ahead. A lot of people experienced with version control systems use the terms “change” and “changeset” interchangeably, and we should clarify what Subversion understands as a changeset.
Everyone seems to have a slightly different definition of “changeset,” or at least a different expectation of what it means for a version control system to have one. For our purpose, let's say that a changeset is just a collection of changes with a unique name. The changes might include textual edits to file contents, modifications to tree structure, or tweaks to metadata. In more common speak, a changeset is just a patch with a name you can refer to.
In Subversion, a global revision number N names a tree in the repository: it's the way the repository looked after the Nth commit. It's also the name of an implicit changeset: if you compare tree N with tree N-1, you can derive the exact patch that was committed. For this reason, it's easy to think of revision N as not just a tree, but a changeset as well. If you use an issue tracker to manage bugs, you can use the revision numbers to refer to particular patches that fix bugs—for example, “this issue was fixed by r9238.” Somebody can then run svn log -r 9238 to read about the exact changeset that fixed the bug, and run svn diff -c 9238 to see the patch itself. And (as you'll see shortly) Subversion's merge command is able to use revision numbers. You can merge specific changesets from one branch to another by naming them in the merge arguments: svn merge -c 9238 would merge changeset r9238 into your working copy.
Continuing with our running example, let's suppose that a
week has passed since you started working on your private
branch. Your new feature isn't finished yet, but at the same
time you know that other people on your team have continued to
make important changes in the
project's /trunk. It's in your best
interest to replicate those changes to your own branch, just
to make sure they mesh well with your changes. In fact, this
is a best practice: frequently keeping your branch in sync
with the main development line helps
prevent “surprise” conflicts when it comes time
for you to fold your changes back into the trunk.
Subversion is aware of the history of your branch and knows when it divided away from the trunk. To replicate the latest, greatest trunk changes to your branch, first make sure your working copy of the branch is “clean”—that it has no local modifications reported by svn status. Then simply run:
$ pwd
/home/user/my-calc-branch

$ svn merge http://svn.example.com/repos/calc/trunk
--- Merging r345 through r356 into '.':
U    button.c
U    integer.c
This basic syntax—svn merge URL—tells Subversion to merge all recent changes from the URL to the current working directory (which is typically the root of your working copy.) After running the prior example, your branch working copy now contains new local modifications, and these edits are duplications of all of the changes that have happened on the trunk since you first created your branch:
$ svn status
 M     .
M      button.c
M      integer.c
At this point, the wise thing to do is look at the changes
carefully with svn diff, and then build and
test your branch. Notice that the current working directory
(“.”) has also been
modified; the svn diff will show that
its svn:mergeinfo property has been either
created or modified. This is important merge-related metadata
that you should not touch, since it will
be needed by future svn merge commands.
(We'll learn more about this metadata later in the
chapter.)
After performing the merge, you might also need to resolve some conflicts (just as you do with svn update) or possibly make some small edits to get things working properly. (Remember, just because there are no syntactic conflicts doesn't mean there aren't any semantic conflicts!) If you encounter serious problems, you can always abort the local changes by running svn revert . -R (which will undo all local modifications) and start a long “what's going on?” discussion with your collaborators. If things look good, however, then you can submit these changes into the repository:
$ svn commit -m "Merged latest trunk changes to my-calc-branch."
Sending        .
Sending        button.c
Sending        integer.c
Transmitting file data ..
Committed revision 357.
At this point, your private branch is now “in sync” with the trunk, so you can rest easier knowing that as you continue to work in isolation, you're not drifting too far away from what everyone else is doing.
Suppose that another week has passed. You've committed more changes to your branch, and your comrades have continued to improve the trunk as well. Once again, you'd like to replicate the latest trunk changes to your branch and bring yourself in sync. Just run the same merge command again!
$ svn merge http://svn.example.com/repos/calc/trunk
--- Merging r357 through r380 into '.':
U    integer.c
U    Makefile
A    README
Subversion knows which trunk changes you've already replicated to your branch, so it carefully replicates only those changes you don't yet have. Once again, you'll have to build, test, and svn commit the local modifications to your branch.
What happens when you finally finish your work, though? Your new feature is done, and you're ready to merge your branch changes back to the trunk (so your team can enjoy the bounty of your labor). The process is simple. First, bring your branch in sync with the trunk again, just as you've been doing all along:
$ svn merge http://svn.example.com/repos/calc/trunk
--- Merging r381 through r385 into '.':
U    button.c
U    README

$ # build, test, ...

$ svn commit -m "Final merge of trunk changes to my-calc-branch."
Sending        .
Sending        button.c
Sending        README
Transmitting file data ..
Committed revision 390.
Now, you use svn merge to replicate
your branch changes back into the trunk. You'll need an
up-to-date working copy of /trunk. You
can do this by either doing an svn
checkout, dredging up an old trunk working copy from
somewhere on your disk, or by using svn
switch (see
“使用分支”一节.) However you get a
trunk working copy, remember that it's a best practice to do
your merge into a working copy that
has no local edits and has been recently
updated (i.e., is not a mixture of local revisions.) If your
working copy isn't “clean” in these ways, you can
run into some unnecessary conflict-related headaches
and svn merge will likely return an
error.
Once you have a clean working copy of the trunk, you're ready merge your branch back into it:
$ pwd
/home/user/calc-trunk

$ svn update  # (just to make sure the working copy is at latest everywhere)
At revision 390.

$ svn merge --reintegrate http://svn.example.com/repos/calc/branches/my-calc-branch
--- Merging differences between repository URLs into '.':
U    button.c
U    integer.c
U    Makefile
 U   .

$ # build, test, verify, ...

$ svn commit -m "Merge my-calc-branch back into trunk!"
Sending        .
Sending        button.c
Sending        integer.c
Sending        Makefile
Transmitting file data ..
Committed revision 391.
Congratulations, your branch has now been re-merged back
into the main line of development. Notice our use of
the --reintegrate option this time around.
The option is critical for reintegrating changes from a branch
back into its original line of development—don't forget
it! It's needed because this sort of “merge
back” is a different sort of work than what you've been
doing up until now. Previously, we had been
asking svn merge to grab the “next
set” of changes from one line of development (the
trunk) and duplicate them to another (your branch). This is
fairly straightforward, and each time Subversion knows how to
pick up where it left off. In our prior examples, you can see
that first it merges the ranges 345:356 from trunk to branch;
later on, it continues by merging the next contiguously
available range, 356:380. When doing the final sync, it
merges the range 380:385.
When merging your branch back to the trunk, however, the
underlying mathematics is quite different. Your feature
branch is now a mish-mosh of both duplicated trunk changes and
private branch changes, so there's no simple contiguous range
of revisions to copy over. By specifying
the --reintegrate option, you're asking
Subversion to carefully replicate only
those changes unique to your branch. (And in fact it does
this by comparing the latest trunk tree with the latest branch
tree: the resulting difference is exactly your branch
changes!)
Now that your branch is merged to trunk, you have a couple
of options. You can keep working on your branch, repeating
the whole process of occasionally syncing with the trunk and
eventually using --reintegrate to merge it
back again. Or, if you're really done with the branch, you
can destroy your working copy of it and then remove it from
the repository:
$ svn delete http://svn.example.com/repos/calc/branches/my-calc-branch \
      -m "Remove my-calc-branch."
Committed revision 392.
But wait! Isn't the history of that branch valuable?
What if somebody wants to audit the evolution of your feature
someday and look at all of your branch changes? No need to
worry. Remember that even though your branch is no longer
visible in the /branches directory, its
existence is still an immutable part of the repository's
history. A simple svn log command on
the /branches URL will show the entire
history of your branch. Your branch can even be resurrected
at some point, should you desire (see
“找回删除的项目”一节).
The basic mechanism Subversion uses to track
changesets—that is, which changes have been merged to
which branches—is by recording data in properties.
Specifically, merge data is tracked in
the svn:mergeinfo property attached to
files and directories. (If you're not familiar with
Subversion properties, now is the time to go skim over
“属性”一节.)
You can examine the property, just like any other:
$ cd my-calc-branch
$ svn propget svn:mergeinfo .
/trunk:341-390
It is not recommended that you change
the value of this property yourself, unless you really know
what you're doing. This property is automatically maintained
by Subversion whenever you run svn merge.
Its value indicates which changes (at a given path) have been
replicated into the directory in question. In this case, the
path is /trunk and the directory which
has received the specific changes
is /branches/my-calc-branch.
There's also a subcommand svn mergeinfo, which can be helpful in seeing not only which changesets a directory has absorbed, but also which changesets it's still eligible to receive. This gives a sort of preview of the next set of changes that svn merge will replicate to your branch.
$ cd my-calc-branch

# Which changes have already been merged from trunk to branch?
$ svn mergeinfo http://svn.example.com/repos/calc/trunk
r341
r342
r343
…
r388
r389
r390

# Which changes are still eligible to merge from trunk to branch?
$ svn mergeinfo http://svn.example.com/repos/calc/trunk --show-revs eligible
r391
r392
r393
r394
r395
The svn mergeinfo command requires
a “source” URL (where the changes would be coming
from), and takes an optional “target” URL (where
the changes would be merged to). If no target URL is given,
then it assumes that the current working directory is the
target. In the prior example, because we're querying our
branch working copy, the command assumes we're interested in
receiving changes to /branches/mybranch
from the specified trunk URL.
Another way to get a more precise preview of a merge
operation is to use the --dry-run
option.
$ svn merge http://svn.example.com/repos/calc/trunk --dry-run
U    integer.c

$ svn status
#  nothing printed, working copy is still unchanged.
The --dry-run option doesn't actually
apply any local changes to the working copy. It shows only
status codes that would be printed in a
real merge. It's useful for getting a “high
level” preview of the potential merge, for those times
when running svn diff gives too much
detail.
提示
After performing a merge operation, but before committing
the results of the merge, you can use svn diff
--depth=empty /path/to/merge/target to see only
the changes to the immediate target of your merge. If your
merge target was a directory, only property differences will
be displayed. This is a handy way to see the changes to the
svn:mergeinfo property recorded by the
merge operation, which will remind you about what you've
just merged.
Of course, the best way to preview a merge operation is to just do it! Remember, running svn merge isn't an inherently risky thing (unless you've made local modifications to your working copy—but we've already stressed that you shouldn't be merging into such an environment.) If you don't like the results of the merge, simply svn revert . -R the changes from your working copy and retry the command with different options. The merge isn't final until you actually svn commit the results.
提示
While it's perfectly fine to experiment with merges by running svn merge and svn revert over and over, you may run into some annoying (but easily bypassed) roadblocks. For example, if the merge operation adds a new file (i.e., schedules it for addition), then svn revert won't actually remove the file; it simply unschedules the addition. You're left with an unversioned file. If you then attempt to run the merge again, you may get conflicts due to the unversioned file “being in the way.” Solution? After performing a revert, be sure to clean up the working copy and remove unversioned files and directories. The output of svn status should be as clean (read: empty) as possible!
An extremely common use for svn merge
is to roll back a change that has already been committed.
Suppose you're working away happily on a working copy of
/calc/trunk, and you discover that the
change made way back in revision 303, which changed
integer.c, is completely wrong. It never
should have been committed. You can use svn
merge to “undo” the change in your
working copy, and then commit the local modification to the
repository. All you need to do is to specify a
reverse difference. (You can do this by
specifying --revision 303:302, or by an
equivalent --change -303.)
$ svn merge -c -303 http://svn.example.com/repos/calc/trunk
--- Reverse-merging r303 into 'integer.c':
U    integer.c

$ svn status
 M     .
M      integer.c

$ svn diff
…
# verify that the change is removed
…

$ svn commit -m "Undoing change committed in r303."
Sending        integer.c
Transmitting file data .
Committed revision 350.
As we mentioned earlier, one way to think about a
repository revision is as a specific changeset. By using the
-r option, you can ask svn
merge to apply a changeset, or a whole range of
changesets, to your working copy. In our case of undoing a
change, we're asking svn merge to apply
changeset #303 to our working copy
backwards.
记住回滚修改和任何一个svn merge命令都一样,所以你应该使用svn status或是svn diff来确定你的工作处于期望的状态中,然后使用svn commit来提交,提交之后,这个特定修改集不会反映到HEAD版本了。
继续,你也许会想:好吧,这不是真的取消提交吧!是吧?版本303还依然存在着修改,如果任何人取出calc的303-349版本,他还会得到错误的修改,对吧?
Yes, that's true. When we talk about
“removing” a change, we're really talking about
removing it from the HEAD revision. The
original change still exists in the repository's history. For
most situations, this is good enough. Most people are only
interested in tracking the HEAD of a
project anyway. There are special cases, however, where you
really might want to destroy all evidence of the commit.
(Perhaps somebody accidentally committed a confidential
document.) This isn't so easy, it turns out, because
Subversion was deliberately designed to never lose
information. Revisions are immutable trees that build upon
one another. Removing a revision from history would cause a
domino effect, creating chaos in all subsequent revisions and
possibly invalidating all working copies.
[20]
The great thing about version control systems is that
information is never lost. Even when you delete a file or
directory, it may be gone from the HEAD
revision, but the object still exists in earlier revisions.
One of the most common questions new users ask is, “How
do I get my old file or directory back?”
The first step is to define exactly which item you're trying to resurrect. Here's a useful metaphor: you can think of every object in the repository as existing in a sort of two-dimensional coordinate system. The first coordinate is a particular revision tree, and the second coordinate is a path within that tree. So every version of your file or directory can be defined by a specific coordinate pair. (Remember the “peg revision” syntax—foo.c@224—mentioned back in “Peg和实施修订版本”一节.)
First, you might need to use svn log to
discover the exact coordinate pair you wish to resurrect. A
good strategy is to run svn log --verbose
in a directory that used to contain your deleted item. The
--verbose (-v) option shows
a list of all changed items in each revision; all you need to
do is find the revision in which you deleted the file or
directory. You can do this visually, or by using another tool
to examine the log output (via grep, or
perhaps via an incremental search in an editor).
$ cd parent-dir
$ svn log -v
…
------------------------------------------------------------------------
r808 | joe | 2003-12-26 14:29:40 -0600 (Fri, 26 Dec 2003) | 3 lines
Changed paths:
   D /calc/trunk/real.c
   M /calc/trunk/integer.c

Added fast fourier transform functions to integer.c.
Removed real.c because code now in double.c.
…
在这个例子里,你可以假定你正在找已经删除了的文件real.c,通过查找父目录的历史 ,你知道这个文件在808版本被删除,所以存在这个对象的版本在此之前 。结论:你想从版本807找回/calc/trunk/real.c。
以上是最重要的部分—重新找到你需要恢复的对象。现在你已经知道该恢复的文件,而你有两种选择。
One option is to use svn merge to apply
revision 808 “in reverse.” (We've already
discussed how to undo changes in
“取消修改”一节.) This
would have the effect of re-adding real.c
as a local modification. The file would be scheduled for
addition, and after a commit, the file would again exist
in HEAD.
在这个例子里,这不是一个好的策略,这样做不仅把real.c加入添加到计划,也取消了对integer.c的修改,而这不是你期望的。确实,你可以恢复到版本808,然后对integer.c执行取消svn revert操作,但这样的操作无法扩大使用,因为如果从版本808修改了90个文件怎么办?
所以第二个方法不是使用svn merge,而是使用svn copy命令,精确的拷贝版本和路径“坐标对”到你的工作拷贝:
$ svn copy http://svn.example.com/repos/calc/trunk/real.c@807 ./real.c

$ svn status
A  +   real.c

$ svn commit -m "Resurrected real.c from revision 807, /calc/trunk/real.c."
Adding         real.c
Transmitting file data .
Committed revision 1390.
The plus sign in the status output indicates that the item
isn't merely scheduled for addition, but scheduled for
addition “with history.” Subversion remembers
where it was copied from. In the future, running svn
log on this file will traverse back through the
file's resurrection and through all the history it had prior
to revision 807. In other words, this new
real.c isn't really new; it's a direct
descendant of the original, deleted file. This is usually
considered a good and useful thing. If, however, you wanted
to resurrect the file without
maintaining a historical link to the old file, this technique
works just as well:
$ svn cat http://svn.example.com/repos/calc/trunk/real.c@807 > ./real.c

$ svn add real.c
A         real.c

$ svn commit -m "Recreated real.c from revision 807."
Adding         real.c
Transmitting file data .
Committed revision 1390.
Although our example shows us resurrecting a file, note that these same techniques work just as well for resurrecting deleted directories. Also note that a resurrection doesn't have to happen in your working copy—it can happen entirely in the repository:
$ svn copy http://svn.example.com/repos/calc/trunk/real.c@807 \
           http://svn.example.com/repos/calc/trunk/ \
      -m "Resurrect real.c from revision 807."
Committed revision 1390.

$ svn update
A    real.c
Updated to revision 1390.
Here ends the automated magic. Sooner or later, once you get the hang of branching and merging, you're going to have to ask Subversion to merge specific changes from one place to another. In order to do this, you're going to have to start passing more complicated arguments to svn merge. This next section describes the fully expanded syntax of the command and discusses a number of common scenarios that require it.
Just as the term “changeset” is often used in version control systems, so is the term of cherrypicking. This word refers to the act of choosing one specific changeset from a branch and replicating it to another. Cherrypicking may also refer to the act of duplicating a particular set of (not necessarily contiguous!) changesets from one branch to another. This is in contrast to more typical merging scenarios, where the “next” contiguous range of revisions is duplicated automatically.
Why would people want to replicate just a single change?
It comes up more often than you'd think. For example, let's
go back in time and imagine that you haven't yet merged your
private feature-branch back to the trunk. At the
water cooler, you get word that Sally made an interesting
change to integer.c on the trunk.
Looking over the history of commits to the trunk, you see that
in revision 355 she fixed a critical bug that directly
impacts the feature you're working on. You might not be ready
to merge all the trunk changes to your branch just yet, but
you certainly need that particular bugfix in order to continue
your work.
$ svn diff -c 355 http://svn.example.com/repos/calc/trunk

Index: integer.c
===================================================================
--- integer.c	(revision 354)
+++ integer.c	(revision 355)
@@ -147,7 +147,7 @@
     case 6:  sprintf(info->operating_system, "HPFS (OS/2 or NT)"); break;
     case 7:  sprintf(info->operating_system, "Macintosh"); break;
     case 8:  sprintf(info->operating_system, "Z-System"); break;
-    case 9:  sprintf(info->operating_system, "CP/MM");
+    case 9:  sprintf(info->operating_system, "CP/M"); break;
     case 10:  sprintf(info->operating_system, "TOPS-20"); break;
     case 11:  sprintf(info->operating_system, "NTFS (Windows NT)"); break;
     case 12:  sprintf(info->operating_system, "QDOS"); break;
Just as you used svn diff in the prior example to examine revision 355, you can pass the same option to svn merge:
$ svn merge -c 355 http://svn.example.com/repos/calc/trunk
U    integer.c

$ svn status
M      integer.c
You can now go through the usual testing procedures before committing this change to your branch. After the commit, Subversion marks r355 as having been merged to the branch, so that future “magic” merges that synchronize your branch with the trunk know to skip over r355. (Merging the same change to the same branch almost always results in a conflict!)
$ cd my-calc-branch

$ svn propget svn:mergeinfo .
/trunk:341-349,355

# Notice that r355 isn't listed as "eligible" to merge, because
# it's already been merged.
$ svn mergeinfo http://svn.example.com/repos/calc/trunk --show-revs eligible
r350
r351
r352
r353
r354
r356
r357
r358
r359
r360

$ svn merge http://svn.example.com/repos/calc/trunk
--- Merging r350 through r354 into '.':
 U   .
U    integer.c
U    Makefile
--- Merging r356 through r360 into '.':
 U   .
U    integer.c
U    button.c
This use-case of replicating (or backporting) bugfixes from one branch to another is perhaps the most popular reason for cherrypicking changes; it comes up all the time, for example, when a team is maintaining a “release branch” of software. (We discuss this pattern in “发布分支”一节.)
警告
Did you notice how, in the last example, the merge invocation caused two distinct ranges of merges to be applied? The svn merge command applied two independent patches to your working copy in order to skip over changeset 355, which your branch already contained. There's nothing inherently wrong with this, except that it has the potential to make conflict resolution more tricky. If the first range of changes creates conflicts, you must resolve them interactively in order for the merge process to continue and apply the second range of changes. If you postpone a conflict from the first wave of changes, the whole merge command will bail out with an error message. [21]
A word of warning: while svn diff and svn merge are very similar in concept, they do have different syntax in many cases. Be sure to read about them in 第 9 章 Subversion 完全参考 for details, or ask svn help. For example, svn merge requires a working-copy path as a target, i.e., a place where it should apply the generated patch. If the target isn't specified, it assumes you are trying to perform one of the following common operations:
-
你希望合并目录修改到工作拷贝的当前目录。
-
You want to merge the changes in a specific file into a file by the same name that exists in your current working directory.
If you are merging a directory and haven't specified a target path, svn merge assumes the first case and tries to apply the changes into your current directory. If you are merging a file, and that file (or a file by the same name) exists in your current working directory, svn merge assumes the second case and tries to apply the changes to a local file with the same name.
You've now seen some examples of the svn merge command, and you're about to see several more. If you're feeling confused about exactly how merging works, you're not alone. Many users (especially those new to version control) are initially perplexed about the proper syntax of the command and about how and when the feature should be used. But fear not, this command is actually much simpler than you think! There's a very easy technique for understanding exactly how svn merge behaves.
迷惑的主要原因是这个命令的名称,术语“合并”不知什么原因被用来表明分支的组合,或者是其他什么神奇的数据混合,这不是事实,一个更好的名称应该是svn diff-and-apply,这是发生的所有事件:首先两个版本库树比较,然后将区别应用到本地拷贝。
If you're using svn merge to do basic copying of changes between branches, it will generally do the right thing automatically. For example, a command like the following:
$ svn merge http://svn.example.com/repos/calc/some-branch
will attempt to duplicate any changes made
on some-branch into your current working
directory, which is presumably a working copy that shares some
historical connection to the branch. The command is smart
enough to only duplicate changes that your working copy
doesn't yet have. If you repeat this command once a week, it
will only duplicate the “newest” branch changes
that happened since you last merged.
If you choose to use the svn merge command in all its full glory by giving it specific revision ranges to duplicate, then the command takes three main arguments:
-
An initial repository tree (often called the left side of the comparison)
-
A final repository tree (often called the right side of the comparison)
-
A working copy to accept the differences as local changes (often called the target of the merge)
Once these three arguments are specified, the two trees are compared, and the resulting differences are applied to the target working copy as local modifications. When the command is done, the results are no different than if you had hand-edited the files or run various svn add or svn delete commands yourself. If you like the results, you can commit them. If you don't like the results, you can simply svn revert all of the changes.
svn merge的语法允许非常灵活的指定三个必要的参数,如下是一些例子:
$ svn merge http://svn.example.com/repos/branch1@150 \
            http://svn.example.com/repos/branch2@212 \
            my-working-copy

$ svn merge -r 100:200 http://svn.example.com/repos/trunk my-working-copy

$ svn merge -r 100:200 http://svn.example.com/repos/trunk
第一种语法使用URL@REV的形式直接列出了所有参数,第二种语法可以用来作为比较同一个URL的不同版本的简略写法,最后一种语法表示工作拷贝是可选的,如果省略,默认是当前目录。
While the first example shows the “full”
syntax of svn merge, it needs to be used
very carefully; it can result in merges which do not record
any svn:mergeinfo metadata at all. The
next section talks a bit more about this.
Subversion tries to generate merge metadata whenever it
can, to make future invocations of svn
merge smarter. There are still situations, however,
where svn:mergeinfo data is not created or
changed. Remember to be a bit wary of these scenarios:
-
Merging unrelated sources. If you ask svn merge to compare two URLs that aren't related to each other, a patch will still be generated and applied to your working copy, but no merging metadata will be created. There's no common history between the two sources, and future “smart” merges depend on that common history.
-
Merging from foreign repositories. While it's possible to run a command such as svn merge -r 100:200 http://svn.foreignproject.com/repos/trunk, the resulting patch will also lack any historical merge metadata. At time of writing, Subversion has no way of representing different repository URLs within the
svn:mergeinfoproperty. -
Using
--ignore-ancestry. If this option is passed to svn merge, it causes the merging logic to mindlessly generate differences the same way that svn diff does, ignoring any historical relationships. We discuss this later in the chapter in “关注还是忽视祖先”一节. -
Applying reverse merges to a target's natural history. In a prior section (“取消修改”一节) we discussed how to use svn merge to apply a “reverse patch” as a way of rolling back changes. If this technique is used to undo a change to a object's personal history (e.g., commit r5 to the trunk, then immediately roll back r5 using svn merge -c -5), this sort of merge doesn't affect the recorded mergeinfo. [22]
就像svn update命令,svn merge会把修改应用到工作拷贝,因此它也会造成冲突,因为svn merge造成的冲突有时候会有些不同,本小节会解释这些区别。
作为开始,我们假定本地没有修改,当你svn update到一个特定修订版本时,修改会“干净的”应用到工作拷贝,服务器产生比较两树的增量数据:一个工作拷贝和你关注的版本树的虚拟快照,因为比较的左边同你拥有的完全相同,增量数据确保你把工作拷贝转化到右边的树。
But svn merge has no such guarantees and can be much more chaotic: the advanced user can ask the server to compare any two trees at all, even ones that are unrelated to the working copy! This means there's large potential for human error. Users will sometimes compare the wrong two trees, creating a delta that doesn't apply cleanly. svn merge will do its best to apply as much of the delta as possible, but some parts may be impossible. Just as the Unix patch command sometimes complains about “failed hunks,” svn merge will similarly complain about “skipped targets”:
$ svn merge -r 1288:1351 http://svn.example.com/repos/branch
U    foo.c
U    bar.c
Skipped missing target: 'baz.c'
U    glub.c
U    sputter.h

Conflict discovered in 'glorb.h'.
Select: (p) postpone, (df) diff-full, (e) edit,
        (h) help for more options:
In the previous example it might be the case that
baz.c exists in both snapshots of the
branch being compared, and the resulting delta wants to
change the file's contents, but the file doesn't exist in
the working copy. Whatever the case, the
“skipped” message means that the user is most
likely comparing the wrong two trees; they're the classic
sign of user error. When this happens, it's easy to
recursively revert all the changes created by the merge
(svn revert --recursive), delete any
unversioned files or directories left behind after the
revert, and rerun svn merge with
different arguments.
也应当注意前一个例子显示glorb.h发生了冲突,我们已经规定本地拷贝没有修改:冲突怎么会发生呢?因为用户可以使用svn merge将过去的任何变化应用到当前工作拷贝,变化包含的文本修改也许并不能干净的应用到工作拷贝文件,即使这些文件没有本地修改。
另一个svn update和svn merge的小区别是冲突产生的文件的名字不同,在“解决冲突(合并别人的修改)”一节,我们看到过更新产生的文件名字为filename.mine、filename.rOLDREV和filename.rNEWREV,当svn merge产生冲突时,它产生的三个文件分别为 filename.working、filename.left和filename.right。在这种情况下,术语“left”和“right”表示了两棵树比较时的两边,在两种情况下,不同的名字会帮助你区分冲突是因为更新造成的还是合并造成的。
Sometimes there's a particular changeset that you don't
want to be automatically merged. For example, perhaps your
team's policy is to do new development work on
/trunk, but to be more conservative about
backporting changes to a stable branch you use for releasing
to the public. On one extreme, you can manually cherrypick
single changesets from trunk to the branch—just the
changes that are stable enough to pass muster. Maybe things
aren't quite that strict, though; perhaps most of the time
you'd like to just let svn merge
automatically merge most changes from trunk to branch. In
this case, you'd like a way to mask a few specific changes
out, i.e. prevent them from ever being automatically
merged.
In Subversion 1.5, the only way to block a changeset is to
make the system believe that the change has
already been merged. To do this, one can
invoke a merge command with the --record-only
option:
$ cd my-calc-branch

$ svn propget svn:mergeinfo .
/trunk:1680-3305

# Let's make the metadata list r3328 as already merged.
$ svn merge -c 3328 --record-only http://svn.example.com/repos/calc/trunk

$ svn status
M     .

$ svn propget svn:mergeinfo .
/trunk:1680-3305,3328

$ svn commit -m "Block r3328 from being merged to the branch."
…
This technique works, but it's also a little bit dangerous. The main problem is that we're not clearly differentiating between the ideas of “I don't want this change” and “I don't have this change.” We're effectively lying to the system, making it think that the change was previously merged. This puts the responsibility on you—the user—to remember that the change wasn't actually merged, it just wasn't wanted. There's no way to ask Subversion for a list of “blocked changelists.” If you want to track them (so that you can unblock them someday.) you'll need to record them in a text file somewhere, or perhaps in an invented property. In Subversion 1.5, unfortunately, this is the only way to manage blocked revisions; the plans are to make a better interface for this in future versions.
One of the main features of any version control system is to keep track of who changed what, and when they did it. The svn log and svn blame commands are just the tools for this: when invoked on individual files, they show not only the history of changesets that affected the file, but exactly which user wrote which line of code, and when they did it.
When changes start getting replicated between branches, however, things start to get complicated. For example, if you were to ask svn log about the history of your feature branch, it shows exactly every revision that ever affected the branch:
$ cd my-calc-branch
$ svn log -q
------------------------------------------------------------------------
r390 | user | 2002-11-22 11:01:57 -0600 (Fri, 22 Nov 2002) | 1 line
------------------------------------------------------------------------
r388 | user | 2002-11-21 05:20:00 -0600 (Thu, 21 Nov 2002) | 2 lines
------------------------------------------------------------------------
r381 | user | 2002-11-20 15:07:06 -0600 (Wed, 20 Nov 2002) | 2 lines
------------------------------------------------------------------------
r359 | user | 2002-11-19 19:19:20 -0600 (Tue, 19 Nov 2002) | 2 lines
------------------------------------------------------------------------
r357 | user | 2002-11-15 14:29:52 -0600 (Fri, 15 Nov 2002) | 2 lines
------------------------------------------------------------------------
r343 | user | 2002-11-07 13:50:10 -0600 (Thu, 07 Nov 2002) | 2 lines
------------------------------------------------------------------------
r341 | user | 2002-11-03 07:17:16 -0600 (Sun, 03 Nov 2002) | 2 lines
------------------------------------------------------------------------
r303 | sally | 2002-10-29 21:14:35 -0600 (Tue, 29 Oct 2002) | 2 lines
------------------------------------------------------------------------
r98 | sally | 2002-02-22 15:35:29 -0600 (Fri, 22 Feb 2002) | 2 lines
------------------------------------------------------------------------
But is this really an accurate picture of all the changes that happened on the branch? What's being left out here is the fact that revisions 390, 381, and 357 were actually the results of merging changes from trunk. If you look at a one of these logs in detail, the multiple trunk changesets that comprised the branch change are nowhere to be seen.
$ svn log -v -r 390
------------------------------------------------------------------------
r390 | user | 2002-11-22 11:01:57 -0600 (Fri, 22 Nov 2002) | 1 line
Changed paths:
   M /branches/my-calc-branch/button.c
   M /branches/my-calc-branch/README

Final merge of trunk changes to my-calc-branch.
We happen to know that this merge to the branch was
nothing but a merge of trunk changes. How can we see those
trunk changes as well? The answer is to use the
--use-merge-history (-g)
option. This option expands those “child”
changes that were part of the merge.
$ svn log -v -r 390 -g
------------------------------------------------------------------------
r390 | user | 2002-11-22 11:01:57 -0600 (Fri, 22 Nov 2002) | 1 line
Changed paths:
   M /branches/my-calc-branch/button.c
   M /branches/my-calc-branch/README

Final merge of trunk changes to my-calc-branch.
------------------------------------------------------------------------
r383 | sally | 2002-11-21 03:19:00 -0600 (Thu, 21 Nov 2002) | 2 lines
Changed paths:
   M /branches/my-calc-branch/button.c
Merged via: r390

Fix inverse graphic error on button.
------------------------------------------------------------------------
r382 | sally | 2002-11-20 16:57:06 -0600 (Wed, 20 Nov 2002) | 2 lines
Changed paths:
   M /branches/my-calc-branch/README
Merged via: r390

Document my last fix in README.
By making the log operation use merge history, we see not just the revision we queried (r390), but the two revisions that came along on the ride with it—a couple of changes made by Sally to the trunk. This is a much more complete picture of history!
The svn blame command also takes the
--use-merge-history (-g)
option. If this option is neglected, then somebody looking at
a line-by-line annotation of button.c may
get the mistaken impression that you were responsible for the
lines that fixed a certain error:
$ svn blame button.c
…
   390    user    retval = inverse_func(button, path);
   390    user    return retval;
   390    user    }
…
And while it's true that you did actually commit those three lines in revision 390, two of them were actually written by Sally back in revision 383:
$ svn blame button.c -g
…
G    383    sally   retval = inverse_func(button, path);
G    383    sally   return retval;
     390    user    }
…
Now we know who to really blame for those two lines of code!
当与Subversion开发者交谈时你一定会听到提及术语祖先,这个词是用来描述两个对象的关系:如果他们互相关联,一个对象就是另一个的祖先,或者相反。
For example, suppose you commit revision 100, which
includes a change to a file foo.c.
Then foo.c@99 is an
“ancestor” of foo.c@100.
On the other hand, suppose you commit the deletion of
foo.c in revision 101, and then add a
new file by the same name in revision 102. In this case,
foo.c@99 and
foo.c@102 may appear to be related
(they have the same path), but in fact are completely
different objects in the repository. They share no history
or “ancestry.”
The reason for bringing this up is to point out an
important difference between svn diff and
svn merge. The former command ignores
ancestry, while the latter command is quite sensitive to it.
For example, if you asked svn diff to
compare revisions 99 and 102 of foo.c,
you would see line-based diffs; the diff
command is blindly comparing two paths. But if you asked
svn merge to compare the same two objects,
it would notice that they're unrelated and first attempt to
delete the old file, then add the new file; the output would
indicate a deletion followed by an add:
D    foo.c
A    foo.c
Most merges involve comparing trees that are ancestrally
related to one another; therefore, svn
merge defaults to this behavior. Occasionally,
however, you may want the merge command to
compare two unrelated trees. For example, you may have
imported two source-code trees representing different vendor
releases of a software project (see
“Vendor Branches”一节). If you ask
svn merge to compare the two trees, you'd
see the entire first tree being deleted, followed by an add
of the entire second tree! In these situations, you'll want
svn merge to do a path-based comparison
only, ignoring any relations between files and directories.
Add the --ignore-ancestry option to your
merge command, and it will behave just
like svn diff. (And conversely, the
--notice-ancestry option will cause
svn diff to behave like the
svn merge command.)
一个普遍的愿望是重构源程序,特别是Java软件项目。在改名中文件和目录变乱,通常导致每个项目成员的极大破坏。听起来好像应该使用分支,不是吗?只是创建分支,变乱事情,然后合并回主干,不对吗?
Alas, this scenario doesn't work so well right now and is considered one of Subversion's current weak spots. The problem is that Subversion's update command isn't as robust as it should be, particularly when dealing with copy and move operations.
When you use svn copy to duplicate a file, the repository remembers where the new file came from, but it fails to transmit that information to the client which is running svn update or svn merge. Instead of telling the client, “Copy that file you already have to this new location,” it instead sends down an entirely new file. This can lead to problems, especially because the same thing happens with renamed files. A lesser-known fact about Subversion is that it lacks “true renames”—the svn move command is nothing more than an aggregation of svn copy and svn delete.
例如,假定我们在一个私有分支工作,你将integer.c改名为whole.c,你这是在分支上创建了原来文件的一个拷贝,并且删除了原来的文件。同时,回到trunk,Sally提交了一些integer.c的修改,所以你需要将分支合并到主干:
$ cd calc/trunk

$ svn merge --reintegrate http://svn.example.com/repos/calc/branches/my-calc-branch
--- Merging differences between repository URLs into '.':
D   integer.c
A   whole.c
U   .
This doesn't look so bad at first glance, but it's also
probably not what you or Sally expected. The merge operation
has deleted the latest version of
the integer.c file (the one containing
Sally's latest changes), and blindly added your
new whole.c file—which is a
duplicate of the older version
of integer.c. The net effect is that
merging your “rename” to the branch has removed
Sally's recent changes from the latest revision!
This isn't true data loss; Sally's changes are still in the repository's history, but it may not be immediately obvious that this has happened. The moral of this story is that until Subversion improves, be very careful about merging copies and renames from one branch to another.
If you've just upgraded your server to Subversion 1.5 or
later, then there's a significant risk that pre-1.5 Subversion
clients can mess up your automated merge tracking. Why is
this? When a pre-1.5 Subversion client performs svn
merge, it doesn't modify the value of
the svn:mergeinfo property at all. So the
subsequent commit, despite being the result of a merge,
doesn't tell the repository about the duplicated
changes—that information is lost. Later on,
when “merge-aware” clients attempt automatic
merging, they're likely to run into all sorts of conflicts
resulting from repeated merges.
If you and your team are relying on the merge-tracking
features of Subversion, then you may want to configure your
repository to prevent older clients from committing changes.
The easy way to do this is by inspecting
the “capabilities” parameter in
the start-commit hook script. If the
client reports itself as having mergeinfo
capabilities, the hook script can allow the commit to start.
If the client doesn't report that capability, have the hook
deny the commit. We'll learn more about hook scripts in the
next chapter; see
“实现版本库钩子”一节 and
start-commit for
details.
svn switch命令改变存在的工作拷贝到另一个分支,然而这个命令在分支上工作时不是严格必要的,它只是提供了一个快捷方式。在前面的例子里,完成了私有分支的建立,你取出了新目录的工作拷贝,相反,你可以简单的告诉Subversion改变你的/calc/trunk的工作拷贝到分支的路径:
$ cd calc

$ svn info | grep URL
URL: http://svn.example.com/repos/calc/trunk

$ svn switch http://svn.example.com/repos/calc/branches/my-calc-branch
U   integer.c
U   button.c
U   Makefile
Updated to revision 341.

$ svn info | grep URL
URL: http://svn.example.com/repos/calc/branches/my-calc-branch
After “switching” to the branch, your working copy is no different than what you would get from doing a fresh checkout of the directory. And it's usually more efficient to use this command, because often branches differ only by a small degree. The server sends only the minimal set of changes necessary to make your working copy reflect the branch directory.
svn switch命令也可以带--revision(-r)参数,所以你不需要一直移动你的工作拷贝到分支的HEAD。
Of course, most projects are more complicated than our
calc example, and contain multiple
subdirectories. Subversion users often follow a specific
algorithm when using branches:
-
拷贝整个项目的“trunk”目录到一个新的分支目录。
-
只是转换工作拷贝的部分目录到分支。
In other words, if a user knows that the branch-work needs only to happen on a specific subdirectory, they use svn switch to move only that subdirectory to the branch. (Or sometimes users will switch just a single working file to the branch!) That way, they can continue to receive normal “trunk” updates to most of their working copy, but the switched portions will remain immune (unless someone commits a change to their branch). This feature adds a whole new dimension to the concept of a “mixed working copy”—not only can working copies contain a mixture of working revisions, but a mixture of repository locations as well.
如果你的工作拷贝包含许多来自不同版本库目录跳转的子树,它会工作如常。当你更新时,你会得到每一个目录适当的补丁,当你提交时,你的本地修改会一直作为一个单独的原子修改提交到版本库。
注意,因为你的工作拷贝可以在混合位置的情况下工作正常,但是所有的位置必须在同一个版本库,Subversion的版本库不能互相通信,这个特性还不在Subversion未来的计划里。
Because svn switch is essentially a variant of svn update, it shares the same behaviors; any local modifications in your working copy are preserved when new data arrives from the repository.
提示
Have you ever found yourself making some complex edits
(in your /trunk working copy) and
suddenly realized, “Hey, these changes ought to be in
their own branch?” A great technique to do this can
be summarized in two steps:
$ svn copy http://svn.example.com/repos/calc/trunk \
           http://svn.example.com/repos/calc/branches/newbranch \
      -m "Create branch 'newbranch'."
Committed revision 353.
$ svn switch http://svn.example.com/repos/calc/branches/newbranch
At revision 353.
就像svn update命令,svn switch会保留工作拷贝的本地修改,此刻,你的工作拷贝反映到新建的分支上,而你的下一次svn commit会发送修改到服务器。
另一个常见的版本控制系统概念是标¾(tag),一个标签只是一个项目某一时间的“快照”,在Subversion里这个概念无处不在—每一次提交的修订版本都是一个精确的快照。
However, people often want to give more human-friendly names
to tags, such as release-1.0. And they want
to make snapshots of smaller subdirectories of the filesystem.
After all, it's not so easy to remember that release 1.0 of a
piece of software is a particular subdirectory of revision
4822.
svn copy再次登场,你希望建立一个/calc/trunk的一个快照,就像HEAD修订版本,建立这样一个拷贝:
$ svn copy http://svn.example.com/repos/calc/trunk \
           http://svn.example.com/repos/calc/tags/release-1.0 \
      -m "Tagging the 1.0 release of the 'calc' project."

Committed revision 902.
This example assumes that a
/calc/tags directory already exists. (If
it doesn't, you can create it using svn
mkdir.) After the copy completes, the new
release-1.0 directory is forever a
snapshot of how the /trunk directory
looked in the HEAD revision at the time you
made the copy. Of course you might want to be more precise
about exactly which revision you copy, in case somebody else
may have committed changes to the project when you weren't
looking. So if you know that revision 901 of
/calc/trunk is exactly the snapshot you
want, you can specify it by passing -r 901 to
the svn copy command.
但是等一下:标签的产生过程与建立分支是一样的?是的,实际上在Subversion中标签与分支没有区别,都是普通的目录,通过copy命令得到,与分支一样,一个目录之所以是标签只是人们决定这样使用它,只要没有人提交这个目录,它永远是一个快照,但如果人们开始提交,它就变成了分支。
If you are administering a repository, there are two approaches you can take to managing tags. The first approach is “hands off”: as a matter of project policy, decide where your tags will live, and make sure all users know how to treat the directories they copy. (That is, make sure they know not to commit to them.) The second approach is more paranoid: you can use one of the access-control scripts provided with Subversion to prevent anyone from doing anything but creating new copies in the tags area (see 第 6 章 服务配置). The paranoid approach, however, isn't usually necessary. If a user accidentally commits a change to a tag directory, you can simply undo the change as discussed in the previous section. This is version control, after all!
有时候你希望你的“快照”能够很复杂,而不只是一个单独修订版本的一个单独目录。
For example, pretend your project is much larger than our
calc example: suppose it contains a
number of subdirectories and many more files. In the course
of your work, you may decide that you need to create a working
copy that is designed to have specific features and bug fixes.
You can accomplish this by selectively backdating files or
directories to particular revisions (using svn update
-r liberally), by switching files and directories to
particular branches (making use of svn
switch), or even just by making a bunch of local
changes. When you're done, your working copy is a hodgepodge
of repository locations from different revisions. But after
testing, you know it's the precise combination of data you
need to tag.
是时候进行快照了,拷贝URL在这里不能工作,在这个例子里,你希望把本地拷贝的布局做镜像并且保存到版本库中,幸运的是,svn copy包括四种不同的使用方式(在第 9 章 Subversion 完全参考可以详细阅读),包括拷贝工作拷贝到版本库:
$ ls
my-working-copy/

$ svn copy my-working-copy \
           http://svn.example.com/repos/calc/tags/mytag \
           -m "Tag my existing working copy state."

Committed revision 940.
Now there is a new directory in the repository,
/calc/tags/mytag, which is an exact
snapshot of your working copy—mixed revisions, URLs,
local changes and all.
Other users have found interesting uses for this feature. Sometimes there are situations where you have a bunch of local changes made to your working copy, and you'd like a collaborator to see them. Instead of running svn diff and sending a patch file (which won't capture directory, symlink, or property changes), you can instead use svn copy to “upload” your working copy to a private area of the repository. Your collaborator can then either check out a verbatim copy of your working copy or use svn merge to receive your exact changes.
虽然这是上传快速工作拷贝快照的一个好方法,但这不是初始创建分支的好方法。分支创建必须是它本身的事件,而这个方法创建的分支包含了额外修改,都包含在一个单独修订版本里。这让我们很难识别分支点的单个修订版本号码。
你一定注意到了Subversion极度的灵活性,因为它用相同的底层机制(目录拷贝)实现了分支和标签,因为分支和标签是作为普通的文件系统出现,会让人们感到害怕,因为它太灵活了,在这个小节里,我们会提供安排和管理数据的一些建议。
有一些标准的,推荐的组织版本库的方式,许多人创建一个trunk目录来保存开发的“主线”,一个branches目录存放分支拷贝,一个tags目录保存标签拷贝,如果一个版本库只是存放一个项目,人们会在顶级目录创建这些目录:
/trunk
/branches
/tags
如果一个版本库保存了多个项目,管理员会通过项目来布局(见“规划你的版本库结构”一节关于“项目根目录”):
/paint/trunk
/paint/branches
/paint/tags
/calc/trunk
/calc/branches
/calc/tags
当然,你可以自由的忽略这些通常的布局方式,你可以创建任意的变化,只要是对你和你的项目有益,记住无论你选择什么,这不会是一种永久的承诺,你可以随时重新组织你的版本库。因为分支和标签都是普通的目录,svn move命令可以任意的改名和移动它们,从一种布局到另一种大概只是一系列服务器端的移动,如果你不喜欢版本库的组织方式,你可以任意修改目录结构。
记住,尽管移动目录非常容易,你必须体谅你的用户,你的修改会让你的用户感到迷惑,如果一个用户的拥有一个版本库目录的工作拷贝,你的svn move命令也许会删除最新的版本的这个路径,当用户运行svn update,会被告知这个工作拷贝引用的路径已经不再存在,用户需要强制使用svn switch转到新的位置。
另一个Subversion模型的可爱特性是分支和标签可以有有限的生命周期,就像其它的版本化的项目,举个例子,假定你最终完成了calc项目你的个人分支上的所有工作,在合并了你的所有修改到/calc/trunk后,没有必要继续保留你的私有分支目录:
$ svn delete http://svn.example.com/repos/calc/branches/my-calc-branch \
             -m "Removing obsolete branch of calc project."

Committed revision 375.
你的分支已经消失了,当然不是真的消失了:这个目录只是在HEAD修订版本里消失了,如果你使用svn checkout、svn switch或者svn list来检查一个旧的版本,你仍会见到这个旧的分支。
If browsing your deleted directory isn't enough, you can
always bring it back. Resurrecting data is very easy in
Subversion. If there's a deleted directory (or file) that
you'd like to bring back into HEAD, simply
use svn copy to copy it from the old
revision:
$ svn copy http://svn.example.com/repos/calc/branches/my-calc-branch@374 \
           http://svn.example.com/repos/calc/branches/my-calc-branch \
           -m "Restore my-calc-branch."

Committed revision 376.
In our example, your personal branch had a relatively
short lifetime: you may have created it to fix a bug or
implement a new feature. When your task is done, so is the
branch. In software development, though, it's also common to
have two “main” branches running side by side for
very long periods. For example, suppose it's time to release
a stable version of the calc project to the
public, and you know it's going to take a couple of months to
shake bugs out of the software. You don't want people to add
new features to the project, but you don't want to tell all
developers to stop programming either. So instead, you create
a “stable” branch of the software that won't
change much:
$ svn copy http://svn.example.com/repos/calc/trunk \
           http://svn.example.com/repos/calc/branches/stable-1.0 \
          -m "Creating stable branch of calc project."

Committed revision 377.
And now developers are free to continue adding
cutting-edge (or experimental) features to
/calc/trunk, and you can declare a
project policy that only bug fixes are to be committed to
/calc/branches/stable-1.0. That is, as
people continue to work on the trunk, a human selectively
ports bug fixes over to the stable branch. Even after the
stable branch has shipped, you'll probably continue to
maintain the branch for a long time—that is, as long
as you continue to support that release for customers. We'll
discuss this more in the next section.
There are many different uses for branching and svn merge, and this section describes the most common.
版本控制在软件开发中广泛使用,这里是团队里程序员最常用的两种分支/合并模式的介绍,如果你不是使用Subversion软件开发,可随意跳过本小节,如果你是第一次使用版本控制的软件开发者,请更加注意,以下模式被许多老兵当作最佳实践,这个过程并不只是针对Subversion,在任何版本控制系统中都一样,但是在这里使用Subversion术语会感觉更方便一点。
Most software has a typical lifecycle: code, test, release, repeat. There are two problems with this process. First, developers need to keep writing new features while quality-assurance teams take time to test supposedly stable versions of the software. New work cannot halt while the software is tested. Second, the team almost always needs to support older, released versions of software; if a bug is discovered in the latest code, it most likely exists in released versions as well, and customers will want to get that bugfix without having to wait for a major new release.
这是版本控制可以做的帮助,典型的过程如下:
-
开发者提交所有的新特性到主干。 每日的修改提交到
/trunk:新特性,bug修正和其他。 -
这个主干被拷贝到“发布”分支。 当小组认为软件已经做好发布的准备(如,版本1.0)然后
/trunk会被拷贝到/branches/1.0。 -
项目组继续并行工作,一个小组开始对分支进行严酷的测试,同时另一个小组在
/trunk继续新的工作(如,准备2.0),如果一个bug在任何一个位置被发现,错误修正需要来回运送。然而这个过程有时候也会结束,例如分支已经为发布前的最终测试“停滞”了。 -
分支已经作了标签并且发布,当测试结束,
/branches/1.0作为引用快照已经拷贝到/tags/1.0.0,这个标签被打包发布给客户。 -
分支多次维护。当继续在
/trunk上为版本2.0工作,bug修正继续从/trunk运送到/branches/1.0,如果积累了足够的bug修正,管理部门决定发布1.0.1版本:拷贝/branches/1.0到/tags/1.0.1,标签被打包发布。
整个过程随着软件的成熟不断重复:当2.0完成,一个新的2.0分支被创建,测试、打标签和最终发布,经过许多年,版本库结束了许多版本发布,进入了“维护”模式,许多标签代表了最终的发布版本。
A feature branch is the sort of
branch that's been the dominant example in this chapter (the
one you've been working on while Sally continues to work on
/trunk). It's a temporary branch created
to work on a complex change without interfering with the
stability of /trunk. Unlike release
branches (which may need to be supported forever), feature
branches are born, used for a while, merged back to the trunk,
then ultimately deleted. They have a finite span of
usefulness.
Again, project policies vary widely concerning exactly
when it's appropriate to create a feature branch. Some
projects never use feature branches at all: commits to
/trunk are a free-for-all. The
advantage to this system is that it's simple—nobody
needs to learn about branching or merging. The disadvantage
is that the trunk code is often unstable or unusable. Other
projects use branches to an extreme: no change is
ever committed to the trunk directly.
Even the most trivial changes are created on a short-lived
branch, carefully reviewed, and merged to the trunk. Then
the branch is deleted. This system guarantees an
exceptionally stable and usable trunk at all times, but at
the cost of tremendous process overhead.
Most projects take a middle-of-the-road approach. They
commonly insist that /trunk compile and
pass regression tests at all times. A feature branch is
only required when a change requires a large number of
destabilizing commits. A good rule of thumb is to ask this
question: if the developer worked for days in isolation and
then committed the large change all at once (so that
/trunk were never destabilized), would it
be too large a change to review? If the answer to that
question is “yes,” then the change should be
developed on a feature branch. As the developer commits
incremental changes to the branch, they can be easily reviewed
by peers.
最终,有一个问题就是怎样保持一个特性分支“同步”于工作中的主干,在前面提到过,在一个分支上工作数周或几个月是很有风险的,主干的修改也许会持续涌入,因为这一点,两条线的开发会区别巨大,合并分支回到主干会成为一个噩梦。
This situation is best avoided by regularly merging trunk changes to the branch. Make up a policy: once a week, merge the last week's worth of trunk changes to the branch.
At some point, you'll be ready to merge the
“synchronized” feature branch back to the trunk.
To do this, begin by doing a final merge of the latest trunk
changes to the branch. When that's done, the latest versions
of branch and trunk will be absolutely identical except for
your branch changes. You would then merge back with
the --reintegrate option:
$ cd trunk-working-copy

$ svn update
At revision 1910.

$ svn merge --reintegrate http://svn.example.com/repos/calc/branches/mybranch
--- Merging differences between repository URLs into '.':
U    real.c
U    integer.c
A    newdirectory
A    newdirectory/newfile
 U   .
…
可以用另一种考虑这种模式,你每周按时同步分支到主干,类似于在工作拷贝执行svn update的命令,最终的合并操作类似于在工作拷贝运行svn commit,毕竟,工作拷贝不就是一个非常浅的分支吗?只是它一次只可以保存一个修改。
As is especially the case when developing software, the data that you maintain under version control is often closely related to, or perhaps dependent upon, someone else's data. Generally, the needs of your project will dictate that you stay as up to date as possible with the data provided by that external entity without sacrificing the stability of your own project. This scenario plays itself out all the time—anywhere that the information generated by one group of people has a direct effect on that which is generated by another group.
For example, software developers might be working on an application that makes use of a third-party library. Subversion has just such a relationship with the Apache Portable Runtime library (see “Apache可移植运行库”一节). The Subversion source code depends on the APR library for all its portability needs. In earlier stages of Subversion's development, the project closely tracked APR's changing API, always sticking to the “bleeding edge” of the library's code churn. Now that both APR and Subversion have matured, Subversion attempts to synchronize with APR's library API only at well-tested, stable release points.
现在,如果你的项目依赖于其他人的信息,有许多方法可以用来尝试同步你的信息,最痛苦的,你可以为项目所有的贡献者发布口头或书写的指导,告诉他们确信他们拥有你们的项目需要的特定版本的第三方信息。如果第三方信息是用Subversion版本库维护,你可以使用Subversion的外部定义来有效的“强制”特定的版本的信息在你的工作拷贝的的位置(见“外部定义”一节)。
But sometimes you want to maintain custom modifications to third-party code in your own version control system. Returning to the software development example, programmers might need to make modifications to that third-party library for their own purposes. These modifications might include new functionality or bug fixes, maintained internally only until they become part of an official release of the third-party library. Or the changes might never be relayed back to the library maintainers, existing solely as custom tweaks to make the library further suit the needs of the software developers.
Now you face an interesting situation. Your project could house its custom modifications to the third-party data in some disjointed fashion, such as using patch files or full-fledged alternate versions of files and directories. But these quickly become maintenance headaches, requiring some mechanism by which to apply your custom changes to the third-party code and necessitating regeneration of those changes with each successive version of the third-party code that you track.
这个问题的解决方案是使用供方分支,一个供方分支是一个目录树保存了第三方实体或供应方的信息,每一个供应方数据的版本吸收到你的项目叫做供方drop。
供方分支提供了两个关键的益处,第一,通过在我们的版本控制系统保存现在支持的供方drop,你项目的成员不需要指导他们是否有了正确版本的供方数据,他们只需要作为不同工作拷贝更新的一部份,简单的接受正确的版本就可以了。第二,因为数据存在于你自己的Subversion版本库,你可以在恰当的位置保存你的自定义修改—你不需要一个自动的(或者是更坏,手工的)方法来交换你的自定义行为。
Managing vendor branches generally works like this: first,
you create a top-level directory (such as
/vendor) to hold the vendor branches.
Then you import the third-party code into a subdirectory of
that top-level directory. You then copy that subdirectory
into your main development branch (for example,
/trunk) at the appropriate location. You
always make your local changes in the main development branch.
With each new release of the code you are tracking, you bring
it into the vendor branch and merge the changes into
/trunk, resolving whatever conflicts
occur between your local changes and the upstream
changes.
An example will help to clarify this algorithm. We'll use
a scenario where your development team is creating a
calculator program that links against a third-party complex
number arithmetic library, libcomplex. We'll begin with the
initial creation of the vendor branch and the import of the
first vendor drop. We'll call our vendor branch directory
libcomplex, and our code drops will go
into a subdirectory of our vendor branch called
current. And since svn
import creates all the intermediate parent
directories it needs, we can actually accomplish both of these
steps with a single command:
$ svn import /path/to/libcomplex-1.0 \
             http://svn.example.com/repos/vendor/libcomplex/current \
             -m 'importing initial 1.0 vendor drop'
…
We now have the current version of the libcomplex source
code in /vendor/libcomplex/current. Now,
we tag that version (see “标签”一节)
and then copy it into the main development branch. Our copy
will create a new directory called
libcomplex in our existing
calc project directory. It is in this
copied version of the vendor data that we will make our
customizations:
$ svn copy http://svn.example.com/repos/vendor/libcomplex/current  \
           http://svn.example.com/repos/vendor/libcomplex/1.0      \
           -m 'tagging libcomplex-1.0'
…
$ svn copy http://svn.example.com/repos/vendor/libcomplex/1.0  \
           http://svn.example.com/repos/calc/libcomplex        \
           -m 'bringing libcomplex-1.0 into the main branch'
…
我们取出我们项目的主分支—现在包括了第一个供方释放的拷贝—我们开始自定义libcomplex的代码,在我们知道之前,我们的libcomplex修改版本是已经与我们的计算器程序完全集成了。 [23]
几周之后,libcomplex得开发者发布了一个新的版本—版本1.1—包括了我们很需要的一些特性和功能。我们很希望升级到这个版本,但不希望失去在当前版本所作的修改。我们本质上会希望把我们当前基线版本是的libcomplex1.0的拷贝替换为libcomplex 1.1,然后把前面自定义的修改应用到新的版本。但是实际上我们通过一个相反的方向解决这个问题,应用libcomplex从版本1.0到1.1的修改到我们修改的拷贝。
To perform this upgrade, we check out a copy of our vendor
branch and replace the code in the
current directory with the new libcomplex
1.1 source code. We quite literally copy new files on top of
existing files, perhaps exploding the libcomplex 1.1 release
tarball atop our existing files and directories. The goal
here is to make our current directory
contain only the libcomplex 1.1 code and to ensure that all
that code is under version control. Oh, and we want to do
this with as little version control history disturbance as
possible.
After replacing the 1.0 code with 1.1 code, svn
status will show files with local modifications as
well as, perhaps, some unversioned files. If we did what we
were supposed to do, the unversioned files are only those new
files introduced in the 1.1 release of libcomplex—we
run svn add on those to get them under
version control. If the 1.1 code no longer has certain files
that were in the 1.0 tree, it may be hard to notice them;
you'd have to compare the two trees with some external tool
and then svn delete any files present in
1.0 but not in 1.1. (Although it might also be just fine to
let these same files live on in unused obscurity!) Finally,
once our current working copy contains
only the libcomplex 1.1 code, we commit the changes we made to
get it looking that way.
Our current branch now contains the
new vendor drop. We tag the new version as 1.1 (in the same
way we previously tagged the version 1.0 vendor drop), and
then merge the differences between the tag of the previous
version and the new current version into our main development
branch:
$ cd working-copies/calc
$ svn merge http://svn.example.com/repos/vendor/libcomplex/1.0      \
            http://svn.example.com/repos/vendor/libcomplex/current  \
            libcomplex
… # resolve all the conflicts between their changes and our changes
$ svn commit -m 'merging libcomplex-1.1 into the main branch'
…
In the trivial use case, the new version of our third-party tool would look, from a files-and-directories point of view, just like the previous version. None of the libcomplex source files would have been deleted, renamed, or moved to different locations—the new version would contain only textual modifications against the previous one. In a perfect world, our modifications would apply cleanly to the new version of the library, with absolutely no complications or conflicts.
But things aren't always that simple, and in fact it is quite common for source files to get moved around between releases of software. This complicates the process of ensuring that our modifications are still valid for the new version of code, and things can quickly degrade into a situation where we have to manually recreate our customizations in the new version. Once Subversion knows about the history of a given source file—including all its previous locations—the process of merging in the new version of the library is pretty simple. But we are responsible for telling Subversion how the source file layout changed from vendor drop to vendor drop.
Vendor drops that contain more than a few deletes, additions, and moves complicate the process of upgrading to each successive version of the third-party data. So Subversion supplies the svn_load_dirs.pl script to assist with this process. This script automates the importing steps we mentioned in the general vendor branch management procedure to make sure that mistakes are minimized. You will still be responsible for using the merge commands to merge the new versions of the third-party data into your main development branch, but svn_load_dirs.pl can help you more quickly and easily arrive at that stage.
一句话,svn_load_dirs.pl是一个增强的svn import,具备了许多重要的特性:
-
它可以在任何有一个存在的版本库目录与一个外部的目录匹配时执行,会执行所有必要的添加和删除并且可以选则执行移动。
-
它可以用来操作一系列复杂的操作,如那些需要一个中间媒介的提交—如在操作之前重命名一个文件或者目录两次。
-
它可以随意的为新导入目录打上标签。
-
它可以随意为符合正则表达式的文件和目录添加任意的属性。
svn_load_dirs.pl利用三个强制的参数,第一个参数是Subversion工作的基本目录URL,第二个参数在URL之后—相对于第一个参数—指向当前的供方分支将会导入的目录,最后,第三个参数是一个需要导入的本地目录,使用前面的例子,一个典型的svn_load_dirs.pl调用看起来如下:
$ svn_load_dirs.pl http://svn.example.com/repos/vendor/libcomplex \
                   current                                        \
                   /path/to/libcomplex-1.1
…
你可以说明你会希望svn_load_dirs.pl同时打上标签,这使用-t命令行选项,需要指定一个标签名,这个标签是第一个参数的一个相对URL。
$ svn_load_dirs.pl -t libcomplex-1.1                              \
                   http://svn.example.com/repos/vendor/libcomplex \
                   current                                        \
                   /path/to/libcomplex-1.1
…
When you run svn_load_dirs.pl, it
examines the contents of your existing “current”
vendor drop and compares them with the proposed new vendor
drop. In the trivial case, there will be no files that are in
one version and not the other, and the script will perform the
new import without incident. If, however, there are
discrepancies in the file layouts between versions,
svn_load_dirs.pl will ask you how
to resolve those differences. For example, you
will have the opportunity to tell the script that you know
that the file math.c in version 1.0 of
libcomplex was renamed to arithmetic.c in
libcomplex 1.1. Any discrepancies not explained by moves
are treated as regular additions and deletions.
这个脚本也接受单独配置文件用来为添加到版本库的文件和目录设置匹配正则表达式的属性。配置文件通过svn_load_dirs.pl的-p命令行选项指定,这个配置文件的每一行都是一个空白分割的两列或者四列值:一个Perl样式的正则表达式来匹配添加的路径、一个控制关键字(break或者是cont)和可选的属性名和值。
\.png$              break   svn:mime-type   image/png
\.jpe?g$            break   svn:mime-type   image/jpeg
\.m3u$              cont    svn:mime-type   audio/x-mpegurl
\.m3u$              break   svn:eol-style   LF
.*                  break   svn:eol-style   native
对每一个添加的路径,会按照顺序为匹配正则表达式的文件配置属性,除非控制标志是break(意味着不需要更多的路径匹配应用到这个路径)。如果控制说明是cont—continue的缩写—然后匹配工作会继续到配置文件的下一行。
任何正则表达式,属性名或者属性值的空格必须使用单引号或者双引号环绕,你可以使用反斜杠(\)换码符来回避引号,反斜杠只会在解析配置文件时回避引号,所以不能保护必要正则表达式字符之外的的其它字符。
We've covered a lot of ground in this chapter. We've discussed the concepts of tags and branches and demonstrated how Subversion implements these concepts by copying directories with the svn copy command. We've shown how to use svn merge to copy changes from one branch to another or roll back bad changes. We've gone over the use of svn switch to create mixed-location working copies. And we've talked about how one might manage the organization and lifetimes of branches in a repository.
Remember the Subversion mantra: branches and tags are cheap. So don't be afraid to use them when needed!
As a helpful reminder of all the operations we've discussed, the following table is a handy reference that you can consult as you begin to make use of branches.
表 4.1.
| Action | Command |
|---|---|
| Create a branch or tag | svn copy URL1 URL2 |
| Switch a working copy to a branch or tag | svn switch URL |
| Synchronize a branch with trunk | svn merge trunkURL; svn commit |
| See merge history or eligible changesets | svn mergeinfo target [--from-source=URL] |
| Merge a branch back into trunk | svn merge --reintegrate branchURL; svn commit |
| Merge one specific change | svn merge -c REV URL; svn commit |
| Merge a range of changes | svn merge -r REV1:REV2 URL; svn commit |
| Block a change from automatic merging | svn merge -c REV --record-only URL; svn commit |
| Preview a merge | svn merge URL --dry-run |
| Abandon merge results | svn revert -R . |
| Resurrect something from history | svn copy URL@REV local-path |
| Undo a committed change | svn merge -c -REV URL; svn commit |
| Examine merge-sensitive history | svn log -g; svn blame -g |
| Create a tag from a working copy | svn copy . tagURL |
| Rearrange a branch or tag | svn mv URL1 URL2 |
| Remove a branch or tag | svn rm URL |
[19] Subversion不支持跨版本库的拷贝,当使用svn copy或者svn move直接操作URL时你只能在同一个版本库内操作。
[20] Subversion项目有计划,不管用什么方式,会有一天要实现svnadmin obliterate命令来进行永久删除操作,而此时可以看“svndumpfilter”一节找到可行的方案。
[21] At least, this is true in Subversion 1.5 at the time of writing. This behavior may improve in future versions of Subversion.
[22] Interestingly, after rolling back a
revision like this, we wouldn't be able to re-apply
the revision using svn merge -c 5,
since the mergeinfo would already list r5 as being
applied. We would have to use
the --ignore-ancestry option to make
the merge command ignore the existing
mergeinfo!
[23] 而且完全没有bug,当然!
目录
The Subversion repository is the central storehouse of all your versioned data. As such, it becomes an obvious candidate for all the love and attention an administrator can offer. While the repository is generally a low-maintenance item, it is important to understand how to properly configure and care for it so that potential problems are avoided, and so actual problems are safely resolved.
In this chapter, we'll discuss how to create and configure a Subversion repository. We'll also talk about repository maintenance, providing examples of how and when to use the svnlook and svnadmin tools provided with Subversion. We'll address some common questions and mistakes and give some suggestions on how to arrange the data in the repository.
如果您只是以普通用户的身份访问版本库对数据进行版本控制(就是说通过Subversion客户端),您完全可以跳过本章。但是如果您已经是或打算成为Subversion版本库的管理员,[24]您一定要关注一下本章的内容。
在进入版本库管理这块宽泛的主题之前,让我们进一步确定一下版本库的定义,它是怎样工作的?让人有什么感觉?它希望茶是热的还是冰的,加糖或柠檬吗?作为一名管理员,你应该既能够从物理具体细节的视角-版本库如何响应一个非Subversion的工具,也能够从逻辑视角-数据在版本库中如何展示。
通过典型的文件浏览器应用程序或命令行为基础的文件系统浏览工具查看,Subversion版本库只是另一个目录。也有一些子目录下包含可读的数据文件,也有一些子目录包含不可读的数据文件。Subversion设计的其他地方,模块化被认真考虑,等级化的组织可以减少混乱,所以脱离细节粗略看一下典型的版本库可以有效地揭示版本库的基本组件。
$ ls repos
conf/  dav/  db/  format  hooks/  locks/  README.txt
下面是一个你看到列出目录的快速总揽。(不要因为术语陷入困境—这些组件的细节介绍可以从本章或其他章节找到。)
- conf
-
A directory containing configuration files.
- dav
-
A directory provided to
mod_dav_svnfor its private housekeeping data. - db
-
你的版本化数据的数据存储方式。
- format
-
包含了一个用来表示版本库布局版本号整数的文件。
- hooks
-
一个存储钩子脚本模版的目录(还有钩子脚本本身, 如果你安装了的话)。
- locks
-
一个存储Subversion版本库锁定文件的目录,被用来追踪对版本库的访问。
- README.txt
-
这个文件只是用来告诉它的阅读者,他现在看的是 Subversion 的版本库。
当然,当通过Subversion库访问时,这些平常的文件和目录立刻变成了虚拟文件系统的实现,由自定义的事件触发完成。这个文件系统的目录和文件都有自己的概念,与真实的文件系统(例如NTFS、FAT32、ext3等等)很类似,但是也有特别的地方—它在修订版本间锁定目录和文件,保持你的所有修改可以永远访问的,这是你的所有版本化数据存放的地方。
Due largely to the simplicity of the overall design of the Subversion repository and the technologies on which it relies, creating and configuring a repository are fairly straightforward tasks. There are a few preliminary decisions you'll want to make, but the actual work involved in any given setup of a Subversion repository is pretty basic, tending towards mindless repetition if you find yourself setting up multiples of these things.
下面是一些你需要预先考虑的事情:
-
你的版本库将要存放什么数据(或多个版本库),这些数据如何组织?
-
版本库存放在哪里,如何被访问?
-
你需要什么类型的访问控制和版本库事件报告?
-
你希望使用哪种数据存储方式?
在本节,我们要尝试帮你回答这些问题。
在Subversion版本库中,移动版本化的文件和目录不会损失任何信息,甚至也可以将版本库的的一组数据无损历史的移植到另一个版本库,但是这样一来那些经常访问版本库并且以为文件总是在同一个路径的用户可能会受到干扰。为将来着想,最好预先对你的版本库布局进行规划。以一种高效的“布局”开始项目,可以减少将来很多不必要的麻烦。
假如你是一个版本库管理员,需要向多个项目提供版本控制支持。那么,你首先要决定的是,用一个版本库支持多个项目,还是为每个项目建立一个版本库,还是两种方法的混合方式。
There are benefits to using a single repository for multiple projects, most obviously the lack of duplicated maintenance. A single repository means that there is one set of hook programs, one thing to routinely back up, one thing to dump and load if Subversion releases an incompatible new version, and so on. Also, you can move data between projects easily, without losing any historical versioning information.
单一版本库的缺点是,不同的项目通常都有不同的版本库触发事件需求,例如需要发送提交通知邮件到不同的邮件列表,需要不同的鉴定提交是否合法的定义。这些都不是不可逾越的问题,当然—之需要你的钩子程序能够察看版本库的布局,而不是假定整个版本库与同一组人关联。还有,别忘了Subversion的修订版本号是针对整个版本库的,这些号码没有任何魔力。即使最近没有对某个项目作出修改,版本库的修订版本号还是会因为其它项目的修改而不停的提升,许多人并不喜欢这样的事实。[25]
可以采用折中的办法。比如,可以把许多项目按照彼此之间的关联程度划分为几个组合,然后为每一个项目组合建立一个版本库。这样,在相关项目之间共享数据依旧很简单,而如果修订版本号有了变化,至少开发人员知道,改变的东西多少和他们有些关系。
After deciding how to organize your projects with respect
to repositories, you'll probably want to think about directory
hierarchies within the repositories themselves. Because
Subversion uses regular directory copies for branching and
tagging (see 第 4 章 分支与合并), the
Subversion community recommends that you choose a repository
location for each project
root—the “top-most” directory
that contains data related to that project—and then
create three subdirectories beneath that root:
trunk, meaning the directory under which
the main project development occurs;
branches, which is a directory in which
to create various named branches of the main development line;
and tags, which is a collection of tree
snapshots that are created, and perhaps destroyed, but never
changed.
[26]
举个例子,一个版本库可能会有如下的布局:
/
   calc/
      trunk/
      tags/
      branches/
   calendar/
      trunk/
      tags/
      branches/
   spreadsheet/
      trunk/
      tags/
      branches/
   …
项目在版本库中的根目录地址并不重要。如果每个版本库中只有一个项目,那么就可以认为项目的根目录就是版本库的根目录。如果版本库中包含多个项目,那么可以将这些项目划分成不同的组合(按照项目的目标或者是否需要共享代码甚至是字母顺序)保存在不同子目录中,下面的例子给出了一个类似的布局:
/
   utils/
      calc/
         trunk/
         tags/
         branches/
      calendar/
         trunk/
         tags/
         branches/
      …
   office/
      spreadsheet/
         trunk/
         tags/
         branches/
      …
按照你认为合适的方式安排版本库的布局,Subversion自身并不强制或者偏好某一种布局形式,对于Subversion来说,目录就是目录。最后,在设计版本库布局的时候,不要忘了考虑一下项目参与者们的意见。
为了完整性,我们需要提一下另一种常见的布局,在这种布局中trunk、tags和branches都在根目录下,而你的项目在各个子目录下,例如:
/
   trunk/
      calc/
      calendar/
      spreadsheet/
      …
   tags/
      calc/
      calendar/
      spreadsheet/
      …
   branches/
      calc/
      calendar/
      spreadsheet/
      …
There's nothing particularly incorrect about such a layout, but it may or may not seem as intuitive for your users. Especially in large, multiproject situations with many users, those users may tend to be familiar with only one or two of the projects in the repository. But the projects-as-branch-siblings tends to de-emphasize project individuality and focus on the entire set of projects as a single entity. That's a social issue though. We like our originally suggested arrangement for purely practical reasons—it's easier to ask about (or modify, or migrate elsewhere) the entire history of a single project when there's a single repository path that holds the entire history—past, present, tagged, and branched—for that project and that project alone.
Before creating your Subversion repository, an obvious question you'll need to answer is where the thing is going to live. This is strongly connected to a myriad of other questions involving how the repository will be accessed (via a Subversion server or directly), by whom (users behind your corporate firewall or the whole world out on the open Internet), what other services you'll be providing around Subversion (repository browsing interfaces, email-based commit notification, etc.), your data backup strategy, and so on.
We cover server choice and configuration in 第 6 章 服务配置, but the point we'd like to briefly make here is simply that the answers to some of these other questions might have implications that force your hand when deciding where your repository will live. For example, certain deployment scenarios might require accessing the repository via a remote filesystem from multiple computers, in which case (as you'll read in the next section) your choice of a repository backend data store turns out not to be a choice at all because only one of the available backends will work in this scenario.
Addressing each possible way to deploy Subversion is both impossible and outside the scope of this book. We simply encourage you to evaluate your options using these pages and other sources as your reference material and to plan ahead.
As of version 1.1, Subversion provides two options for the type of underlying data store—often referred to as “the backend” or, somewhat confusingly, “the (versioned) filesystem”—that each repository uses. One type of data store keeps everything in a Berkeley DB (or BDB) database environment; repositories that use this type are often referred to as being “BDB-backed.” The other type stores data in ordinary flat files, using a custom format. Subversion developers have adopted the habit of referring to this latter data storage mechanism as FSFS [27] —a versioned filesystem implementation that uses the native OS filesystem directly—rather than via a database library or some other abstraction layer—to store data.
表 5.1 “”从总体上比较了Berkeley DB和FSFS版本库。
表 5.1.
| 分类 | 特性 | Berkeley DB | FSFS |
|---|---|---|---|
| 可靠性 | 数据完整性 | When properly deployed, extremely reliable; Berkeley DB 4.4 brings auto-recovery. | Older versions had some rarely demonstrated, but data-destroying bugs. |
| 对操作中断的敏感 | Very; crashes and permission problems can leave the database “wedged,” requiring journaled recovery procedures. | Quite insensitive. | |
| 可用性 | 可只读加载 | No. | Yes. |
| 存储平台无关 | No. | Yes. | |
| 可从网络文件系统访问 | Generally, no. | Yes. | |
| 组访问权处理 | Sensitive to user umask problems; best if accessed by only one user. | Works around umask problems. | |
| 伸缩性 | 版本库磁盘使用情况 | Larger (especially if logfiles aren't purged). | Smaller. |
| 修订版本树的数量 | Database; no problems. | Some older native filesystems don't scale well with thousands of entries in a single directory. | |
| 有很多文件的目录 | Slower. | Faster. | |
| 性能 | 检出最新的代码 | No meaningful difference. | No meaningful difference. |
| 大的提交 | Slower overall, but cost is amortized across the lifetime of the commit. | Faster overall, but finalization delay may cause client timeouts. |
There are advantages and disadvantages to each of these two backend types. Neither of them is more “official” than the other, though the newer FSFS is the default data store as of Subversion 1.2. Both are reliable enough to trust with your versioned data. But as you can see in 表 5.1 “”, the FSFS backend provides quite a bit more flexibility in terms of its supported deployment scenarios. More flexibility means you have to work a little harder to find ways to deploy it incorrectly. Those reasons—plus the fact that not using Berkeley DB means there's one fewer component in the system—largely explain why today almost everyone uses the FSFS backend when creating new repositories.
Fortunately, most programs that access Subversion repositories are blissfully ignorant of which backend data store is in use. And you aren't even necessarily stuck with your first choice of a data store—in the event that you change your mind later, Subversion provides ways of migrating your repository's data into another repository that uses a different backend data store. We talk more about that later in this chapter.
The following subsections provide a more detailed look at the available backend data store types.
When the initial design phase of Subversion was in progress, the developers decided to use Berkeley DB for a variety of reasons, including its open source license, transaction support, reliability, performance, API simplicity, thread-safety, support for cursors, and so on.
Berkeley DB提供了真正的事务支持-这或许是它最强大的特性,访问你的Subversion版本库的多个进程不必担心偶尔会破坏其他进程的数据。事务系统提供的隔离对于任何给定的操作,Subversion版本库代码看到的只是数据库的静态视图-而不是一个在其他进程影响不断变化的数据库-并能够根据该视图作出决定。如果该决定正好同其他进程所做操作冲突,整个操作会回滚,就像什么都没有发生一样,并且Subversion会优雅的再次对更新的静态视图进行操作。
Another great feature of Berkeley DB is hot backups—the ability to back up the database environment without taking it “offline.” We'll discuss how to back up your repository later in this chapter (in “版本库备份”一节), but the benefits of being able to make fully functional copies of your repositories without any downtime should be obvious.
Berkeley DB is also a very reliable database system when properly used. Subversion uses Berkeley DB's logging facilities, which means that the database first writes to on-disk logfiles a description of any modifications it is about to make, and then makes the modification itself. This is to ensure that if anything goes wrong, the database system can back up to a previous checkpoint—a location in the logfiles known not to be corrupt—and replay transactions until the data is restored to a usable state. See “管理磁盘空间”一节 later in this chapter for more about Berkeley DB logfiles.
But every rose has its thorn, and so we must note some known limitations of Berkeley DB. First, Berkeley DB environments are not portable. You cannot simply copy a Subversion repository that was created on a Unix system onto a Windows system and expect it to work. While much of the Berkeley DB database format is architecture-independent, there are other aspects of the environment that are not. Secondly, Subversion uses Berkeley DB in a way that will not operate on Windows 95/98 systems—if you need to house a BDB-backed repository on a Windows machine, stick with Windows 2000 or newer.
然而Berkeley DB对于在网络共享上工作提出了一组规范,[28]大多数网络文件系统和应用没有实现这个要求,所以不能允许在网络共享上的BDB后端版本库被多个客户端同时访问(首先要知道版本库存放在网络共享上是非常普遍的)。
警告
If you attempt to use Berkeley DB on a noncompliant remote filesystem, the results are unpredictable—you may see mysterious errors right away, or it may be months before you discover that your repository database is subtly corrupted. You should strongly consider using the FSFS data store for repositories that need to live on a network share.
最后,因为Berkeley DB的库直接链接到了Subversion中,它对于中断比典型的关系型数据库系统更为敏感。大多数SQL系统,举例来说,有一个主服务进程来协调对数据库表的访问。如果一个访问数据库的程序因为某种原因出现问题,数据库守护进程察觉到连接中断会做一些清理。因为数据库守护进程是唯一访问数据库表的进程,应用程序不需要担心访问许可的冲突。但是,这些情况与Berkeley DB不同。Subversion(和使用Subversion库的程序)直接访问数据库的表,这意味着如果有一个程序崩溃,就会使数据库处于一个暂时的不一致、不可访问的状态。当这种情况发生时,管理员需要让Berkeley DB恢复到一个检查点,这的确有点讨厌。除了崩溃的进程,还有一些情况能让版本库出现异常,比如程序在数据库文件的所有权或访问权限上发生冲突。
注意
Berkeley DB 4.4(对应Subversion 1.4和更高)提供了在需要恢复时自动恢复Berkeley DB环境的能力,当Subversion进程发现任何以前进程未清理的连接,就会执行所有可能的恢复,然后就当什么都没有发生一样继续执行。这样不会完全消除版本库楔住的可能,但是大大减少了人工干预恢复的数量。
So while a Berkeley DB repository is quite fast and
scalable, it's best used by a single server process running
as one user—such as Apache's httpd
or svnserve (see 第 6 章 服务配置)—rather than accessing it
as many different users via file:// or
svn+ssh:// URLs. If accessing a Berkeley
DB repository directly as multiple users, be sure to read
“支持多种版本库访问方法”一节 later in this
chapter.
In mid-2004, a second type of repository storage system—one that doesn't use a database at all—came into being. An FSFS repository stores the changes associated with a revision in a single file, and so all of a repository's revisions can be found in a single subdirectory full of numbered files. Transactions are created in separate subdirectories as individual files. When complete, the transaction file is renamed and moved into the revisions directory, thus guaranteeing that commits are atomic. And because a revision file is permanent and unchanging, the repository also can be backed up while “hot,” just like a BDB-backed repository.
修订版本文件格式代表了一个修订版本的目录结构,文件内容,和其它修订版本树中相关信息。不像Berkeley DB数据库,这种存储格式可跨平台并且与CPU架构无关。因为没有日志或用到共享内存的文件,数据库能被网络文件系统安全的访问和在只读环境下检查。缺少数据库花消同时也意味着版本库的总体体积可以稍小一点。
FSFS也有一种不同的性能特性。当提交大量文件时,FSFS可以更快的追加条目。另一方面,FSFS通过写入与上一个版本比较的变化来记录新版本,这也意味着获取最新修订版本时会比Berkeley DB慢一点,提交时FSFS也会有一个更长的延迟,在某些极端情况下会导致客护端在等待回应时超时。
The most important distinction, however, is FSFS's imperviousness to wedging when something goes wrong. If a process using a Berkeley DB database runs into a permissions problem or suddenly crashes, the database can be left in an unusable state until an administrator recovers it. If the same scenarios happen to a process using an FSFS repository, the repository isn't affected at all. At worst, some transaction data is left behind.
The only real argument against FSFS is its relative immaturity compared to Berkeley DB. Unlike Berkeley DB, which has years of history, its own dedicated development team, and, now, Oracle's mighty name attached to it, [29] FSFS is a newer bit of engineering. Prior to Subversion 1.4, it was still shaking out some pretty serious data integrity bugs, which, while only triggered in very rare cases, nonetheless did occur. That said, FSFS has quickly become the backend of choice for some of the largest public and private Subversion repositories, and it promises a lower barrier to entry for Subversion across the board.
Earlier, in “版本库开发策略”一节, we looked at some of the important decisions that should be made before creating and configuring your Subversion repository. Now, we finally get to get our hands dirty! In this section, we'll see how to actually create a Subversion repository and configure it to perform custom actions when special repository events occur.
Subversion repository creation is an incredibly simple task. The svnadmin utility that comes with Subversion provides a subcommand (svnadmin create) for doing just that.
$ # Create a repository
$ svnadmin create /var/svn/repos
$
This creates a new repository in the directory
/var/svn/repos, and with the default
filesystem data store. Prior to Subversion 1.2, the default
was to use Berkeley DB; the default is now FSFS. You can
explicitly choose the filesystem type using the
--fs-type argument, which accepts as a
parameter either fsfs or
bdb.
$ # Create an FSFS-backed repository
$ svnadmin create --fs-type fsfs /var/svn/repos
$
# Create a Berkeley-DB-backed repository
$ svnadmin create --fs-type bdb /var/svn/repos
$
运行这个命令之后,你有了一个Subversion版本库。
提示
你可能已经注意到了,svnadmin命令的路径参数只是一个普通的文件系统路径,而不是一个svn客户端程序访问版本库时使用的URL。svnadmin和svnlook都被认为是服务器端工具—它们在版本库所在的机器上使用,用来检查或修改版本库,不能通过网络来执行任务。一个Subversion的新手通常会犯的错误,就是试图将URL(甚至“本地”file:路径)传给这两个程序。
这个命令在目录/path/to/repos创建了一个新的版本库。这个新的版本库会以修订版本版本0开始其生命周期,里面除了最上层的根目录(/),什么都没有。刚开始,修订版本0有一个修订版本属性svn:date,设置为版本库创建的时间。
现在你有了一个版本库,可以用户化了。
警告
While some parts of a Subversion repository—such as the configuration files and hook scripts—are meant to be examined and modified manually, you shouldn't (and shouldn't need to) tamper with the other parts of the repository “by hand.” The svnadmin tool should be sufficient for any changes necessary to your repository, or you can look to third-party tools (such as Berkeley DB's tool suite) for tweaking relevant subsections of the repository. Do not attempt manual manipulation of your version control history by poking and prodding around in your repository's data store files!
A hook is a program triggered by some repository event, such as the creation of a new revision or the modification of an unversioned property. Some hooks (the so-called “pre hooks”) run in advance of a repository operation and provide a means by which to both report what is about to happen and to prevent it from happening at all. Other hooks (the “post hooks”) run after the completion of a repository event and are useful for performing tasks that examine—but don't modify—the repository. Each hook is handed enough information to tell what that event is (or was), the specific repository changes proposed (or completed), and the username of the person who triggered the event.
The hooks subdirectory is, by
default, filled with templates for various repository
hooks:
$ ls repos/hooks/
post-commit.tmpl          post-unlock.tmpl  pre-revprop-change.tmpl
post-lock.tmpl            pre-commit.tmpl   pre-unlock.tmpl
post-revprop-change.tmpl  pre-lock.tmpl     start-commit.tmpl
$
There is one template for each hook that the Subversion
repository supports; by examining the contents of those
template scripts, you can see what triggers each script
to run and what data is passed to that script. Also present
in many of these templates are examples of how one might use
that script, in conjunction with other Subversion-supplied
programs, to perform common useful tasks. To actually install
a working hook, you need only place some executable program or
script into the repos/hooks directory,
which can be executed as the name (such as
start-commit or
post-commit) of the hook.
On Unix platforms, this means supplying a script or
program (which could be a shell script, a Python program, a
compiled C binary, or any number of other things) named
exactly like the name of the hook. Of course, the template
files are present for more than just informational
purposes—the easiest way to install a hook on Unix
platforms is to simply copy the appropriate template file to a
new file that lacks the .tmpl extension,
customize the hook's contents, and ensure that the script is
executable. Windows, however, uses file extensions to
determine whether a program is executable, so you would
need to supply a program whose basename is the name of the
hook and whose extension is one of the special extensions
recognized by Windows for executable programs, such as
.exe for programs and
.bat for batch files.
提示
由于安全原因,Subversion版本库在一个空环境中执行钩子脚本—就是没有设置任何环境变量,甚至没有$PATH或%PATH%。由于这个原因,许多管理员会感到很困惑,它们的钩子脚本手工运行时正常,可在Subversion中却不能运行。要注意,必须在你的钩子中设置好环境变量或为你的程序指定好绝对路径。
Subversion executes hooks as the same user who owns the process that is accessing the Subversion repository. In most cases, the repository is being accessed via a Subversion server, so this user is the same user as whom the server runs on the system. The hooks themselves will need to be configured with OS-level permissions that allow that user to execute them. Also, this means that any programs or files (including the Subversion repository) accessed directly or indirectly by the hook will be accessed as the same user. In other words, be alert to potential permission-related problems that could prevent the hook from performing the tasks it is designed to perform.
There are nine hooks implemented by the Subversion repository, and you can get details about each of them in “版本库钩子”一节. As a repository administrator, you'll need to decide which hooks you wish to implement (by way of providing an appropriately named and permissioned hook program), and how. When you make this decision, keep in mind the big picture of how your repository is deployed. For example, if you are using server configuration to determine which users are permitted to commit changes to your repository, then you don't need to do this sort of access control via the hook system.
There is no shortage of Subversion hook programs and scripts freely available either from the Subversion community itself or elsewhere. These scripts cover a wide range of utility—basic access control, policy adherence checking, issue tracker integration, email- or syndication-based commit notification, and beyond. Or, if you wish to write your own, see 第 8 章 嵌入Subversion.
警告
While hook scripts can do almost
anything, there is one dimension in which hook script
authors should show restraint: do not
modify a commit transaction using hook scripts. While it
might be tempting to use hook scripts to automatically
correct errors, shortcomings, or policy violations present
in the files being committed, doing so can cause problems.
Subversion keeps client-side caches of certain bits of
repository data, and if you change a commit transaction in
this way, those caches become indetectably stale. This
inconsistency can lead to surprising and unexpected
behavior. Instead of modifying the transaction, you should
simply validate the transaction in the
pre-commit hook and reject the commit
if it does not meet the desired requirements. As a
bonus, your users will learn the value of careful,
compliance-minded work habits.
A Berkeley DB environment is an encapsulation of one or more databases, logfiles, region files and configuration files. The Berkeley DB environment has its own set of default configuration values for things such as the number of database locks allowed to be taken out at any given time, the maximum size of the journaling logfiles, etc. Subversion's filesystem logic additionally chooses default values for some of the Berkeley DB configuration options. However, sometimes your particular repository, with its unique collection of data and access patterns, might require a different set of configuration option values.
The producers of Berkeley DB understand that different
applications and database environments have different
requirements, so they have provided a mechanism for overriding
at runtime many of the configuration values for the Berkeley
DB environment. BDB checks for the presence of a file named
DB_CONFIG in the environment directory
(namely, the repository's db
subdirectory), and parses the options found in that file.
Subversion itself creates this file when it creates the rest
of the repository. The file initially contains some default
options, as well as pointers to the Berkeley DB online
documentation so you can read about what those options do. Of
course, you are free to add any of the supported Berkeley DB
options to your DB_CONFIG file. Just be
aware that while Subversion never attempts to read or
interpret the contents of the file and makes no direct use of
the option settings in it, you'll want to avoid any
configuration changes that may cause Berkeley DB to behave in
a fashion that is at odds with what Subversion might expect.
Also, changes made to DB_CONFIG won't
take effect until you recover the database environment (using
svnadmin recover).
Maintaining a Subversion repository can be daunting, mostly due to the complexities inherent in systems that have a database backend. Doing the task well is all about knowing the tools—what they are, when to use them, and how. This section will introduce you to the repository administration tools provided by Subversion and discuss how to wield them to accomplish tasks such as repository data migration, upgrades, backups and cleanups.
Subversion provides a handful of utilities useful for creating, inspecting, modifying, and repairing your repository. Let's look more closely at each of those tools. Afterward, we'll briefly examine some of the utilities included in the Berkeley DB distribution that provide functionality specific to your repository's database backend not otherwise provided by Subversion's own tools.
svnadmin程序是版本库管理员最好的朋友。除了提供创建Subversion版本库的功能,这个程序使你可以维护这些版本库。svnadmin的语法同其他Subversion命令类似:
$ svnadmin help
general usage: svnadmin SUBCOMMAND REPOS_PATH  [ARGS & OPTIONS ...]
Type 'svnadmin help <subcommand>' for help on a specific subcommand.
Type 'svnadmin --version' to see the program version and FS modules.

Available subcommands:
   crashtest
   create
   deltify
…
Previously in this chapter (in “创建版本库”一节), we were introduced to the svnadmin create subcommand. Most of the other svnadmin subcommands we will cover later in this chapter. And you can consult “ svnadmin ”一节 for a full rundown of subcommands and what each of them offers.
svnlook is a tool provided by Subversion for examining the various revisions and transactions (which are revisions in the making) in a repository. No part of this program attempts to change the repository. svnlook is typically used by the repository hooks for reporting the changes that are about to be committed (in the case of the pre-commit hook) or that were just committed (in the case of the post-commit hook) to the repository. A repository administrator may use this tool for diagnostic purposes.
svnlook的语法很直接:
$ svnlook help
general usage: svnlook SUBCOMMAND REPOS_PATH [ARGS & OPTIONS ...]
Note: any subcommand which takes the '--revision' and '--transaction'
      options will, if invoked without one of those options, act on
      the repository's youngest revision.
Type 'svnlook help <subcommand>' for help on a specific subcommand.
Type 'svnlook --version' to see the program version and FS modules.
…
Most of svnlook's
subcommands can operate on either a revision or a
transaction tree, printing information about the tree
itself, or how it differs from the previous revision of the
repository. You use the --revision
(-r) and --transaction
(-t) options to specify which revision or
transaction, respectively, to examine. In the absence of
both the --revision (-r)
and --transaction (-t)
options, svnlook will examine the
youngest (or HEAD) revision in the
repository. So the following two commands do exactly the
same thing when 19 is the youngest revision in the
repository located at
/var/svn/repos:
$ svnlook info /var/svn/repos
$ svnlook info /var/svn/repos -r 19
One exception to these rules about subcommands is the svnlook youngest subcommand, which takes no options and simply prints out the repository's youngest revision number:
$ svnlook youngest /var/svn/repos
19
$
注意
Keep in mind that the only transactions you can browse
are uncommitted ones. Most repositories will have no such
transactions because transactions are usually either
committed (in which case, you should access them as
revision with the --revision
(-r) option) or aborted and
removed.
Output from svnlook is designed to be both human- and machine-parsable. Take, as an example, the output of the svnlook info subcommand:
$ svnlook info /var/svn/repos
sally
2002-11-04 09:29:13 -0600 (Mon, 04 Nov 2002)
27
Added the usual
Greek tree.
$
The output of svnlook info consists of the following, in the order given:
-
作者,后接换行。
-
日期,后接换行。
-
日志消息的字数,后接换行。
-
日志信息本身, 后接换行。
This output is human-readable, meaning items such as the datestamp are displayed using a textual representation instead of something more obscure (such as the number of nanoseconds since the Tasty Freeze guy drove by). But the output is also machine-parsable—because the log message can contain multiple lines and be unbounded in length, svnlook provides the length of that message before the message itself. This allows scripts and other wrappers around this command to make intelligent decisions about the log message, such as how much memory to allocate for the message, or at least how many bytes to skip in the event that this output is not the last bit of data in the stream.
svnlook还可以做很多别的查询:显示我们先前提到的信息的一些子集,递归显示版本目录树,报告指定的修订版本或事务中哪些路径曾经被修改过,显示对文件和目录做过的文本和属性的修改,等等。“ svnlook ”一节是svnlook命令能接受子命令的完全特性参考。
虽然在管理员的日常工作中并不会经常使用,不过svndumpfilter提供了一项特别有用的功能—可以简单快速的作为Subversion版本库历史的以路径为基础的过滤器。
svndumpfilter的语法如下:
$ svndumpfilter help
general usage: svndumpfilter SUBCOMMAND [ARGS & OPTIONS ...]
Type "svndumpfilter help <subcommand>" for help on a specific subcommand.
Type 'svndumpfilter --version' to see the program version.

Available subcommands:
   exclude
   include
   help (?, h)
There are only two interesting subcommands: svndumpfilter exclude and svndumpfilter include. They allow you to make the choice between implicit or explicit inclusion of paths in the stream. You can learn more about these subcommands and svndumpfilter's unique purpose later in this chapter, in “过滤版本库历史”一节.
svnsync程序是Subversion 1.4版的新特性,提供了维护一个只读版本库镜像的全部功能。这个程序只有一个工作—将一个版本库的历史转移到另一个,尽管有几种方法,但这种方法的主要特点是可以远程操作—“源”,“目标”[30]版本库以及svnsync程序可能在不同的计算机上。
就像你期望的,svnsync的语法与本节提到的其他命令非常类似。
$ svnsync help general usage: svnsync SUBCOMMAND DEST_URL [ARGS & OPTIONS ...] Type 'svnsync help <subcommand>' for help on a specific subcommand. Type 'svnsync --version' to see the program version and RA modules. Available subcommands: initialize (init) synchronize (sync) copy-revprops help (?, h) $
We talk more about replicating repositories with svnsync later in this chapter (see “版本库复制”一节).
While not an official member of the Subversion
toolchain, the fsfs-reshard.py script
(found in the tools/server-side
directory of the Subversion source distribution) is a useful
performance tuning tool for administrators of FSFS-backed
Subversion repositories. FSFS repositories contain files
that describe the changes made in a single revision, and
files that contain the revision properties associated with
a single revision. Repositories created in versions of
Subversion prior to 1.5 keep these files in two
directories—one for each type of file. As new
revisions are committed to the repository, Subversion drops
more files into these two directories—over time, the
number of these files in each directory can grow to be quite
large. This has been observed to cause performance problems
on certain network-based filesystems.
Subversion 1.5 creates FSFS-backed repositories using a slightly modified layout in which the contents of these two directories are sharded, or scattered across several subdirectories. This can greatly reduce the time it takes the system to locate any one of these files, and therefore increases the overall performance of Subversion when reading from the repository. The number of subdirectories used to house these files is configurable, though, and that's where fsfs-reshard.py comes in. This script reshuffles the repository's file structure into a new arrangement that reflects the requested number of sharding subdirecties. This is especially useful for converting an older Subversion repository into the new Subversion 1.5 sharded layout (which Subversion will not automatically do for you) or for fine-tuning an already sharded repository.
If you're using a Berkeley DB repository, then all of
your versioned filesystem's structure and data live in a set
of database tables within the db/
subdirectory of your repository. This subdirectory is a
regular Berkeley DB environment directory and can therefore
be used in conjunction with any of the Berkeley database
tools, typically provided as part of the Berkeley DB
distribution.
对于Subversion的日常使用来说,这些工具并没有什么用处。大多数Subversion版本库必须的数据库操作都集成到svnadmin工具中。比如,svnadmin list-unused-dblogs和svnadmin list-dblogs实现了Berkeley db_archive命令功能的一个子集,而svnadmin recover则起到了db_recover工具的作用。
However, there are still a few Berkeley DB utilities that you might find useful. The db_dump and db_load programs write and read, respectively, a custom file format that describes the keys and values in a Berkeley DB database. Since Berkeley databases are not portable across machine architectures, this format is a useful way to transfer those databases from machine to machine, irrespective of architecture or operating system. As we describe later in this chapter, you can also use svnadmin dump and svnadmin load for similar purposes, but db_dump and db_load can do certain jobs just as well and much faster. They can also be useful if the experienced Berkeley DB hacker needs to do in-place tweaking of the data in a BDB-backed repository for some reason, which is something Subversion's utilities won't allow. Also, the db_stat utility can provide useful information about the status of your Berkeley DB environment, including detailed statistics about the locking and storage subsystems.
For more information on the Berkeley DB tool chain,
visit the documentation section of the Berkeley DB section
of Oracle's web site, located at http://www.oracle.com/technology/documentation/berkeley-db/db/.
Sometimes a user will have an error in her log message (a
misspelling or some misinformation, perhaps). If the
repository is configured (using the
pre-revprop-change hook; see “实现版本库钩子”一节) to accept changes to
this log message after the commit is finished, then the user
can “fix” her log message remotely using
svn propset (see svn propset). However, because of the
potential to lose information forever, Subversion repositories
are not, by default, configured to allow changes to
unversioned properties—except by an
administrator.
如果管理员想要修改日志信息,那么可以使用svnadmin setlog命令。这个命令从指定的文件中读取信息,取代版本库中某个修订版本的日志信息(svn:log属性)。
$ echo "Here is the new, correct log message" > newlog.txt $ svnadmin setlog myrepos newlog.txt -r 388
即使是svnadmin setlog命令也受到限制。pre-和 post-revprop-change钩子同样会被触发,因此必须进行相应的设置才能允许修改非版本化属性。不过管理员可以使用svnadmin setlog命令的--bypass-hooks选项跳过钩子。
警告
Remember, though, that by bypassing the hooks, you are likely avoiding such things as email notifications of property changes, backup systems that track unversioned property changes, and so on. In other words, be very careful about what you are changing, and how you change it.
虽然存储器的价格在过去的几年里以让人难以致信的速度滑落,但是对于那些需要对大量数据进行版本管理的管理员们来说,磁盘空间的消耗依然是一个重要的因素。版本库每增加一个字节都意味着需要多一个字节的磁盘空间进行备份,对于多重备份来说,就需要消耗更多的磁盘空间。Berkeley DB版本库的主要存储机制是基于一个复杂的数据库系统建立的,因此了解一些数据性质是有意义的,比如哪些数据必须保持在线,哪些数据需要备份、哪些数据可以安全的删除等等。
To keep the repository small, Subversion uses deltification (or, “deltified storage”) within the repository itself. Deltification involves encoding the representation of a chunk of data as a collection of differences against some other chunk of data. If the two pieces of data are very similar, this deltification results in storage savings for the deltified chunk—rather than taking up space equal to the size of the original data, it takes up only enough space to say, “I look just like this other piece of data over here, except for the following couple of changes.” The result is that most of the repository data that tends to be bulky—namely, the contents of versioned files—is stored at a much smaller size than the original “fulltext” representation of that data. And for repositories created with Subversion 1.4 or later, the space savings are even better—now those fulltext representations of file contents are themselves compressed.
注意
Because all of the data that is subject to deltification in a BDB-backed repository is stored in a single Berkeley DB database file, reducing the size of the stored values will not immediately reduce the size of the database file itself. Berkeley DB will, however, keep internal records of unused areas of the database file and consume those areas first before growing the size of the database file. So while deltification doesn't produce immediate space savings, it can drastically slow future growth of the database.
尽管不太常见,Subversion的提交进程也有失败,同时留下将要生成的修订版本—未提交的事物和所有随之的文件和目录修改。出现这种情况可能有以下原因:客户端的用户粗暴的结束了操作,操作过程中出现网络故障,等等。不管是什么原因,死亡的事务总是有可能会出现。这类事务不会产生什么负面影响,仅仅是消耗了一点点磁盘空间。不过,严厉的管理员总是希望能够将它们清除出去。
You can use the svnadmin lstxns command to list the names of the currently outstanding transactions:
$ svnadmin lstxns myrepos 19 3a1 a45 $
Each item in the resultant output can then be used with
svnlook (and its
--transaction (-t) option)
to determine who created the transaction, when it was
created, what types of changes were made in the
transaction—information that is helpful in determining
whether or not the transaction is a safe candidate for
removal! If you do indeed want to remove a transaction, its
name can be passed to svnadmin rmtxns,
which will perform the cleanup of the transaction. In fact,
svnadmin rmtxns can take its input
directly from the output of
svnadmin lstxns!
$ svnadmin rmtxns myrepos `svnadmin lstxns myrepos` $
在按照上面例子中的方法清理版本库之前,你或许应该暂时关闭版本库和客户端的连接。这样在你开始清理之前,不会有正常的事务进入版本库。例 5.1 “txn-info.sh (reporting outstanding transactions)”中的shell脚本可以用来迅速获得版本库中异常事务的信息。
例 5.1. txn-info.sh (reporting outstanding transactions)
#!/bin/sh
### Generate informational output for all outstanding transactions in
### a Subversion repository.
REPOS="${1}"
if [ "x$REPOS" = x ] ; then
echo "usage: $0 REPOS_PATH"
exit
fi
for TXN in `svnadmin lstxns ${REPOS}`; do
echo "---[ Transaction ${TXN} ]-------------------------------------------"
svnlook info "${REPOS}" -t "${TXN}"
done
The output of the script is basically a concatenation of several chunks of svnlook info output (see “svnlook”一节) and will look something like:
$ txn-info.sh myrepos ---[ Transaction 19 ]------------------------------------------- sally 2001-09-04 11:57:19 -0500 (Tue, 04 Sep 2001) 0 ---[ Transaction 3a1 ]------------------------------------------- harry 2001-09-10 16:50:30 -0500 (Mon, 10 Sep 2001) 39 Trying to commit over a faulty network. ---[ Transaction a45 ]------------------------------------------- sally 2001-09-12 11:09:28 -0500 (Wed, 12 Sep 2001) 0 $
一个废弃了很长时间的事务通常是提交错误或异常中断的结果。事务的时间戳可以提供给我们一些有趣的信息,比如一个进行了9个月的操作居然还是活动的等等。
简言之,作出事务清理的决定前应该仔细考虑一下。许多信息源—比如Apache的错误和访问日志,已成功完成的Subversion提交日志等等—都可以作为决策的参考。当然,管理员还可以直接和那些似乎已经死亡事务的提交者直接交流(比如通过邮件),来确认该事务确实已经死亡了。
Until recently, the largest offender of disk space usage with respect to BDB-backed Subversion repositories were the logfiles in which Berkeley DB performs its prewrites before modifying the actual database files. These files capture all the actions taken along the route of changing the database from one state to another—while the database files, at any given time, reflect a particular state, the logfiles contain all the many changes along the way between states. Thus, they can grow and accumulate quite rapidly.
Fortunately, beginning with the 4.2 release of Berkeley
DB, the database environment has the ability to remove its
own unused logfiles automatically. Any
repositories created using svnadmin
when compiled against Berkeley DB version 4.2 or greater
will be configured for this automatic log file removal. If
you don't want this feature enabled, simply pass the
--bdb-log-keep option to the
svnadmin create command. If you forget
to do this or change your mind at a later time, simply edit
the DB_CONFIG file found in your
repository's db directory, comment out
the line that contains the set_flags
DB_LOG_AUTOREMOVE directive, and then run
svnadmin recover on your repository to
force the configuration changes to take effect. See “Berkeley DB 配置”一节 for more information about
database configuration.
Without some sort of automatic log file removal in place, logfiles will accumulate as you use your repository. This is actually somewhat of a feature of the database system—you should be able to recreate your entire database using nothing but the logfiles, so these files can be useful for catastrophic database recovery. But typically, you'll want to archive the logfiles that are no longer in use by Berkeley DB, and then remove them from disk to conserve space. Use the svnadmin list-unused-dblogs command to list the unused logfiles:
$ svnadmin list-unused-dblogs /var/svn/repos /var/svn/repos/log.0000000031 /var/svn/repos/log.0000000032 /var/svn/repos/log.0000000033 … $ rm `svnadmin list-unused-dblogs /var/svn/repos` ## disk space reclaimed!
警告
BDB-backed repositories whose logfiles are used as part of a backup or disaster recovery plan should not make use of the log file autoremoval feature. Reconstruction of a repository's data from logfiles can only be accomplished when all the logfiles are available. If some of the logfiles are removed from disk before the backup system has a chance to copy them elsewhere, the incomplete set of backed-up log files is essentially useless.
As mentioned in “Berkeley DB”一节, a Berkeley DB repository can sometimes be left in a frozen state if not closed properly. When this happens, an administrator needs to rewind the database back into a consistent state. This is unique to BDB-backed repositories, though—if you are using FSFS-backed ones instead, this won't apply to you. And for those of you using Subversion 1.4 with Berkeley DB 4.4 or better, you should find that Subversion has become much more resilient in these types of situations. Still, wedged Berkeley DB repositories do occur, and an administrator needs to know how to safely deal with this circumstance.
Berkeley DB使用一种锁机制保护版本库中的数据。锁机制确保数据库不会同时被多个访问进程修改,也就保证了从数据库中读取到的数据始终是稳定而且正确的。当一个进程需要修改数据库中的数据时,首先必须检查目标数据是否已经上锁。如果目标数据没有上锁,进程就将它锁上,然后作出修改,最后再将锁解除。而其它进程则必须等待锁解除后才能继续访问数据库中的相关内容。(你对这种锁无能为力,作为一个用户,可以应用版本库的版本化文件;我们会在The Three Meanings of “Lock”讨论因为术语冲突导致的概念混淆。)
In the course of using your Subversion repository, fatal errors or interruptions can prevent a process from having the chance to remove the locks it has placed in the database. The result is that the backend database system gets “wedged.” When this happens, any attempts to access the repository hang indefinitely (since each new accessor is waiting for a lock to go away—which isn't going to happen).
If this happens to your repository, don't panic. The Berkeley DB filesystem takes advantage of database transactions, checkpoints, and prewrite journaling to ensure that only the most catastrophic of events [31] can permanently destroy a database environment. A sufficiently paranoid repository administrator will have made off-site backups of the repository data in some fashion, but don't head off to the tape backup storage closet just yet.
然后,使用下面的方法试着“恢复”你的版本库:
-
Make sure that there are no processes accessing (or attempting to access) the repository. For networked repositories, this also means shutting down the Apache HTTP Server or svnserve daemon.
-
Become the user who owns and manages the repository. This is important, as recovering a repository while running as the wrong user can tweak the permissions of the repository's files in such a way that your repository will still be inaccessible even after it is “unwedged.”
-
Run the command svnadmin recover /var/svn/repos. You should see output like this:
Repository lock acquired。 Please wait; recovering the repository may take some time... Recovery completed. The latest repos revision is 19.
此命令可能需要数分钟才能完成。
-
重新启动服务进程。
This procedure fixes almost every case of repository
wedging. Make sure that you run this command as the user that
owns and manages the database, not just as
root. Part of the recovery process might
involve recreating from scratch various database files (shared
memory regions, for example). Recovering as
root will create those files such that they
are owned by root, which means that even
after you restore connectivity to your repository, regular
users will be unable to access it.
If the previous procedure, for some reason, does not
successfully unwedge your repository, you should do two
things. First, move your broken repository directory aside
(perhaps by renaming it to something like
repos.BROKEN) and then restore your
latest backup of it. Then, send an email to the Subversion
users mailing list (at <[email protected]>)
describing your problem in detail. Data integrity is an
extremely high priority to the Subversion developers.
Subversion文件系统将数据保存在许多数据库表中,而这些表的结构只有Subversion开发者们才了解(也只有他们才感兴趣),不过,有些时候我们会想到把所有或一部分数据转移到另一个版本库。
Subversion provides such functionality by way of repository dump streams. A repository dump stream (often referred to as a “dumpfile” when stored as a file on disk) is a portable, flat file format that describes the various revisions in your repository—what was changed, by whom, when, and so on. This dump stream is the primary mechanism used to marshal versioned history—in whole or in part, with or without modification—between repositories. And Subversion provides the tools necessary for creating and loading these dump streams: the svnadmin dump and svnadmin load subcommands, respectively.
警告
虽然Subversion版本库转储格式包含了人可读的部分和熟悉的结构(类似RFC-822格式,大多数邮件使用的),它不是纯文本的格式,这种格式必须作为二进制文件格式处理,对修改高度敏感。例如,许多文本编辑器会破坏这种文件的内容,通常是因为自动换行符替换。
There are many reasons for dumping and loading Subversion repository data. Early in Subversion's life, the most common reason was due to the evolution of Subversion itself. As Subversion matured, there were times when changes made to the backend database schema caused compatibility issues with previous versions of the repository, so users had to dump their repository data using the previous version of Subversion and load it into a freshly created repository with the new version of Subversion. Now, these types of schema changes haven't occurred since Subversion's 1.0 release, and the Subversion developers promise not to force users to dump and load their repositories when upgrading between minor versions (such as from 1.3 to 1.4) of Subversion. But there are still other reasons for dumping and loading, including re-deploying a Berkeley DB repository on a new OS or CPU architecture, switching between the Berkeley DB and FSFS backends, or (as we'll cover later in “过滤版本库历史”一节) purging versioned data from repository history.
注意
The Subversion repository dump format describes versioned repository changes only. It will not carry any information about uncommitted transactions, user locks on filesystem paths, repository or server configuration customizations (including hook scripts), and so on.
无论你是什么原因需要移植版本库历史,都可以直接使用svnadmin dump和svnadmin load。svnadmin dump命令会将版本库中的修订版本数据按照特定的格式输出到转储流中,转储数据会输出到标准输出,而提示信息会输出到标准错误。这就是说,可以将转储数据存储到文件中,而同时在终端窗口中监视运行状态,例如:
$ svnlook youngest myrepos 26 $ svnadmin dump myrepos > dumpfile * Dumped revision 0. * Dumped revision 1. * Dumped revision 2. … * Dumped revision 25. * Dumped revision 26.
最后,版本库中的指定的修订版本数据被转储到一个独立的文件中(在上面的例子中是dumpfile)。注意,svnadmin dump从版本库中读取修订版本树与其它“读者”(比如svn checkout)的过程相同,所以可以在任何时候安全的运行这个命令。
The other subcommand in the pair, svnadmin load, parses the standard input stream as a Subversion repository dump file and effectively replays those dumped revisions into the target repository for that operation. It also gives informative feedback, this time using the standard output stream:
$ svnadmin load newrepos < dumpfile
<<< Started new txn, based on original revision 1
* adding path : A ... done.
* adding path : A/B ... done.
…
------- Committed new rev 1 (loaded from original rev 1) >>>
<<< Started new txn, based on original revision 2
* editing path : A/mu ... done.
* editing path : A/D/G/rho ... done.
------- Committed new rev 2 (loaded from original rev 2) >>>
…
<<< Started new txn, based on original revision 25
* editing path : A/D/gamma ... done.
------- Committed new rev 25 (loaded from original rev 25) >>>
<<< Started new txn, based on original revision 26
* adding path : A/Z/zeta ... done.
* editing path : A/mu ... done.
------- Committed new rev 26 (loaded from original rev 26) >>>
The result of a load is new revisions added to a
repository—the same thing you get by making commits
against that repository from a regular Subversion client.
Just as in a commit, you can use hook programs to perform
actions before and after each of the commits made during a
load process. By passing the
--use-pre-commit-hook and
--use-post-commit-hook options to
svnadmin load, you can instruct Subversion
to execute the pre-commit and post-commit hook programs,
respectively, for each loaded revision. You might use these,
for example, to ensure that loaded revisions pass through the
same validation steps that regular commits pass through. Of
course, you should use these options with care—if your
post-commit hook sends emails to a mailing list for each new
commit, you might not want to spew hundreds or thousands of
commit emails in rapid succession at that list! You can read more about the use of hook
scripts in “实现版本库钩子”一节.
既然svnadmin使用标准输入流和标准输出流作为转储和装载的输入和输出,那么更漂亮的用法是(管道两端可以是不同版本的svnadmin:
$ svnadmin create newrepos $ svnadmin dump oldrepos | svnadmin load newrepos
By default, the dump file will be quite large—much
larger than the repository itself. That's because by default
every version of every file is expressed as a full text in the
dump file. This is the fastest and simplest behavior, and
it's nice if you're piping the dump data directly into some other
process (such as a compression program, filtering program, or
loading process). But if you're creating a dump file
for longer-term storage, you'll likely want to save disk space
by using the --deltas option. With this
option, successive revisions of files will be output as
compressed, binary differences—just as file revisions
are stored in a repository. This option is slower, but
results in a dump file much closer in size to the original
repository.
We mentioned previously that svnadmin
dump outputs a range of revisions. Use the
--revision (-r) option to
specify a single revision, or a range of revisions, to dump.
If you omit this option, all the existing repository revisions
will be dumped.
$ svnadmin dump myrepos -r 23 > rev-23.dumpfile $ svnadmin dump myrepos -r 100:200 > revs-100-200.dumpfile
Subversion在转储修订版本时,仅会输出与前一个修订版本之间的差异,通过这些差异足以从前一个修订版本中重建当前的修订版本。换句话说,在转储文件中的每一个修订版本仅包含这个修订版本作出的修改。这个规则的唯一一个例外是当前svnadmin dump转储的第一个修订版本。
默认情况下,Subversion不会把转储的第一个修订版本看作对前一个修订版本的更改。 首先,转储文件中没有比第一个修订版本更靠前的修订版本了!其次,Subversion不知道装载转储数据时(如果真的需要装载的话)的版本库是什么样的情况。为了保证每次运行svnadmin dump都能得到一个独立的结果,第一个转储的修订版本默认情况下会完整的保存目录、文件以及属性等数据。
However, you can change this default behavior. If you add
the --incremental option when you dump your
repository, svnadmin will compare the first
dumped revision against the previous revision in the
repository—the same way it treats every other revision that
gets dumped. It will then output the first revision exactly
as it does the rest of the revisions in the dump
range—mentioning only the changes that occurred in that
revision. The benefit of this is that you can create several
small dump files that can be loaded in succession, instead of
one large one, like so:
$ svnadmin dump myrepos -r 0:1000 > dumpfile1 $ svnadmin dump myrepos -r 1001:2000 --incremental > dumpfile2 $ svnadmin dump myrepos -r 2001:3000 --incremental > dumpfile3
这些转储文件可以使用下列命令装载到一个新的版本库中:
$ svnadmin load newrepos < dumpfile1 $ svnadmin load newrepos < dumpfile2 $ svnadmin load newrepos < dumpfile3
另一个有关的技巧是,可以使用--incremental选项在一个转储文件中增加新的转储修订版本。举个例子,可以使用post-commit钩子在每次新的修订版本提交后将其转储到文件中。或者,可以编写一个脚本,在每天夜里将所有新增的修订版本转储到文件中。这样,svnadmin dump命令就变成了很好的版本库备份工具,以防万一出现系统崩溃或其它灾难性事件。
转储还可以用来将几个独立的版本库合并为一个版本库。使用svnadmin load的--parent-dir选项,可以在装载的时候指定根目录。也就是说,如果有三个不同版本库的转储文件,比如calc-dumpfile,cal-dumpfile,和ss-dumpfile,可以在一个新的版本库中保存所有三个转储文件中的数据:
$ svnadmin create /var/svn/projects $
Then, make new directories in the repository that will encapsulate the contents of each of the three previous repositories:
$ svn mkdir -m "Initial project roots" \
file:///var/svn/projects/calc \
file:///var/svn/projects/calendar \
file:///var/svn/projects/spreadsheet
Committed revision 1.
$
最后,将转储文件分别装载到各自的目录中:
$ svnadmin load /var/svn/projects --parent-dir calc < calc-dumpfile … $ svnadmin load /var/svn/projects --parent-dir calendar < cal-dumpfile … $ svnadmin load /var/svn/projects --parent-dir spreadsheet < ss-dumpfile … $
我们再介绍一下Subversion版本库转储数据的最后一种用途——在不同的存储机制或版本控制系统之间转换。因为转储数据的格式的大部分是可以阅读的,所以使用这种格式描述变更集(每个变更集对应一个新的修订版本)会相对容易一些。事实上,cvs2svn工具(参见 “迁移CVS版本库到Subversion”一节)正是将CVS版本库的内容转换为转储数据格式,如此才能将CVS版本库的数据导入Subversion版本库之中。
Since Subversion stores your versioned history using, at the very least, binary differencing algorithms and data compression (optionally in a completely opaque database system), attempting manual tweaks is unwise if not quite difficult, and at any rate strongly discouraged. And once data has been stored in your repository, Subversion generally doesn't provide an easy way to remove that data. [32] But inevitably, there will be times when you would like to manipulate the history of your repository. You might need to strip out all instances of a file that was accidentally added to the repository (and shouldn't be there for whatever reason). [33] Or, perhaps you have multiple projects sharing a single repository, and you decide to split them up into their own repositories. To accomplish tasks such as these, administrators need a more manageable and malleable representation of the data in their repositories—the Subversion repository dump format.
As we described earlier in “版本库数据的移植”一节, the Subversion repository dump format is a human-readable representation of the changes that you've made to your versioned data over time. Use the svnadmin dump command to generate the dump data, and svnadmin load to populate a new repository with it. The great thing about the human-readability aspect of the dump format is that, if you aren't careless about it, you can manually inspect and modify it. Of course, the downside is that if you have three years' worth of repository activity encapsulated in what is likely to be a very large dump file, it could take you a long, long time to manually inspect and modify it.
That's where svndumpfilter becomes useful. This program acts as path-based filter for repository dump streams. Simply give it either a list of paths you wish to keep or a list of paths you wish to not keep, and then pipe your repository dump data through this filter. The result will be a modified stream of dump data that contains only the versioned paths you (explicitly or implicitly) requested.
Let's look a realistic example of how you might use this program. We discuss elsewhere (see “规划你的版本库结构”一节) the process of deciding how to choose a layout for the data in your repositories—using one repository per project or combining them, arranging stuff within your repository, and so on. But sometimes after new revisions start flying in, you rethink your layout and would like to make some changes. A common change is the decision to move multiple projects that are sharing a single repository into separate repositories for each project.
假设有一个包含三个项目的版本库: calc,calendar,和 spreadsheet。它们在版本库中的布局如下:
/
calc/
trunk/
branches/
tags/
calendar/
trunk/
branches/
tags/
spreadsheet/
trunk/
branches/
tags/
现在要把这三个项目转移到三个独立的版本库中。首先,转储整个版本库:
$ svnadmin dump /var/svn/repos > repos-dumpfile * Dumped revision 0. * Dumped revision 1. * Dumped revision 2. * Dumped revision 3. … $
Next, run that dump file through the filter, each time including only one of our top-level directories. This results in three new dump files:
$ svndumpfilter include calc < repos-dumpfile > calc-dumpfile … $ svndumpfilter include calendar < repos-dumpfile > cal-dumpfile … $ svndumpfilter include spreadsheet < repos-dumpfile > ss-dumpfile … $
At this point, you have to make a decision. Each of your
dump files will create a valid repository, but will preserve
the paths exactly as they were in the original repository.
This means that even though you would have a repository solely
for your calc project, that repository
would still have a top-level directory named
calc. If you want your
trunk, tags, and
branches directories to live in the root
of your repository, you might wish to edit your dump files,
tweaking the Node-path and
Node-copyfrom-path headers so they no
longer have that first calc/ path
component. Also, you'll want to remove the section of dump
data that creates the calc directory. It
will look something like the following:
Node-path: calc Node-action: add Node-kind: dir Content-length: 0
警告
If you do plan on manually editing the dump file to
remove a top-level directory, make sure that your editor is
not set to automatically convert end-of-line characters to
the native format (e.g. \r\n to
\n), as the content will then not agree
with the metadata. This will render the dump file
useless.
All that remains now is to create your three new repositories, and load each dump file into the right repository, ignoring the UUID found in the dumpstream:
$ svnadmin create calc
$ svnadmin load --ignore-uuid calc < calc-dumpfile
<<< Started new transaction, based on original revision 1
* adding path : Makefile ... done.
* adding path : button.c ... done.
…
$ svnadmin create calendar
$ svnadmin load --ignore-uuid calendar < cal-dumpfile
<<< Started new transaction, based on original revision 1
* adding path : Makefile ... done.
* adding path : cal.c ... done.
…
$ svnadmin create spreadsheet
$ svnadmin load --ignore-uuid spreadsheet < ss-dumpfile
<<< Started new transaction, based on original revision 1
* adding path : Makefile ... done.
* adding path : ss.c ... done.
…
$
Both of svndumpfilter's subcommands accept options for deciding how to deal with “empty” revisions. If a given revision contains only changes to paths that were filtered out, that now-empty revision could be considered uninteresting or even unwanted. So to give the user control over what to do with those revisions, svndumpfilter provides the following command-line options:
-
--drop-empty-revs -
不生成任何空修订版本,忽略它们。
-
--renumber-revs -
如果空修订版本被剔除(通过使用
--drop-empty-revs选项),依次修改其它修订版本的编号,确保编号序列是连续的。 -
--preserve-revprops -
如果空修订版本被保留,保持这些空修订版本的属性(日志信息,作者,日期,自定义属性,等等)。如果不设定这个选项,空修订版本将仅保留初始时间戳,以及一个自动生成的日志信息,表明此修订版本由svndumpfilter处理过。
While svndumpfilter can be very
useful and a huge timesaver, there are unfortunately a
couple of gotchas. First, this utility is overly sensitive
to path semantics. Pay attention to whether paths in your
dump file are specified with or without leading slashes.
You'll want to look at the Node-path and
Node-copyfrom-path headers.
… Node-path: spreadsheet/Makefile …
If the paths have leading slashes, you should include leading slashes in the paths you pass to svndumpfilter include and svndumpfilter exclude (and if they don't, you shouldn't). Further, if your dump file has an inconsistent usage of leading slashes for some reason, [34] you should probably normalize those paths so they all have, or all lack, leading slashes.
Also, copied paths can give you some trouble. Subversion supports copy operations in the repository, where a new path is created by copying some already existing path. It is possible that at some point in the lifetime of your repository, you might have copied a file or directory from some location that svndumpfilter is excluding, to a location that it is including. In order to make the dump data self-sufficient, svndumpfilter needs to still show the addition of the new path—including the contents of any files created by the copy—and not represent that addition as a copy from a source that won't exist in your filtered dump data stream. But because the Subversion repository dump format shows only what was changed in each revision, the contents of the copy source might not be readily available. If you suspect that you have any copies of this sort in your repository, you might want to rethink your set of included/excluded paths, perhaps including the paths that served as sources of your troublesome copy operations, too.
Finally, svndumpfilter takes path
filtering quite literally. If you are trying to copy the
history of a project rooted at
trunk/my-project and move it into a
repository of its own, you would, of course, use the
svndumpfilter include command to keep all
the changes in and under
trunk/my-project. But the resulting
dump file makes no assumptions about the repository into
which you plan to load this data. Specifically, the dump
data might begin with the revision that added the
trunk/my-project directory, but it will
not contain directives that would
create the trunk directory itself
(because trunk doesn't match the
include filter). You'll need to make sure that any
directories that the new dump stream expects to exist
actually do exist in the target repository before trying to
load the stream into that repository.
有许多场景下会存在一个Subversion版本库的版本历史与另一个完全相同。或许最明显的就是在主版本库因为硬件故障或网络已出或其他原因而不可用时,维护一个简单的备份版本库。其他的场景包括,部署一个镜像版本库来分流压力,作为软升级机制等等。
As of version 1.4, Subversion provides a program for managing scenarios like these—svnsync. This works by essentially asking the Subversion server to “replay” revisions, one at a time. It then uses that revision information to mimic a commit of the same to another repository. Neither repository needs to be locally accessible to the machine on which svnsync is running—its parameters are repository URLs, and it does all its work through Subversion's repository access (RA) interfaces. All it requires is read access to the source repository and read/write access to the destination repository.
注意
当对远程源版本库使用svnsync时,Subversion版本库的服务器必须是Subversion1.4或更高的版本。
Assuming you already have a source repository that you'd like to mirror, the next thing you need is an empty target repository that will actually serve as that mirror. This target repository can use either of the available filesystem data-store backends (see “选择数据存储格式”一节), but it must not yet have any version history in it. The protocol that svnsync uses to communicate revision information is highly sensitive to mismatches between the versioned histories contained in the source and target repositories. For this reason, while svnsync cannot demand that the target repository be read-only, [35] allowing the revision history in the target repository to change by any mechanism other than the mirroring process is a recipe for disaster.
警告
不要做出会对镜像版本库产生版本库历史偏移的修改,所有提交和版本库的属性修改必须是由svnsync执行的。
Another requirement of the target repository is that the svnsync process be allowed to modify revision properties. Because svnsync works within the framework of that repository's hook system, the default state of the repository (which is to disallow revision property changes; see pre-revprop-change) is insufficient. You'll need to explicitly implement the pre-revprop-change hook, and your script must allow svnsync to set and change revision properties. With those provisions in place, you are ready to start mirroring repository revisions.
提示
It's a good idea to implement authorization measures that allow your repository replication process to perform its tasks while preventing other users from modifying the contents of your mirror repository at all.
Let's walk through the use of svnsync in a somewhat typical mirroring scenario. We'll pepper this discourse with practical recommendations, which you are free to disregard if they aren't required by or suitable for your environment.
As a service to the fine developers of our favorite version control system, we will be mirroring the public Subversion source code repository and exposing that mirror publicly on the Internet, hosted on a different machine than the one on which the original Subversion source code repository lives. This remote host has a global configuration that permits anonymous users to read the contents of repositories on the host, but requires users to authenticate in order to modify those repositories. (Please forgive us for glossing over the details of Subversion server configuration for the moment—those are covered thoroughly in 第 6 章 服务配置.) And for no other reason than that it makes for a more interesting example, we'll be driving the replication process from a third machine—the one that we currently find ourselves using.
首先,我们会创建一个作为镜像的版本库,下面两步需要我们能够通过shell访问镜像版本库的机器。一旦版本库配置完成,我们不必再直接碰它了。
$ ssh [email protected] \ "svnadmin create /var/svn/svn-mirror" [email protected]'s password: ******** $
此刻,我们有了我们的版本库,因为我们服务器的配置,这个版本库现在“存在于”Internet。现在,因为除了复制进程我们不希望任何其他修改,我们需要将这个进程同其他可能的提交者区分开来。为此,我们的进程使用专用的用户,只有特定用户syncuser的提交和属性修改可以被执行。
We'll use the repository's hook system both to allow the
replication process to do what it needs to do and to enforce
that only it is doing those things. We accomplish this by
implementing two of the repository event
hooks—pre-revprop-change and start-commit. Our
pre-revprop-change hook script is found
in 例 5.2 “镜像版本库的 pre-revprop-change 钩子”, and basically verifies that the user attempting the
property changes is our syncuser user. If
so, the change is allowed; otherwise, it is denied.
例 5.2. 镜像版本库的 pre-revprop-change 钩子
#!/bin/sh USER="$3" if [ "$USER" = "syncuser" ]; then exit 0; fi echo "Only the syncuser user may change revision properties" >&2 exit 1
这里覆盖了修订版本属性修改,我们现在需要来确认只有用户syncuser允许提交新版本到版本库,我们使用了一个像例 5.3 “镜像版本库的 start-commit 钩子”的start-commit钩子。
例 5.3. 镜像版本库的 start-commit 钩子
#!/bin/sh USER="$2" if [ "$USER" = "syncuser" ]; then exit 0; fi echo "Only the syncuser user may commit new revisions" >&2 exit 1
在安装了我们的钩子脚本和确定它们可以被Subversion服务器执行后,我们完成了镜像版本库的配置,现在我们开始实际的镜像。
The first thing we need to do with svnsync is to register in our target repository the fact that it will be a mirror of the source repository. We do this using the svnsync initialize subcommand. The URLs we provide point to the root directories of the target and source repositories, respectively. In Subversion 1.4, this is required—only full mirroring of repositories is permitted. In Subversion 1.5, though, you can use svnsync to mirror only some subtree of the repository, too.
$ svnsync help init
initialize (init): usage: svnsync initialize DEST_URL SOURCE_URL
Initialize a destination repository for synchronization from
another repository.
…
$ svnsync initialize http://svn.example.com/svn-mirror \
http://svn.collab.net/repos/svn \
--sync-username syncuser --sync-password syncpass
Copied properties for revision 0.
$
我们的目标版本库现在记住了它是Subversion公共源代码版本库的镜像,注意我们在svnsync提供了一个用户名和密码—这是我们的镜像版本库pre-revprop-change钩子的要求。
注意
In Subversion 1.4, the values given to
svnsync's --username and
--password command-line options were used
for authentication against both the source and destination
repositories. This caused problems when a user's
credentials weren't exactly the same for both repositories,
especially when running in noninteractive mode (with the
--non-interactive option).
This has been fixed in Subversion 1.5 with the
introduction of two new pairs of options. Use
--source-username and
--source-password to provide authentication
credentials for the source repository; use
--sync-username and
--sync-password to provide credentials for
the destination repository. (The old
--username and --password
options still exist for compatibility, but we advise against
using them.)
And now comes the fun part. With a single subcommand, we can tell svnsync to copy all the as-yet-unmirrored revisions from the source repository to the target. [36] The svnsync synchronize subcommand will peek into the special revision properties previously stored on the target repository, and determine both what repository it is mirroring as well as that the most recently mirrored revision was revision 0. Then it will query the source repository and determine what the latest revision in that repository is. Finally, it asks the source repository's server to start replaying all the revisions between 0 and that latest revision. As svnsync get the resulting response from the source repository's server, it begins forwarding those revisions to the target repository's server as new commits.
$ svnsync help synchronize synchronize (sync): usage: svnsync synchronize DEST_URL Transfer all pending revisions to the destination from the source with which it was initialized. … $ svnsync synchronize http://svn.example.com/svn-mirror Transmitting file data ........................................ Committed revision 1. Copied properties for revision 1. Transmitting file data .. Committed revision 2. Copied properties for revision 2. Transmitting file data ..... Committed revision 3. Copied properties for revision 3. … Transmitting file data .. Committed revision 23406. Copied properties for revision 23406. Transmitting file data . Committed revision 23407. Copied properties for revision 23407. Transmitting file data .... Committed revision 23408. Copied properties for revision 23408. $
Of particular interest here is that for each mirrored
revision, there is first a commit of that revision to the
target repository, and then property changes follow. This is
because the initial commit is performed by (and attributed to)
the user syncuser, and it is datestamped
with the time as of that revision's creation. Also,
Subversion's underlying repository access interfaces don't
provide a mechanism for setting arbitrary revision properties
as part of a commit. So svnsync follows up
with an immediate series of property modifications that copy
into the target repository all the revision properties found
for that revision in the source repository. This also has the
effect of fixing the author and datestamp of the revision to
match that of the source repository.
Also noteworthy is that svnsync performs careful bookkeeping that allows it to be safely interrupted and restarted without ruining the integrity of the mirrored data. If a network glitch occurs while mirroring a repository, simply repeat the svnsync synchronize command, and it will happily pick up right where it left off. In fact, as new revisions appear in the source repository, this is exactly what you to do in order to keep your mirror up to date.
There is, however, one bit of inelegance in the process. Because Subversion revision properties can be changed at any time throughout the lifetime of the repository, and because they don't leave an audit trail that indicates when they were changed, replication processes have to pay special attention to them. If you've already mirrored the first 15 revisions of a repository and someone then changes a revision property on revision 12, svnsync won't know to go back and patch up its copy of revision 12. You'll need to tell it to do so manually by using (or with some additional tooling around) the svnsync copy-revprops subcommand, which simply re-replicates all the revision properties for a particular revision or range thereof.
$ svnsync help copy-revprops copy-revprops: usage: svnsync copy-revprops DEST_URL [REV[:REV2]] Copy the revision properties in a given range of revisions to the destination from the source with which it was initialized. … $ svnsync copy-revprops http://svn.example.com/svn-mirror 12 Copied properties for revision 12. $
That's repository replication in a nutshell. You'll likely want some automation around such a process. For example, while our example was a pull-and-push setup, you might wish to have your primary repository push changes to one or more blessed mirrors as part of its post-commit and post-revprop-change hook implementations. This would enable the mirror to be up to date in as near to real time as is likely possible.
而且,这样做并不平凡,在人证用户只有部分读权限时svnsync也会优雅的镜像,它只会拷贝允许查看的版本库内容,显然这种镜像不适合备份方案。
In Subversion 1.5, svnsync grew the ability to also mirror a subset of a repository rather than the whole thing. The process of setting up and maintaining such a mirror is exactly the same as when mirroring a whole repository, except that instead of specifying the source repository's root URL when running svnsync init, you specify the URL of some subdirectory within that repository. Synchronization to that mirror will now only copy the bits that changed under that source repository subdirectory. There are some limitations to this support though. First, you can't mirror multiple disjoint subdirectories of the source repository into a single mirror repository—you'd need to instead mirror some parent directory that is common to both. Secondly, the filtering logic is entirely path-based, so if the subdirectory you are mirroring was renamed at some point in the past, your mirror would only contain the revisions since the directory appeared at the URL you specified. And likewise, if the source subdirectory is renamed in the future, your synchronization processes will stop mirroring data at the point that the source URL you specified is no longer valid.
As far as user interaction with repositories and mirrors goes, it is possible to have a single working copy that interacts with both, but you'll have to jump through some hoops to make it happen. First, you need to ensure that both the primary and mirror repositories have the same repository UUID (which is not the case by default). See “Managing Repository UUIDs”一节 later in this chapter for more about this.
Once the two repositories have the same UUID, you can use svn switch --relocate to point your working copy to whichever of the repositories you wish to operate against, a process that is described in svn switch. There is a possible danger here, though, in that if the primary and mirror repositories aren't in close synchronization, a working copy up to date with, and pointing to, the primary repository will, if relocated to point to an out-of-date mirror, become confused about the apparent sudden loss of revisions it fully expects to be present, and it will throw errors to that effect. If this occurs, you can relocate your working copy back to the primary repository and then either wait until the mirror repository is up to date, or backdate your working copy to a revision you know is present in the sync repository, and then retry the relocation.
Finally, be aware that the revision-based replication provided by svnsync is only that—replication of revisions. Only information carried by the Subversion repository dump file format is available for replication. As such, svnsync has the same sorts of limitations that the repository dump stream has, and does not include such things as the hook implementations, repository or server configuration data, uncommitted transactions, or information about user locks on repository paths.
Despite numerous advances in technology since the birth of the modern computer, one thing unfortunately rings true with crystalline clarity—sometimes, things go very, very awry. Power outages, network connectivity dropouts, corrupt RAM, and crashed hard drives are but a taste of the evil that Fate is poised to unleash on even the most conscientious administrator. And so we arrive at a very important topic—how to make backup copies of your repository data.
There are two types of backup methods available for Subversion repository administrators—full and incremental. A full backup of the repository involves squirreling away in one sweeping action all the information required to fully reconstruct that repository in the event of a catastrophe. Usually, it means, quite literally, the duplication of the entire repository directory (which includes either a Berkeley DB or FSFS environment). Incremental backups are lesser things: backups of only the portion of the repository data that has changed since the previous backup.
As far as full backups go, the naïve approach might seem like a sane one, but unless you temporarily disable all other access to your repository, simply doing a recursive directory copy runs the risk of generating a faulty backup. In the case of Berkeley DB, the documentation describes a certain order in which database files can be copied that will guarantee a valid backup copy. A similar ordering exists for FSFS data. But you don't have to implement these algorithms yourself, because the Subversion development team has already done so. The svnadmin hotcopy command takes care of the minutia involved in making a hot backup of your repository. And its invocation is as trivial as Unix's cp or Windows' copy operations:
$ svnadmin hotcopy /var/svn/repos /var/svn/repos-backup
作为结果的备份是一个完全功能的版本库,当发生严重错误时可以作为你的活动版本库的替换。
When making copies of a Berkeley DB repository, you can
even instruct svnadmin hotcopy to purge any
unused Berkeley DB logfiles (see “删除不使用的Berkeley DB日志文件”一节) from the
original repository upon completion of the copy. Simply
provide the --clean-logs option on the
command line.
$ svnadmin hotcopy --clean-logs /var/svn/bdb-repos /var/svn/bdb-repos-backup
Additional tooling around this command is available, too.
The tools/backup/ directory of the
Subversion source distribution holds the
hot-backup.py script. This script adds a
bit of backup management atop svnadmin
hotcopy, allowing you to keep only the most recent
configured number of backups of each repository. It will
automatically manage the names of the backed-up repository
directories to avoid collisions with previous backups and
will “rotate off” older backups, deleting them so
only the most recent ones remain. Even if you also have an
incremental backup, you might want to run this program on a
regular basis. For example, you might consider using
hot-backup.py from a program scheduler
(such as cron on Unix systems), which can
cause it to run nightly (or at whatever granularity of Time
you deem safe).
Some administrators use a different backup mechanism built
around generating and storing repository dump data. We
described in “版本库数据的移植”一节
how to use svnadmin dump --incremental to
perform an incremental backup of a given revision or range of
revisions. And of course, there is a full backup variation of
this achieved by omitting the --incremental
option to that command. There is some value in these methods,
in that the format of your backed-up information is
flexible—it's not tied to a particular platform,
versioned filesystem type, or release of Subversion or
Berkeley DB. But that flexibility comes at a cost, namely
that restoring that data can take a long time—longer
with each new revision committed to your repository. Also, as
is the case with so many of the various backup methods,
revision property changes that are made to already backed-up
revisions won't get picked up by a nonoverlapping,
incremental dump generation. For these reasons, we recommend
against relying solely on dump-based backup approaches.
如你所见,几种备份方式都有各自的优点,最简单的方式是完全热备份,将会每次建立版本库的完美复制品,这意味着如果当你的活动版本库发生了什么事情,你可以用备份恢复。但不幸的是,如果你维护多个备份,每个完全的备份会吞噬掉和你的活动版本库同样的空间。与之相对照的是增量备份,能够快速生成小的备份,但是恢复过程将会很痛苦,通常要包括多个增量拷贝的应用。其他方法都有自己的特点,管理员需要在创建拷贝和恢复的代价之间寻求平衡。
The svnsync program (see “版本库复制”一节) actually provides a rather handy middle-ground approach. If you are regularly synchronizing a read-only mirror with your main repository, then in a pinch, your read-only mirror is probably a good candidate for replacing that main repository if it falls over. The primary disadvantage of this method is that only the versioned repository data gets synchronized—repository configuration files, user-specified repository path locks, and other items that might live in the physical repository directory but not inside the repository's virtual versioned filesystem are not handled by svnsync.
在每一种备份情境下,版本库管理员需要意识到对未版本化的修订版本属性的修改对备份的影响,因为这些修改本身不会产生新的修订版本,所以不会触发post-commit的钩子程序,也不会触发pre-revprop-change和post-revprop-change的钩子。 [37]而且因为你可以改变修订版本的属性,而不需要遵照时间顺序—你可在任何时刻修改任何修订版本的属性—因此最新版本的增量备份不会捕捉到以前特定修订版本的属性修改。
Generally speaking, only the truly paranoid would need to back up their entire repository, say, every time a commit occurred. However, assuming that a given repository has some other redundancy mechanism in place with relatively fine granularity (such as per-commit emails or incremental dumps), a hot backup of the database might be something that a repository administrator would want to include as part of a system-wide nightly backup. It's your data—protect it as much as you'd like.
Often, the best approach to repository backups is a diversified one that leverages combinations of the methods described here. The Subversion developers, for example, back up the Subversion source code repository nightly using hot-backup.py and an offsite rsync of those full backups; keep multiple archives of all the commit and property change notification emails; and have repository mirrors maintained by various volunteers using svnsync. Your solution might be similar, but should be catered to your needs and that delicate balance of convenience with paranoia. And whatever you do, validate your backups from time to time—what good is a spare tire that has a hole in it? While all of this might not save your hardware from the iron fist of Fate, [38] it should certainly help you recover from those trying times.
Subversion repositories have a universally unique identifier (UUID) associated with them. This is used by Subversion clients to verify the identity of a repository when other forms of verification aren't good enough (such as checking the repository URL, which can change over time). Most Subversion repository administrators rarely, if ever, need to think about repository UUIDs as anything more than a trivial implementation detail of Subversion. Sometimes, however, there is cause for attention to this detail.
As a general rule, you want the UUIDs of your live repositories to be unique. That is, after all, the point of having UUIDs. But there are times when you want the repository UUIDs of two repositories to be exactly the same. For example, if you make a copy of a repository for backup purposes, you want the backup to be a perfect replica of the original so that, in the event that you have to restore that backup and replace the live repository, users don't suddenly see what looks like a different repository. When dumping and loading repository history (as described earlier in “版本库数据的移植”一节), you get to decide whether to apply the UUID encapsulated in the data dump stream to the repository you are loading the data into. The particular circumstance will dictate the correct behavior.
There are a couple of ways to set (or reset) a repository's UUID, should you need to. As of Subversion 1.5, this is as simple as using the svnadmin setuuid command. If you provide this subcommand with an explicit UUID, it will validate that the UUID is well-formed and then set the repository UUID to that value. If you omit the UUID, a brand-new UUID will be generated for your repository.
$ svnlook uuid /var/svn/repos
cf2b9d22-acb5-11dc-bc8c-05e83ce5dbec
$ svnadmin setuuid /var/svn/repos # generate a new UUID
$ svnlook uuid /var/svn/repos
3c3c38fe-acc0-11dc-acbc-1b37ff1c8e7c
$ svnadmin setuuid /var/svn/repos \
cf2b9d22-acb5-11dc-bc8c-05e83ce5dbec # restore the old UUID
$ svnlook uuid /var/svn/repos
cf2b9d22-acb5-11dc-bc8c-05e83ce5dbec
$
For folks using versions of Subversion earlier than 1.5, these tasks are a little more complicated. You can explicitly set a repository's UUID by piping a repository dump file stub that carries the new UUID specification through svnadmin load --force-uuid.
$ svnadmin load --force-uuid /var/svn/repos <<EOF SVN-fs-dump-format-version: 2 UUID: cf2b9d22-acb5-11dc-bc8c-05e83ce5dbec EOF $ svnlook uuid /var/svn/repos cf2b9d22-acb5-11dc-bc8c-05e83ce5dbec $
Having older versions of Subversion generate a brand new UUID is not quite as simple to do, though. Your best bet here is to find some other way to generate a UUID, and then explicitly set the repository's UUID to that value.
Subversion repository data is wholly contained within the repository directory. As such, you can move a Subversion repository to some other location on disk, rename a repository, copy a repository, or delete a repository altogether using the tools provided by your operating system for manipulating directories—mv, cp -a, and rm -r on Unix platforms; copy, move and rmdir /s /q on Windows; vast numbers of mouse and menu gyrations in various graphical file explorer applications, and so on.
Of course, there's often still more to be done when trying to cleanly affect changes such as this. For example, you might need to update your Subversion server configuration to point to the new location of a relocated repository or to remove configuration bits for a now-deleted repository. If you have automated processes that publish information from or about your repositories, they may need to be updated. Hook scripts might need to be reconfigured. Users may need to be notified. The list can go on indefinitely, or at least to the extent that you've built processes and procedures around your Subversion repository.
In the case of a copied repository, you should also consider the fact that Subversion uses repository UUIDs to distinguish repositories. If you copy a Subversion repository using a typical shell recursive copy command, you'll wind up with two repositories identical in every way—including their UUIDs. In some circumstances, this might be desirable. But in the instances where it is not, you'll need to generate a new UUID for one of these identical repositories. See “Managing Repository UUIDs”一节 for more about managing repository UUIDs.
By now you should have a basic understanding of how to create, configure, and maintain Subversion repositories. We've introduced you to the various tools that will assist you with this task. Throughout the chapter, we've noted common administration pitfalls and offered suggestions for avoiding them.
剩下的,就是由你决定在你的版本库中存放一些什么有趣的资料,并最终通过网络获得这些资料。下一章是关于网络的内容。
[24] 这可能听起来很崇高, 但我们所指的只是那些对管理别人工作拷贝数据之外的神秘领域感兴趣的人。
[25] 无论是在忽略情况下建立或很少考虑过如何产生正确的软件开发矩阵,都不应该愚蠢的担心全局的修订版本号码,这不应该成为安排项目和版本库的理由。
[26] The trunk, tags,
and branches trio are sometimes referred
to as “the TTB directories.”
[27] Often pronounced “fuzz-fuzz,” if Jack Repenning has anything to say about it. (This book, however, assumes that the reader is thinking “eff-ess-eff-ess.”)
[28] Berkeley DB需要底层的文件系统实现严格的POSIX锁定语法,更重要的是,将文件直接映射到内存的能力。
[29] Oracle在2006情人节购买了Sleepycat和它的旗舰软件Berkeley DB。
[30] 或者是, “sync” ?
[31] e.g., hard drive + huge electromagnet = disaster
[32] 那就是你是用版本控制的原因,对吗?
[33] Conscious, cautious removal of certain bits of versioned data is actually supported by real use cases. That's why an “obliterate” feature has been one of the most highly requested Subversion features, and one which the Subversion developers hope to soon provide.
[34] While svnadmin dump has a consistent leading slash policy (to not include them), other programs that generate dump data might not be so consistent.
[35] 实际上,它不是真的完全只读,或者svnsync本身有时间将版本库历史拷入。
[36] Be forewarned that while it will take only a few seconds for the average reader to parse this paragraph and the sample output that follows it, the actual time required to complete such a mirroring operation is, shall we say, quite a bit longer.
[37] svnadmin setlog可以被绕过钩子程序被调用。
[38] You know—the collective term for all of her “fickle fingers.”
目录
一个Subversion的版本库可以和客户端同时运行在同一个机器上,使用file:///访问,但是一个典型的Subversion设置应该包括一个单独的服务器,可以被办公室的所有客户端访问—或者有可能是整个世界。
This chapter describes how to get your Subversion repository exposed outside its host machine for use by remote clients. We will cover Subversion's currently available server mechanisms, discussing the configuration and use of each. After reading this section, you should be able to decide which networking setup is right for your needs, as well as understand how to enable such a setup on your host computer.
Subversion was designed with an abstract network layer. This means that a repository can be programmatically accessed by any sort of server process, and the client “repository access” API allows programmers to write plug-ins that speak relevant network protocols. In theory, Subversion can use an infinite number of network implementations. In practice, there are only two servers at the time of this writing.
Apache is an extremely popular web server; using the mod_dav_svn module, Apache can access a repository and make it available to clients via the WebDAV/DeltaV protocol, which is an extension of HTTP. Because Apache is an extremely extensible server, it provides a number of features “for free,” such as encrypted SSL communication, logging, integration with a number of third-party authentication systems, and limited built-in web browsing of repositories.
In the other corner is svnserve: a small, lightweight server program that speaks a custom protocol with clients. Because its protocol is explicitly designed for Subversion and is stateful (unlike HTTP), it provides significantly faster network operations—but at the cost of some features as well. While it can use SASL to provide a variety of authentication and encryption options, it has no logging or built-in web browsing. It is, however, extremely easy to set up and is often the best option for small teams just starting out with Subversion.
第三个选择是使用SSH连接包裹的svnserve,尽管这个场景依然使用svnserve,它与传统的svnserve部署非常不同,SSH在多所有的通讯中使用加密方式,SSH也使用排他的认证,所以在服务器主机(svnserve与之不同,它包含了自己的私有用户帐号)上必须要有真实的系统帐户。最后,因为这些配置需要每个用户发起一个私有的临时svnserve进程,这与允许一组本地用户通过file://协议访问等同(从访问许可的视点)。因此路径为基础的访问控制变得没有意义,因为每个用户都可以直接访问版本库。
表 6.1 “” provides a quick summary of the three typical server deployments.
表 6.1.
| 特性 | Apache + mod_dav_svn | svnserve | svnserve over SSH |
|---|---|---|---|
| 认证选项 | HTTP(S) basic auth, X.509 certificates, LDAP, NTLM, or any other mechanism available to Apache httpd. | CRAM-MD5 by default; LDAP, NTLM, or any other mechanism available to SASL. | SSH |
| 用户帐号选项 | Private 'users' file, or other mechanisms available to Apache httpd (LDAP, SQL, etc.) | Private 'users' file, or other mechanisms available to SASL (LDAP, SQL, etc.). | System accounts. |
| 授权选项 | Read/write access can be granted over the whole repository, or specified per path. | Read/write access can be granted over the whole repository, or specified per path. | Read/write access only grantable over the whole repository. |
| 加密 | Available via optional SSL. | Available via optional SASL features. | Inherent in SSH connection. |
| Logging | Full Apache logs of each HTTP request, with optional “高级” logging of general client operations. | No logging. | No logging. |
| 交互性 | Accessible by other WebDAV clients. | Talks only to svn clients. | Talks only to svn clients. |
| Web浏览能力 | Limited built-in support, or via third-party tools such as ViewVC. | Only via third-party tools such as ViewVC. | Only via third-party tools such as ViewVC. |
| Master-slave server replication | Transparent write-proxying available from slave to master. | Can only create read-only slave servers. | Can only create read-only slave servers. |
| 速度 | Somewhat slower. | Somewhat faster. | Somewhat faster. |
| 初始设置 | Somewhat complex. | Extremely simple. | Moderately simple. |
那你应该用什么服务器?什么最好?
显然,对这个问题没有正确的答案,每个团队都有不同的需要,不同的服务器都有各自的代价。Subversion项目没有更加认可哪种服务,或认为哪个服务更加“正式”一点。
下面是你选择或者不选择某一个部署方式的原因。
- 为什么你会希望使用它:
-
-
设置快速简单。
-
网络协议是有状态的,比WebDAV快很多。
-
不需要在服务器创建系统帐号。
-
不会在网络传输密码。
-
- 为什么你会希望避免它:
-
-
By default, only one authentication method is available, the network protocol is not encrypted, and the server stores clear text passwords. (All these things can be changed by configuring SASL, but it's a bit more work to do.)
-
没有任何类型的日志,甚至是错误。
-
No built-in web browsing. (You'd have to install a separate web server and some CGI software to add this.)
-
- 为什么你会希望使用它:
-
-
网络协议是有状态的,比WebDAV快很多。
-
You can take advantage of existing SSH accounts and user infrastructure.
-
所有网络传输是加密的。
-
- 为什么你会希望避免它:
-
-
只有一个认证方法选择。
-
没有任何类型的日志,甚至是错误。
-
Requires users to be in same system group, or use a shared SSH key.
-
如果使用不正确,会导致文件许可问题。
-
- 为什么你会希望使用它:
-
-
允许Subversion使用大量已经集成到Apache的用户认证系统。
-
不需要在服务器创建系统帐号。
-
完全的Apache日志。
-
网络传输可以通过SSL加密。
-
HTTP(S) 通常可以穿越公司防火墙。
-
通过web浏览器访问内置的版本库浏览。
-
Repository can be mounted as a network drive for transparent version control (see “自动版本化”一节).
-
- 为什么你会希望避免它:
-
-
Noticeably slower than svnserve, because HTTP is a stateless protocol and requires more network turnarounds.
-
初始设置可能复杂
-
通常,本书的作者推荐希望尝试开始使用Subversion的小团队使用svnserve;这是设置最简单,维护最少的方法,而当你的需求改变时,你可以转换到复杂的部署方式。
下面是一些常见的建议和小技巧,基于多年对用户的支持:
-
If you're trying to set up the simplest possible server for your group, then a vanilla svnserve installation is the easiest, fastest route. Note, however, that your repository data will be transmitted in the clear over the network. If your deployment is entirely within your company's LAN or VPN, this isn't an issue. If the repository is exposed to the wide-open Internet, then you might want to make sure that either the repository's contents aren't sensitive (e.g., it contains only open source code), or that you go the extra mile in configuring SASL to encrypt network communications.
-
If you need to integrate with existing legacy identity systems (LDAP, Active Directory, NTLM, X.509, etc.), then you must use either the Apache-based server or svnserve configured with SASL. If you absolutely need server-side logs of either server errors or client activities, then an Apache-based server is your only option.
-
If you've decided to use either Apache or stock svnserve, create a single svn user on your system and run the server process as that user. Be sure to make the repository directory wholly owned by the svn user as well. From a security point of view, this keeps the repository data nicely siloed and protected by operating system filesystem permissions, changeable by only the Subversion server process itself.
-
If you have an existing infrastructure heavily based on SSH accounts, and if your users already have system accounts on your server machine, then it makes sense to deploy an svnserve-over-SSH solution. Otherwise, we don't widely recommend this option to the public. It's generally considered safer to have your users access the repository via (imaginary) accounts managed by svnserve or Apache, rather than by full-blown system accounts. If your deep desire for encrypted communication still draws you to this option, we recommend using Apache with SSL or svnserve with SASL encryption instead.
-
Do not be seduced by the simple idea of having all of your users access a repository directly via
file://URLs. Even if the repository is readily available to everyone via network share, this is a bad idea. It removes any layers of protection between the users and the repository: users can accidentally (or intentionally) corrupt the repository database, it becomes hard to take the repository offline for inspection or upgrade, and it can lead to a mess of file-permissions problems (see “支持多种版本库访问方法”一节). Note that this is also one of the reasons we warn against accessing repositories viasvn+ssh://URLs—from a security standpoint, it's effectively the same as local users accessing viafile://, and it can entail all the same problems if the administrator isn't careful.
svnserve是一个轻型的服务器,可以同客户端通过在TCP/IP基础上的自定义有状态协议通讯,客户端通过使用开头为svn://或者svn+ssh://svnserve的URL来访问一个svnserve服务器。这一小节将会解释运行svnserve的不同方式,客户端怎样实现服务器的认证,怎样配置版本库恰当的访问控制。
有许多不同方法运行svnserve:
-
作为一个独立守护进程启动svnserve,监听请求。
-
当特定端口收到一个请求,就会使UNIX的inetd守护进程临时调用svnserve处理。
-
使用SSH在加密通道发起临时svnserve服务。
-
Run svnserve as a Microsoft Windows service.
使用svnserve最简单的方式是作为独立“守护”进程运行,使用-d选项:
$ svnserve -d $ # svnserve is now running, listening on port 3690
当以守护模式运行svnserve时,你可以使用--listen-port=和--listen-host=选项来自定义“绑定”的端口和主机名。
Once we successfully start svnserve as
explained previously, it makes every repository on your system
available to the network. A client needs to specify an
absolute path in the repository URL. For
example, if a repository is located at
/var/svn/project1, then a client would
reach it via
svn://host.example.com/var/svn/project1. To
increase security, you can pass the -r option
to svnserve, which restricts it to
exporting only repositories below that path. For
example:
$ svnserve -d -r /var/svn …
使用-r可以有效地改变文件系统的根位置,客户端可以使用去掉前半部分的路径,留下的要短一些的(更加有提示性)URL:
$ svn checkout svn://host.example.com/project1 …
If you want inetd to launch the
process, then you need to pass the -i
(--inetd) option. In the following
example, we've shown the output from running
svnserve -i at the command line, but note
that isn't how you actually start the daemon; see the
paragraphs following the example for how to configure
inetd to start
svnserve.
$ svnserve -i ( success ( 1 2 ( ANONYMOUS ) ( edit-pipeline ) ) )
When invoked with the --inetd option,
svnserve attempts to speak with a
Subversion client via stdin and
stdout using a custom protocol. This is
the standard behavior for a program being run via
inetd. The IANA has reserved port 3690 for
the Subversion protocol, so on a Unix-like system you can add
lines to /etc/services such as these (if
they don't already exist):
svn 3690/tcp # Subversion svn 3690/udp # Subversion
If your system is using a classic Unix-like
inetd daemon, you can add this line to
/etc/inetd.conf:
svn stream tcp nowait svnowner /usr/bin/svnserve svnserve -i
Make sure “svnowner” is a user that has
appropriate permissions to access your repositories. Now,
when a client connection comes into your server on port 3690,
inetd will spawn an
svnserve process to service it. Of course,
you may also want to add -r to the
configuration line as well, to restrict which repositories are
exported.
A third way to invoke svnserve is in
tunnel mode, using the -t option. This
mode assumes that a remote-service program such as
RSH or SSH has
successfully authenticated a user and is now invoking a
private svnserve process as
that user. (Note that you, the user, will
rarely, if ever, have reason to invoke
svnserve with the -t at
the command line; instead, the SSH daemon
does so for you.) The svnserve program
behaves normally (communicating via
stdin and stdout)
and assumes that the traffic is being automatically
redirected over some sort of tunnel back to the client.
When svnserve is invoked by a tunnel
agent like this, be sure that the authenticated user has
full read and write access to the repository database files.
It's essentially the same as a local user accessing the
repository via file:// URLs.
This option is described in much more detail later in this chapter in “SSH 隧道”一节.
If your Windows system is a descendant of Windows NT
(2000, 2003, XP, or Vista), then you can
run svnserve as a standard Windows
service. This is typically a much nicer experience than
running it as a standalone daemon with the --daemon
(-d) option. Using daemon mode requires launching
a console, typing a command, and then leaving the console
window running indefinitely. A Windows service, however,
runs in the background, can start at boot time
automatically, and can be started and stopped using the same
consistent administration interface as other
Windows services.
You'll need to define the new service using the command-line tool SC.EXE. Much like the inetd configuration line, you must specify an exact invocation of svnserve for Windows to run at startup time:
C:\> sc create svn
binpath= "C:\svn\bin\svnserve.exe --service -r C:\repos"
displayname= "Subversion Server"
depend= Tcpip
start= auto
This defines a new Windows service named
“svn,” which executes a particular
svnserve.exe command when started (in
this case, rooted at C:\repos). There
are a number of caveats in the prior example,
however.
First, notice that the svnserve.exe
program must always be invoked with the
--service option. Any other options to
svnserve must then be specified on the
same line, but you cannot add conflicting options such as
--daemon (-d), --tunnel,
or --inetd (-i). Options such as
-r or --listen-port are
fine, though. Second, be careful about spaces when invoking
the SC.EXE command: the key=
value patterns must have no spaces between
key= and must have exactly one space
before the value. Lastly, be careful
about spaces in your commandline to be invoked. If a
directory name contains spaces (or other characters that
need escaping), place the entire inner value of
binpath in double-quotes, by escaping
them:
C:\> sc create svn
binpath= "\"C:\program files\svn\bin\svnserve.exe\" --service -r C:\repos"
displayname= "Subversion Server"
depend= Tcpip
start= auto
也需要注意单词binpath会造成误解—它的值是一个命令行,而不是可执行的路径,所以我们为了防止有嵌入的空格而使用了引号围绕。
Once the service is defined, it can be stopped, started, or queried using standard GUI tools (the Services administrative control panel), or at the command line:
C:\> net stop svn C:\> net start svn
也可以通过删除其定义删除服务:sc delete svn,只需要确定首先停止服务,SC.EXE有许多子命令和选项,更多信息可以运行sc /?查看。
如果一个客户端连接到svnserve进程,如下事情会发生:
-
客户端选择特定的版本库。
-
The server processes the repository's
conf/svnserve.conffile and begins to enforce any authentication and authorization policies it describes. -
Depending on the defined policies, one of the following may accur:
-
The client may be allowed to make requests anonymously, without ever receiving an authentication challenge.
-
The client may be challenged for authentication at any time.
-
If operating in tunnel mode, the client will declare itself to be already externally authenticated (typically by SSH).
-
The svnserve server, by default, knows only how to send a CRAM-MD5 [39] authentication challenge. In essence, the server sends a small amount of data to the client. The client uses the MD5 hash algorithm to create a fingerprint of the data and password combined, and then sends the fingerprint as a response. The server performs the same computation with the stored password to verify that the result is identical. At no point does the actual password travel over the network.
If your svnserve server was built with SASL, then it not only knows how to send CRAM-MD5 challenges, but likely knows a whole host of other authentication mechanisms. See “Using svnserve with SASL”一节 later in this chapter to learn how to configure SASL authentication and encryption.
It's also possible, of course, for the client to be externally authenticated via a tunnel agent, such as SSH. In that case, the server simply examines the user it's running as, and uses this name as the authenticated username. For more on this, see the later section “SSH 隧道”一节.
As you've already guessed, a repository's
svnserve.conf file is the central
mechanism for controlling authentication and authorization
policies. The file has the same format as other configuration
files (see “运行配置区”一节 in chapter
7): section names are marked by square brackets
([ and ]), comments
begin with hashes (#), and each section
contains specific variables that can be set (variable
= value). Let's walk through these files and learn
how to use them.
For now, the [general] section of the
svnserve.conf has all the variables you
need. Begin by changing the values of those variables:
choose a name for a file that will contain your usernames
and passwords and choose an authentication realm:
[general] password-db = userfile realm = example realm
The realm is a name that you define.
It tells clients which sort of “authentication
namespace” they're connecting to; the Subversion
client displays it in the authentication prompt and uses it
as a key (along with the server's hostname and port) for
caching credentials on disk (see “客户端凭证缓存”一节). The
password-db variable points to a separate
file that contains a list of usernames and passwords, using
the same familiar format. For example:
[users] harry = foopassword sally = barpassword
password-db的值可以是用户文件的绝对或相对路径,对许多管理员来说,把文件保存在版本库conf/下的svnserve.conf旁边是一个简单的方法。另一方面,可能你的多个版本库使用同一个用户文件,此时,这个文件应该在更公开的地方,版本库分享用户文件时必须配置为相同的域,因为用户列表本质上定义了一个认证域,无论这个文件在哪里,必须设置好文件的读写权限,如果你知道运行svnserve的用户,限定这个用户对这个文件有读权限是必须的。
svnserve.conf有两个或多个参数需要设置:它们确定未认证(匿名)和认证用户可以做的事情,参数anon-access和auth-access可以设置为none、read或者write,设置为none会限制所有方式的访问,read允许只读访问,而write允许对版本库完全的读/写权限,例如:
[general] password-db = userfile realm = example realm # anonymous users can only read the repository anon-access = read # authenticated users can both read and write auth-access = write
实例中的设置实际上是参数的缺省值,你一定不要忘了设置它们,如果你希望更保守一点,你可以完全封锁匿名访问:
[general] password-db = userfile realm = example realm # anonymous users aren't allowed anon-access = none # authenticated users can both read and write auth-access = write
服务进程不仅仅理解对版本库的整体访问控制,也可以细粒度的控制版本库某个文件或目录的访问,为了使用这个特性,你需要定一个包含详细规则的文件,并将变量authz-db指向到这个文件。
[general] password-db = userfile realm = example realm # Specific access rules for specific locations authz-db = authzfile
The syntax of the authzfile file is
discussed in detail later in this chapter in
“基于路径的授权”一节. Note
that the authz-db variable isn't mutually
exclusive with the anon-access
and auth-access variables; if all the
variables are defined at once, then all
of the rules must be satisfied before access is allowed.
For many teams, the built-in CRAM-MD5 authentication is all they need from svnserve. However, if your server (and your Subversion clients) were built with the Cyrus Simple Authentication and Security Layer (SASL) library, then you have a number of authentication and encryption options available to you.
Normally, when a subversion client connects to svnserve, the server sends a greeting that advertises a list of the capabilities it supports, and the client responds with a similar list of capabilities. If the server is configured to require authentication, it then sends a challenge that lists the authentication mechanisms available; the client responds by choosing one of the mechanisms, and then authentication is carried out in some number of round-trip messages. Even when SASL capabilities aren't present, the client and server inherently know how to use the CRAM-MD5 and ANONYMOUS mechanisms (see “Built-in Authentication and Authorization”一节). If server and client were linked against SASL, then a number of other authentication mechanisms may also be available. However, you'll need to explicitly configure SASL on the server side to advertise them.
To activate specific SASL mechanisms on the server,
you'll need to do two things. First, create
a [sasl] section in your
repository's svnserve.conf file with an
initial key-value pair:
[sasl]
use-sasl = true
Second, create a main SASL configuration file
called svn.conf in a place where the
SASL library can find it—typically in the directory
where SASL plug-ins are located. You'll have to locate the
plug-in directory on your particular system, such
as /usr/lib/sasl2/
or /etc/sasl2/. (Note that this
is not
the svnserve.conf file that lives
within a repository!)
On a Windows server, you'll also have to edit the system
registry (using a tool such as regedit)
to tell SASL where to find things. Create a registry key
named [HKEY_LOCAL_MACHINE\SOFTWARE\Carnegie
Mellon\Project Cyrus\SASL Library], and place two
keys inside it: a key called SearchPath
(whose value is a path to the directory containing the SASL
sasl*.dll plug-in libraries), and a key
called
ConfFile (whose value is a path to the
parent directory containing
the svn.conf file you created).
Because SASL provides so many different kinds of
authentication mechanisms, it would be foolish (and far
beyond the scope of this book) to try and describe every
possible server-side configuration. Instead, we recommend
that you read the documentation supplied in the
doc/ subdirectory of the SASL source
code. It goes into great detail about every mechanism and
how to configure the server appropriately for each. For the
purposes of this discussion, we'll just demonstrate a simple
example of configuring the DIGEST-MD5 mechanism. For
example, if your subversion.conf
(or svn.conf) file contains the
following:
pwcheck_method: auxprop auxprop_plugin: sasldb sasldb_path: /etc/my_sasldb mech_list: DIGEST-MD5
then you've told SASL to advertise the DIGEST-MD5
mechanism to clients and to check user passwords against a
private password database located
at /etc/my_sasldb. A system
administrator can then use
the saslpasswd2 program to add or modify
usernames and passwords in the database:
$ saslpasswd2 -c -f /etc/my_sasldb -u realm username
A few words of warning: first, make sure that the
“realm” argument
to saslpasswd2 matches the same realm
you've defined in your
repository's svnserve.conf file; if
they don't match, authentication will fail. Also, due to a
shortcoming in SASL, the common realm must be a string with
no space characters. Finally, if you decide to go with the
standard SASL password database, make sure that
the svnserve program has read access to
the file (and possibly write access as well, if you're using
a mechanism such as OTP).
This is just one simple way of configuring SASL. Many other authentication mechanisms are available, and passwords can be stored in other places such as in LDAP or a SQL database. Consult the full SASL documentation for details.
Remember that if you configure your server to only allow certain SASL authentication mechanisms, this forces all connecting clients to have SASL support as well. Any Subversion client built without SASL support (which includes all pre-1.5 clients) will be unable to authenticate. On the one hand, this sort of restriction may be exactly what you want (“my clients must all use Kerberos!”). However, if you still want non-SASL clients to be able to authenticate, be sure to advertise the CRAM-MD5 mechanism as an option. All clients are able to use CRAM-MD5, whether they have SASL capabilities or not.
SASL is also able to perform data encryption if a
particular mechanism supports it. The built-in CRAM-MD5
mechanism doesn't support encryption, but DIGEST-MD5 does,
and mechanisms such as SRP actually require use of the
OpenSSL library. To enable or disable different levels of
encryption, you can set two values in your repository's
svnserve.conf file:
[sasl] use-sasl = true min-encryption = 128 max-encryption = 256
The min-encryption and
max-encryption variables control the
level of encryption demanded by the server. To disable
encryption completely, set both values to 0. To enable
simple checksumming of data (i.e., prevent tampering and
guarantee data integrity without encryption), set both
values to 1. If you wish to allow—but not
require—encryption, set the minimum value to 0, and
the maximum value to some bit-length. To require encryption
unconditionally, set both values to numbers greater than 1.
In our previous example, we require clients to do at least
128-bit encryption, but no more than 256-bit
encryption.
svnserve's built-in authentication (and SASL support) can be very handy, because it avoids the need to create real system accounts. On the other hand, some administrators already have well-established SSH authentication frameworks in place. In these situations, all of the project's users already have system accounts and the ability to “SSH into” the server machine.
SSH与svnserve结合很简单,客户端只需要使用svn+ssh://的URL模式来连接:
$ whoami harry $ svn list svn+ssh://host.example.com/repos/project [email protected]'s password: ***** foo bar baz …
In this example, the Subversion client is invoking a local
ssh process, connecting to
host.example.com, authenticating as the
user harry, then spawning a private
svnserve process on the remote machine
running as the user harry. The
svnserve command is being invoked in tunnel
mode (-t), and its network protocol is being
“tunneled” over the encrypted connection by
ssh, the tunnel agent.
svnserve is aware that it's running as the
user harry, and if the client performs a
commit, the authenticated username will be used as the author
of the new revision.
这里要理解的最重要的事情是Subversion客户端不是连接到运行中的svnserve守护进程,这种访问方法不需要一个运行的守护进程,也不需要在必要时唤醒一个,它依赖于ssh来发起一个svnserve进程,然后网络断开后终止进程。
When using svn+ssh:// URLs to access a
repository, remember that it's the ssh
program prompting for authentication, and
not the svn client
program. That means there's no automatic password-caching
going on (see “客户端凭证缓存”一节). The
Subversion client often makes multiple connections to the
repository, though users don't normally notice this due to the
password caching feature. When using
svn+ssh:// URLs, however, users may be
annoyed by ssh repeatedly asking for a
password for every outbound connection. The solution is to
use a separate SSH password-caching tool such as
ssh-agent on a Unix-like system, or
pageant on Windows.
When running over a tunnel, authorization is primarily
controlled by operating system permissions to the repository's
database files; it's very much the same as if Harry were
accessing the repository directly via a
file:// URL. If multiple system users are
going to be accessing the repository directly, you may want to
place them into a common group, and you'll need to be careful
about umasks (be sure to read “支持多种版本库访问方法”一节 later in this
chapter). But even in the case of tunneling, the
svnserve.conf file can still be used to
block access, by simply setting auth-access =
read or auth-access = none.
[40]
You'd think that the story of SSH tunneling would end
here, but it doesn't. Subversion allows you to create custom
tunnel behaviors in your runtime config
file (see “运行配置区”一节.) For
example, suppose you want to use RSH instead of SSH.
[41] In the
[tunnels] section of your
config file, simply define it like
this:
[tunnels] rsh = rsh
And now, you can use this new tunnel definition by using a
URL scheme that matches the name of your new variable:
svn+rsh://host/path. When using the new
URL scheme, the Subversion client will actually be running the
command rsh host svnserve -t behind the
scenes. If you include a username in the URL (for example,
svn+rsh://username@host/path), the client
will also include that in its command (rsh
username@host svnserve -t). But you can define new
tunneling schemes to be much more clever than that:
[tunnels] joessh = $JOESSH /opt/alternate/ssh -p 29934
This example demonstrates a couple of things. First, it
shows how to make the Subversion client launch a very specific
tunneling binary (the one located at
/opt/alternate/ssh) with specific
options. In this case, accessing a
svn+joessh:// URL would invoke the
particular SSH binary with -p 29934 as
arguments—useful if you want the tunnel program to
connect to a nonstandard port.
第二点,它展示了怎样定义一个自定义的环境变量来覆盖管道程序中的名字,设置SVN_SSH环境变量是覆盖缺省的SSH管道的一种简便方法,但是如果你需要为多个服务器做出多个不同的覆盖,或许每一个都联系不同的端口或传递不同的SSH选项,你可以使用本例论述的机制。现在如果我们设置JOESSH环境变量,它的值会覆盖管道中的变量值—会执行$JOESSH而不是/opt/alternate/ssh -p 29934。
不仅仅是可以控制客户端调用ssh方式,也可以控制服务器中的sshd的行为方式,在本小节,我们会展示怎样控制sshd执行svnserve,包括如何让多个用户分享同一个系统帐户。
作为开始,定位到你启动svnserve的帐号的主目录,确定这个账户已经安装了一套SSH公开/私有密钥对,用户可以通过公开密钥认证,因为所有如下的技巧围绕着使用SSHauthorized_keys文件,密码认证在这里不会工作。
如果这个文件还不存在,创建一个authorized_keys文件(在UNIX下通常是~/.ssh/authorized_keys),这个文件的每一行描述了一个允许连接的公钥,这些行通常是下面的形式:
ssh-dsa AAAABtce9euch.... [email protected]
第一个字段描述了密钥的类型,第二个字段是未加密的密钥本身,第三个字段是注释。然而,这是一个很少人知道的事实,可以使用一个command来处理整行:
command="program" ssh-dsa AAAABtce9euch.... [email protected]
当command字段设置后,SSH守护进程运行命名的程序而不是通常Subversion客户端询问的svnserve -t。这为实施许多服务器端技巧开启了大门,在下面的例子里,我们简写了文件的这些行:
command="program" TYPE KEY COMMENT
因为我们可以指定服务器端执行的命令,我们很容易来选择运行一个特定的svnserve程序来并且传递给它额外的参数:
command="/path/to/svnserve -t -r /virtual/root" TYPE KEY COMMENT
In this example, /path/to/svnserve
might be a custom wrapper script
around svnserve which sets the umask (see
“支持多种版本库访问方法”一节.) It also
shows how to anchor svnserve in a virtual
root directory, just as one often does when
running svnserve as a daemon process.
This might be done either to restrict access to parts of the
system, or simply to relieve the user of having to type an
absolute path in the svn+ssh://
URL.
It's also possible to have multiple users share a single
account. Instead of creating a separate system account for
each user, generate a public/private key-pair for each
person. Then place each public key into
the authorized_users file, one per
line, and use the --tunnel-user
option:
command="svnserve -t --tunnel-user=harry" TYPE1 KEY1 [email protected] command="svnserve -t --tunnel-user=sally" TYPE2 KEY2 [email protected]
这个例子允许Harry和Sally通过公钥认证连接同一个的账户,每个人自定义的命令将会执行。--tunnel-user选项告诉svnserve -t命令采用命名的参数作为经过认证的用户,如果没有--tunnel-user,所有的提交会作为共享的系统帐户提交。
A final word of caution: giving a user access to the
server via public-key in a shared account might still allow
other forms of SSH access, even if you've set
the command value
in authorized_keys. For example, the
user may still get shell access through SSH or be able to
perform X11 or general port-forwarding through your server.
To give the user as little permission as possible, you may
want to specify a number of restrictive options immediately
after the command:
command="svnserve -t --tunnel-user=harry",no-port-forwarding, no-agent-forwarding,no-X11-forwarding,no-pty TYPE1 KEY1 [email protected]
(Note that this all must be on one line—truly on
one line, since SSH authorized_keys files
do not even allow the
conventional “\” for line
continuation. Thus, there should be no line break and no
space
between “no-port-forwarding,”
and
“no-agent-forwarding,” in the
example above; the only reason we've formatted it with a line
break is to fit it on the physical page of a book.)
The Apache HTTP Server is a “heavy duty”
network server that Subversion can leverage. Via a custom
module, httpd makes Subversion repositories
available to clients via the WebDAV/DeltaV protocol, which is an
extension to HTTP 1.1 (see http://www.webdav.org/
for more information). This protocol takes the ubiquitous HTTP
protocol that is the core of the World Wide Web, and adds
writing—specifically, versioned
writing—capabilities. The result is a standardized,
robust system that is conveniently packaged as part of the
Apache 2.0 software, supported by numerous operating systems
and third-party products, and doesn't require network
administrators to open up yet another custom port.[42] While an
Apache-Subversion server has more features than
svnserve, it's also a bit more difficult
to set up. With flexibility often comes more complexity.
Much of the following discussion includes references to
Apache configuration directives. While some examples are given
of the use of these directives, describing them in full is
outside the scope of this chapter. The Apache team maintains
excellent documentation, publicly available on their web site at
http://httpd.apache.org. For example, a general
reference for the configuration directives is located at
http://httpd.apache.org/docs-2.0/mod/directives.html.
Also, as you make changes to your Apache setup, it is likely
that somewhere along the way a mistake will be made. If you are
not already familiar with Apache's logging subsystem, you should
become aware of it. In your httpd.conf
file are directives that specify the on-disk locations of the
access and error logs generated by Apache (the
CustomLog and ErrorLog
directives, respectively).
Subversion's mod_dav_svn uses Apache's error
logging interface as well. You can always browse the contents
of those files for information that might reveal the source of a
problem that is not clearly noticeable otherwise.
为了让你的版本库使用HTTP网络,你基本上需要两个包里的四个部分。你需要Apache httpd2.0和包括的mod_dav DAV模块,Subversion和与之一同分发的mod_dav_svn文件系统提供者模块,如果你有了这些组件,网络化你的版本库将非常简单,如:
-
Getting httpd 2.0 up and running with the mod_dav module
-
Installing the mod_dav_svn back end to mod_dav, which uses Subversion's libraries to access the repository
-
Configuring your
httpd.conffile to export (or expose) the repository
You can accomplish the first two items either by
compiling httpd and Subversion from
source code or by installing prebuilt binary packages of
them on your system. For the most up-to-date information on
how to compile Subversion for use with the Apache HTTP Server,
as well as how to compile and configure Apache itself for
this purpose, see the INSTALL file in
the top level of the Subversion source code tree.
Once you have all the necessary components installed on
your system, all that remains is the configuration of Apache
via its httpd.conf file. Instruct Apache
to load the mod_dav_svn module using the
LoadModule directive. This directive must
precede any other Subversion-related configuration items. If
your Apache was installed using the default layout, your
mod_dav_svn module should have been
installed in the modules subdirectory of
the Apache install location (often
/usr/local/apache2). The
LoadModule directive has a simple syntax,
mapping a named module to the location of a shared library on
disk:
LoadModule dav_svn_module modules/mod_dav_svn.so
注意,如果mod_dav是作为共享对象编译(而不是静态链接到httpd程序),你需要为它使用LoadModule语句,一定确定它在mod_dav_svn之前:
LoadModule dav_module modules/mod_dav.so LoadModule dav_svn_module modules/mod_dav_svn.so
At a later location in your configuration file, you now
need to tell Apache where you keep your Subversion repository
(or repositories). The Location directive
has an XML-like notation, starting with an opening tag and
ending with a closing tag, with various other configuration
directives in the middle. The purpose of the
Location directive is to instruct Apache to
do something special when handling requests that are directed
at a given URL or one of its children. In the case of
Subversion, you want Apache to simply hand off support for
URLs that point at versioned resources to the DAV layer. You
can instruct Apache to delegate the handling of all URLs whose
path portions (the part of the URL that follows the server's
name and the optional port number) begin with
/repos/ to a DAV provider whose
repository is located at
/var/svn/repository using the
following httpd.conf syntax:
<Location /repos> DAV svn SVNPath /var/svn/repository </Location>
If you plan to support multiple Subversion repositories
that will reside in the same parent directory on your local
disk, you can use an alternative
directive—SVNParentPath—to
indicate that common parent directory. For example, if you
know you will be creating multiple Subversion repositories in
a directory /var/svn that would be
accessed via URLs such as
http://my.server.com/svn/repos1,
http://my.server.com/svn/repos2, and so on, you
could use the httpd.conf configuration
syntax in the following example:
<Location /svn> DAV svn # any "/svn/foo" URL will map to a repository /var/svn/foo SVNParentPath /var/svn </Location>
使用上面的语法,Apache会代理所有URL路径部分为/svn/的请求到Subversion的DAV提供者,Subversion会认为SVNParentPath指定的目录下的所有项目是真实的Subversion版本库,这通常是一个便利的语法,不像是用SVNPath指示,我们在此不必为创建新的版本库而重启Apache。
Be sure that when you define your new
Location, it doesn't overlap with other
exported locations. For example, if your main
DocumentRoot is exported to
/www, do not export a Subversion
repository in <Location /www/repos>.
If a request comes in for the URI
/www/repos/foo.c, Apache won't know
whether to look for a file repos/foo.c in
the DocumentRoot, or whether to delegate
mod_dav_svn to return
foo.c from the Subversion repository.
The result is often an error from the server of the form
301 Moved Permanently.
At this stage, you should strongly consider the question of permissions. If you've been running Apache for some time now as your regular web server, you probably already have a collection of content—web pages, scripts, and such. These items have already been configured with a set of permissions that allows them to work with Apache, or more appropriately, that allows Apache to work with those files. Apache, when used as a Subversion server, will also need the correct permissions to read and write to your Subversion repository.
你会需要检验权限系统的设置满足Subversion的需求,同时不会把以前的页面和脚本搞乱。这或许意味着修改Subversion的访问许可来配合Apache服务器已经使用的工具,或者可能意味着需要使用httpd.conf的User和Group指示来指定Apache作为运行的用户和Subversion版本库的组。并不是只有一条正确的方式来设置许可,每个管理员都有不同的原因来以特定的方式操作,只需要意识到许可关联的问题经常在为Apache配置Subversion版本库的过程中被疏忽。
At this point, if you configured
httpd.conf to contain something like the
following:
<Location /svn> DAV svn SVNParentPath /var/svn </Location>
then your repository is “anonymously”
accessible to the world. Until you configure some
authentication and authorization policies, the Subversion
repositories that you make available via the
Location directive will be generally
accessible to everyone. In other words:
-
Anyone can use a Subversion client to check out a working copy of a repository URL (or any of its subdirectories).
-
Anyone can interactively browse the repository's latest revision simply by pointing a web browser to the repository URL.
-
Anyone can commit to the repository.
当然,你也许已经设置了pre-commit钩子来防止提交(见“实现版本库钩子”一节),但是就像你读到的,也可以使用Apache内置的方法来限制访问。
The easiest way to authenticate a client is via the HTTP Basic authentication mechanism, which simply uses a username and password to verify that a user is who she says she is. Apache provides an htpasswd utility for managing the list of acceptable usernames and passwords. Let's grant commit access to Sally and Harry. First, we need to add them to the password file:
$ ### First time: use -c to create the file $ ### Use -m to use MD5 encryption of the password, which is more secure $ htpasswd -cm /etc/svn-auth-file harry New password: ***** Re-type new password: ***** Adding password for user harry $ htpasswd -m /etc/svn-auth-file sally New password: ******* Re-type new password: ******* Adding password for user sally $
下一步,你需要在httpd.conf的Location区里添加一些指示来告诉Apache如何来使用这些密码文件,AuthType指示指定系统使用的认证类型,这种情况下,我们需要指定Basic认证系统,AuthName是你提供给认证域一个任意名称,大多数浏览器会在向用户询问名称和密码的弹出窗口里显示这个名称,最终,使用AuthUserFile指示来指定使用htpasswd创建的密码文件的位置。
添加完这三个指示,你的<Location>区块一定像这个样子:
<Location /svn> DAV svn SVNParentPath /var/svn AuthType Basic AuthName "Subversion repository" AuthUserFile /etc/svn-auth-file </Location>
This <Location> block is not
yet complete, and it will not do anything useful. It's
merely telling Apache that whenever authorization is
required, Apache should harvest a username and password from
the Subversion client. What's missing here, however, are
directives that tell Apache which sorts
of client requests require authorization. Wherever
authorization is required, Apache will demand authentication
as well. The simplest thing to do is protect all requests.
Adding Require valid-user tells Apache
that all requests require an authenticated user:
<Location /svn> DAV svn SVNParentPath /var/svn AuthType Basic AuthName "Subversion repository" AuthUserFile /etc/svn-auth-file Require valid-user </Location>
一定要阅读后面的部分(“授权选项”一节)来得到Require的细节,和授权政策的其他设置方法。
One word of warning: HTTP Basic Auth passwords pass in very nearly plain-text over the network, and thus are extremely insecure.
Another option is to not use Basic authentication but to use Digest authentication instead. Digest authentication allows the server to verify the client's identity without passing the plain-text password over the network. Assuming that the client and server both know the user's password, they can verify that the password is the same by using it to apply a hashing function to a one-time bit of information. The server sends a small random-ish string to the client; the client uses the user's password to hash the string; the server then looks to see if the hashed value is what it expected.
Configuring Apache for Digest authentication is also fairly easy, and only a small variation on our prior example. Be sure to consult Apache's documentation for full details.
<Location /svn> DAV svn SVNParentPath /var/svn AuthType Digest AuthName "Subversion repository" AuthDigestDomain /svn/ AuthUserFile /etc/svn-auth-file Require valid-user </Location>
If you're looking for maximum security, then public-key
cryptography is the best solution. It may be best to use
some sort of SSL encryption, so that clients authenticate
via http:// instead
of http://; at a bare minimum, you can
configure Apache to use a self-signed server certificate.
[43]
Consult Apache's documentation (and OpenSSL documentation)
about how to do that.
商业应用需要越过公司防火墙的版本库访问,防火墙需要小心的考虑非认证用户“吸取”他们的网络流量的情况,SSL让那种形式的关注更不容易导致敏感数据泄露。
如果Subversion使用OpenSSL编译,它就会具备与Subversion服务器使用http://的URL通讯的能力,Subversion客户端使用的Neon库不仅仅可以用来验证服务器证书,也可以必要时提供客户端证书,如果客户端和服务器交换了SSL证书并且成功地互相认证,所有剩下的交流都会通过一个会话关键字加密。
It's beyond the scope of this book to describe how to generate client and server certificates and how to configure Apache to use them. Many other books, including Apache's own documentation, describe this task. But what can be covered here is how to manage server and client certificates from an ordinary Subversion client.
当通过http://与Apache通讯时,一个Subversion客户端可以接收两种类型的信息:
-
A server certificate
-
A demand for a client certificate
如果客户端接收了一个服务器证书,它需要去验证它是可以相信的:这个服务器是它自称的那一个吗?OpenSSL库会去检验服务器证书的签名人或者是核证机构(CA)。如果OpenSSL不可以自动信任这个CA,或者是一些其他的问题(如证书过期或者是主机名不匹配),Subversion命令行客户端会询问你是否愿意仍然信任这个证书:
$ svn list http://host.example.com/repos/project Error validating server certificate for 'http://host.example.com:443': - The certificate is not issued by a trusted authority. Use the fingerprint to validate the certificate manually! Certificate information: - Hostname: host.example.com - Valid: from Jan 30 19:23:56 2004 GMT until Jan 30 19:23:56 2006 GMT - Issuer: CA, example.com, Sometown, California, US - Fingerprint: 7d:e1:a9:34:33:39:ba:6a:e9:a5:c4:22:98:7b:76:5c:92:a0:9c:7b (R)eject, accept (t)emporarily or accept (p)ermanently?
This dialogue should look familiar; it's essentially the
same question you've probably seen coming from your web
browser (which is just another HTTP client like Subversion).
If you choose the (p)ermanent option, the server certificate
will be cached in your private runtime
auth/ area in just the same way your
username and password are cached (see “客户端凭证缓存”一节). If cached,
Subversion will automatically trust this certificate
in future negotiations.
Your runtime servers file also gives
you the ability to make your Subversion client automatically
trust specific CAs, either globally or on a per-host basis.
Simply set the ssl-authority-files
variable to a semicolon-separated list of PEM-encoded CA
certificates:
[global] ssl-authority-files = /path/to/CAcert1.pem;/path/to/CAcert2.pem
Many OpenSSL installations also have a predefined set
of “default” CAs that are nearly universally
trusted. To make the Subversion client automatically trust
these standard authorities, set the
ssl-trust-default-ca variable to
true.
When talking to Apache, a Subversion client might also receive a challenge for a client certificate. Apache is asking the client to identify itself: is the client really who it says it is? If all goes correctly, the Subversion client sends back a private certificate signed by a CA that Apache trusts. A client certificate is usually stored on disk in encrypted format, protected by a local password. When Subversion receives this challenge, it will ask you for both a path to the certificate and for the password that protects it:
$ svn list http://host.example.com/repos/project Authentication realm: http://host.example.com:443 Client certificate filename: /path/to/my/cert.p12 Passphrase for '/path/to/my/cert.p12': ******** …
注意这个客户端证书是一个“p12”文件,为了让Subversion使用客户端证书,它必须是运输标准的PKCS#12格式,大多数浏览器可以导入和导出这种格式的证书,另一个选择是用OpenSSL命令行工具来转化存在的证书为PKCS#12格式。
再次,运行中servers文件允许你为每个主机自动响应这种要求,单个或两条信息可以用运行参数来描述:
[groups] examplehost = host.example.com [examplehost] ssl-client-cert-file = /path/to/my/cert.p12 ssl-client-cert-password = somepassword
一旦你设置了ssl-client-cert-file和 ssl-client-cert-password参数,Subversion客户端可以自动响应客户端证书请求而不会打扰你。[44]
此刻,你已经配置了认证,但是没有配置授权,Apache可以要求用户认证并且确定身份,但是并没有说明这个身份的怎样允许和限制,这个部分描述了两种控制访问版本库的策略。
The simplest form of access control is to authorize certain users for either read-only access to a repository or read/write access to a repository.
You can restrict access on all repository operations by
adding the Require valid-user directive
to your <Location> block. Using
our previous example, this would mean that only clients that
claimed to be either harry or
sally and that provided the correct
password for their respective username would be allowed to
do anything with the Subversion repository:
<Location /svn> DAV svn SVNParentPath /var/svn # how to authenticate a user AuthType Basic AuthName "Subversion repository" AuthUserFile /path/to/users/file # only authenticated users may access the repository Require valid-user </Location>
Sometimes you don't need to run such a tight ship. For
example, Subversion's own source code repository at
http://svn.collab.net/repos/svn allows anyone
in the world to perform read-only repository tasks (such as
checking out working copies and browsing the repository with
a web browser), but restricts all write operations to
authenticated users. To do this type of selective
restriction, you can use the Limit and
LimitExcept configuration directives.
Like the Location directive, these blocks
have starting and ending tags, and you would nest them
inside your <Location>
block.
在Limit和LimitExcept中使用的参数是可以被这个区块影响的HTTP请求类型,举个例子,如果你希望禁止所有的版本库访问,只是保留当前支持的只读操作,你可以使用LimitExcept指示,并且使用GET,PROPFIND,OPTIONS和REPORT请求类型参数,然后前面提到过的Require valid-user指示将会在<LimitExcept>区块中而不是在<Location>区块。
<Location /svn>
DAV svn
SVNParentPath /var/svn
# how to authenticate a user
AuthType Basic
AuthName "Subversion repository"
AuthUserFile /path/to/users/file
# For any operations other than these, require an authenticated user.
<LimitExcept GET PROPFIND OPTIONS REPORT>
Require valid-user
</LimitExcept>
</Location>
这里只是一些简单的例子,想看关于Apache访问控制Require指示的更深入信息,可以查看Apache文档中的教程集http://httpd.apache.org/docs-2.0/misc/tutorials.html中的Security部分。
也可以使用Apache的httpd模块mod_authz_svn更加细致的设置访问权限,这个模块收集客户端传递过来的不同的晦涩的URL信息,询问mod_dav_svn来解码,然后根据在配置文件定义的访问政策来裁决请求。
如果你从源代码创建Subversion,mod_authz_svn会自动附加到mod_dav_svn,许多二进制分发版本也会自动安装,为了验证它是安装正确,确定它是在httpd.conf的LoadModule指示中的mod_dav_svn后面:
LoadModule dav_module modules/mod_dav.so LoadModule dav_svn_module modules/mod_dav_svn.so LoadModule authz_svn_module modules/mod_authz_svn.so
为了激活这个模块,你需要配置你的Location区块的AuthzSVNAccessFile指示,指定保存路径中的版本库访问政策的文件。(一会儿我们将会讨论这个文件的格式。)
Apache is flexible, so you have the option to configure your block in one of three general patterns. To begin, choose one of these basic configuration patterns. (The following examples are very simple; look at Apache's own documentation for much more detail on Apache authentication and authorization options.)
The simplest block is to allow open access to everyone. In this scenario, Apache never sends authentication challenges, so all users are treated as “anonymous.” (See 例 6.1 “匿名访问的配置实例。”.)
例 6.1. 匿名访问的配置实例。
<Location /repos>
DAV svn
SVNParentPath /var/svn
# our access control policy
AuthzSVNAccessFile /path/to/access/file
</Location>
On the opposite end of the paranoia scale, you can
configure your block to demand authentication from everyone.
All clients must supply credentials to identify themselves.
Your block unconditionally requires authentication via the
Require valid-user directive, and it
defines a means to authenticate. (See
例 6.2 “一个认证访问的配置实例。”.)
例 6.2. 一个认证访问的配置实例。
<Location /repos>
DAV svn
SVNParentPath /var/svn
# our access control policy
AuthzSVNAccessFile /path/to/access/file
# only authenticated users may access the repository
Require valid-user
# how to authenticate a user
AuthType Basic
AuthName "Subversion repository"
AuthUserFile /path/to/users/file
</Location>
A third very popular pattern is to allow a combination
of authenticated and anonymous access. For example, many
administrators want to allow anonymous users to read certain
repository directories, but want only authenticated users to
read (or write) more sensitive areas. In this setup, all
users start out accessing the repository anonymously. If
your access control policy demands a real username at any
point, Apache will demand authentication from the client.
To do this, use both the Satisfy Any
and Require valid-user directives
together. (See
例 6.3 “A sample configuration for mixed
authenticated/anonymous access”.)
例 6.3. A sample configuration for mixed authenticated/anonymous access
<Location /repos>
DAV svn
SVNParentPath /var/svn
# our access control policy
AuthzSVNAccessFile /path/to/access/file
# try anonymous access first, resort to real
# authentication if necessary.
Satisfy Any
Require valid-user
# how to authenticate a user
AuthType Basic
AuthName "Subversion repository"
AuthUserFile /path/to/users/file
</Location>
Once you've settled on one of these three
basic httpd.conf templates, you need to
create your file containing access rules for particular
paths within the repository. This is described later in
this chapter in
“基于路径的授权”一节.
The mod_dav_svn module goes through a lot of work to make sure that data you've marked “unreadable” doesn't get accidentally leaked. This means that it needs to closely monitor all of the paths and file-contents returned by commands such as svn checkout or svn update commands. If these commands encounter a path that isn't readable according to some authorization policy, then the path is typically omitted altogether. In the case of history or rename tracing—e.g., running a command such as svn cat -r OLD foo.c on a file that was renamed long ago—the rename tracking will simply halt if one of the object's former names is determined to be read-restricted.
All of this path checking can sometimes be quite
expensive, especially in the case of svn
log. When retrieving a list of revisions, the
server looks at every changed path in each revision and
checks it for readability. If an unreadable path is
discovered, then it's omitted from the list of the
revision's changed paths (normally seen with
the --verbose option), and the whole log
message is suppressed. Needless to say, this can be
time-consuming on revisions that affect a large number of
files. This is the cost of security: even if you haven't
configured a module such as
mod_authz_svn at all, the
mod_dav_svn module is still asking Apache
httpd to run authorization checks on
every path. The mod_dav_svn module has
no idea what authorization modules have been installed, so
all it can do is ask Apache to invoke whatever might be
present.
On the other hand, there's also an escape hatch of
sorts, which allows you to trade security features for
speed. If you're not enforcing any sort of per-directory
authorization (i.e., not using
mod_authz_svn or similar module), then
you can disable all of this path checking. In your
httpd.conf file, use the
SVNPathAuthz directive as shown in
例 6.4 “禁用所有的路径检查”.
The SVNPathAuthz directive
is “on” by default. When
set “off,” all path-based authorization
checking is disabled;
mod_dav_svn stops invoking authorization
checks on every path it discovers.
We've covered most of the authentication and authorization options for Apache and mod_dav_svn. But there are a few other nice features that Apache provides.
One of the most useful benefits of an Apache/WebDAV
configuration for your Subversion repository is that the
youngest revisions of your versioned files and directories
are immediately available for viewing via a regular web
browser. Since Subversion uses URLs to identify versioned
resources, those URLs used for HTTP-based repository access
can be typed directly into a web browser. Your browser will
issue an HTTP GET request for that URL;
based on whether that URL represents a versioned directory
or file, mod_dav_svn will respond with a
directory listing or with file contents.
Since the URLs do not contain any information about which version of the resource you wish to see, mod_dav_svn will always answer with the youngest version. This functionality has the wonderful side effect that you can pass around Subversion URLs to your peers as references to documents, and those URLs will always point at the latest manifestation of that document. Of course, you can even use the URLs as hyperlinks from other web sites, too.
当浏览Subversion版本库时,web浏览器通过从Apache的HTTP GET返回内容中查看Content-Type:头可以知道如何渲染文件的线索,这个值是一种MIME类型。默认情况下,Apache告诉浏览器所有的版本库文件都是缺省的MIME类型,通常是text/plain,这样有时候会让人沮丧,如果一个用户希望版本库文件能够更有意义的渲染—例如一个foo.html,在浏览时最好能够按照HTML方式渲染。
To make this happen, you need only to make sure that
your files have the
proper svn:mime-type set. This is
discussed in more detail in
“文件内容类型”一节,
and you can even configure your client to automatically
attach proper svn:mime-type properties
to files entering the repository for the first time; see
“自动设置属性”一节.
So in our example, if one were to set
the svn:mime-type property
to text/html on
file foo.html, then Apache would
properly tell your web browser to render the file as HTML.
One could also attach proper image/*
mime-type properties to image files and ultimately get an
entire web site to be viewable directly from a repository!
There's generally no problem with this, as long as the web
site doesn't contain any dynamically generated
content.
You generally will get more use out of URLs to
versioned files—after all, that's where the
interesting content tends to lie. But you might have
occasion to browse a Subversion directory listing, where
you'll quickly note that the generated HTML used to
display that listing is very basic, and certainly not
intended to be aesthetically pleasing (or even
interesting). To enable customization of these directory
displays, Subversion provides an XML index feature. A
single SVNIndexXSLT directive in your
repository's Location block of
httpd.conf will
instruct mod_dav_svn to generate XML
output when displaying a directory listing, and to
reference the XSLT stylesheet of your choice:
<Location /svn> DAV svn SVNParentPath /var/svn SVNIndexXSLT "/svnindex.xsl" … </Location>
Using the SVNIndexXSLT directive and
a creative XSLT stylesheet, you can make your directory
listings match the color schemes and imagery used in other
parts of your web site. Or, if you'd prefer, you can use
the sample stylesheets provided in the Subversion source
distribution's tools/xslt/ directory.
Keep in mind that the path provided to the
SVNIndexXSLT directory is actually a URL
path—browsers need to be able to read your
stylesheets in order to make use of them!
如果你通过 SVNParentPath指示从一个URL维护一组版本库,也可以让Apache在浏览器显示所有存在的版本库,只需要通过SVNListParentPath指示激活:
<Location /svn> DAV svn SVNParentPath /var/svn SVNListParentPath on … </Location>
If a user now points her web browser to the
URL http://host.example.com/svn/, she'll
see a list of all Subversion repositories sitting
in /var/svn. Obviously, this can
be a security problem, so this feature is turned off by
default.
因为Apache的核心是一个HTTP服务器,它包含了梦幻般灵活的日志特性。各种配置日志的方式可以超出了本书的范围,但是我们必须指出,即使是最原始的文件httpd.conf也可以让Apache产生两个日志:error_log和access_log。这些日志会出现在不同的地方,但通常是创建在Apache安装的日志区。(在Unix下,这个目录是/usr/local/apache2/logs/。)
error_log描述了所有Apache运行中的内部错误,access_log记录了Apache接收到的所有HTTP请求,这个日志很容易查看,例如包括Subversion客户端的IP地址,哪些用户正确认证和请求成功还是失败。
Unfortunately, because HTTP is a stateless protocol,
even the simplest Subversion client operation generates
multiple network requests. It's very difficult to look at
the access_log and deduce what the
client was doing—most operations look like a series
of cryptic PROPPATCH, GET,
PUT, and REPORT
requests. To make things worse, many client operations send
nearly identical series of requests, so it's even harder to
tell them apart.
mod_dav_svn, however, can come to your aid. By activating an “operational logging” feature, you can ask mod_dav_svn to create a separate log file describing what sort of high-level operations your clients are performing.
为此,你需要利用Apache的CustomLog指示(在Apache自己的文档里有详细解释)指示,请确定在Subversion的Location指示之外配置这个指示。
<Location /svn>
DAV svn
…
</Location>
CustomLog logs/svn_logfile "%t %u %{SVN-ACTION}e" env=SVN-ACTION
In this example, we're asking Apache to create a special
logfile svn_logfile in the standard
Apache logs directory.
The %t and %u
variables are replaced by the time and username of the
request, respectively. The really important part are the
two instances of SVN-ACTION.
When Apache sees that variable, it substitutes the value of
the SVN-ACTION environment variable,
which is automatically set by mod_dav_svn
whenever it detects a high-level client action.
所以我们不选择翻译下面的传统的access_log文件:
[26/Jan/2007:22:25:29 -0600] "PROPFIND /svn/calc/!svn/vcc/default HTTP/1.1" 207 398 [26/Jan/2007:22:25:29 -0600] "PROPFIND /svn/calc/!svn/bln/59 HTTP/1.1" 207 449 [26/Jan/2007:22:25:29 -0600] "PROPFIND /svn/calc HTTP/1.1" 207 647 [26/Jan/2007:22:25:29 -0600] "REPORT /svn/calc/!svn/vcc/default HTTP/1.1" 200 607 [26/Jan/2007:22:25:31 -0600] "OPTIONS /svn/calc HTTP/1.1" 200 188 [26/Jan/2007:22:25:31 -0600] "MKACTIVITY /svn/calc/!svn/act/e6035ef7-5df0-4ac0-b811-4be7c823f998 HTTP/1.1" 201 227 …
you can instead peruse a much more
intelligible svn_logfile like
this:
[26/Jan/2007:22:24:20 -0600] - get-dir /tags r1729 props [26/Jan/2007:22:24:27 -0600] - update /trunk r1729 depth=infinity send-copyfrom-args [26/Jan/2007:22:25:29 -0600] - status /trunk/foo r1729 depth=infinity [26/Jan/2007:22:25:31 -0600] sally commit r1730
For an exhaustive list of all actions logged, see “High-level logging”一节.
One of the nice advantages of using Apache as a Subversion server is that it can be set up for simple replication. For example, suppose that your team is distributed across four offices around the globe. The Subversion repository can only exist in one of those offices, which means the other three offices will not enjoy accessing it—they're likely to experience significantly slower traffic and response times when updating and committing code. A powerful solution is to set up a system consisting of one master Apache server and several slave Apache servers. If you place a slave server in each office, then users can check out a working copy from whichever slave is closest to them. All read requests go to their local slave. Write requests get automatically routed to the single master server. When the commit completes, the master then automatically “pushes” the new revision to each slave server using the svnsync replication tool.
This configuration creates a huge perceptual speed increase for your users, because Subversion client traffic is typically 80–90% read requests. And if those requests are coming from a local server, it's a huge win.
In this section, we'll walk you through a standard setup of this single-master/multiple slave system. However, keep in mind that your servers must be running at least Apache 2.2.0 (with mod_proxy loaded) and Subversion 1.5 (mod_dav_svn).
First, configure your master server's
httpd.conf file in the usual way.
Make the repository available at a certain URI location,
and configure authentication and authorization however
you'd like. After that's done, configure each of your
“slave” servers in the exact same way, but
add the special SVNMasterURI directive
to the block:
<Location /svn> DAV svn SVNPath /var/svn/repos SVNMasterURI http://master.example.com/svn … </Location>
This new directive tells a slave server to redirect all write requests to the master. (This is done automatically via Apache's mod_proxy module.) Ordinary read requests, however, are still serviced by the slaves. Be sure that your master and slave servers all have matching authentication and authorization configurations; if they fall out of sync, it can lead to big headaches.
Next, we need to deal with the problem of infinite recursion. With the current configuration, imagine what will happen when a Subversion client performs a commit to the master server. After the commit completes, the server uses svnsync to replicate the new revision to each slave. But because svnsync appears to be just another Subversion client performing a commit, the slave will immediately attempt to proxy the incoming write request back to the master! Hilarity ensues.
The solution to this problem is to have the master
push revisions to a different
<Location> on the slaves. This
location is configured to not proxy
write requests at all, but to accept normal commits from
(and only from) the master's IP address:
<Location /svn-proxy-sync> DAV svn SVNPath /var/svn/repos Order deny,allow Deny from all # Only let the server's IP address access this Location: Allow from 10.20.30.40 … </Location>
Now that you've configured
your Location blocks on master and
slaves, you need to configure the master to replicate to
the slaves. This is done the usual way—
using svnsync. If you're not familiar
with this tool, see
“版本库复制”一节 for
details.
First, make sure that each slave repository has a
pre-revprop-change hook script which
allows remote revision property changes. (This is
standard procedure for being on the receiving end of
svnsync.) Then log into the master
server and configure each of the slave repository URIs to
receive data from the master repository on local
disk:
$ svnsync init http://slave1.example.com/svn-proxy-sync file://var/svn/repos Copied properties for revision 0. $ svnsync init http://slave2.example.com/svn-proxy-sync file://var/svn/repos Copied properties for revision 0. $ svnsync init http://slave3.example.com/svn-proxy-sync file://var/svn/repos Copied properties for revision 0. # Perform the initial replication $ svnsync sync http://slave1.example.com/svn-proxy-sync Transmitting file data .... Committed revision 1. Copied properties for revision 1. Transmitting file data ....... Committed revision 2. Copied properties for revision 2. … $ svnsync sync http://slave2.example.com/svn-proxy-sync Transmitting file data .... Committed revision 1. Copied properties for revision 1. Transmitting file data ....... Committed revision 2. Copied properties for revision 2. … $ svnsync sync http://slave3.example.com/svn-proxy-sync Transmitting file data .... Committed revision 1. Copied properties for revision 1. Transmitting file data ....... Committed revision 2. Copied properties for revision 2. …
After this is done, we configure the master server's
post-commit hook script to invoke
svnsync on each slave server:
#!/bin/sh # Post-commit script to replicate newly committed revision to slaves svnsync sync http://slave1.example.com/svn-proxy-sync > /dev/null 2>&1 svnsync sync http://slave2.example.com/svn-proxy-sync > /dev/null 2>&1 svnsync sync http://slave3.example.com/svn-proxy-sync > /dev/null 2>&1
The extra bits on the end of each line aren't
necessary, but they're a sneaky way to allow the sync
commands to run in the background, so that the Subversion
client isn't left waiting forever for the commit to
finish. In addition to this
post-commit hook, you'll need a
post-revprop-change hook as well, so
that when a user, say, modifies a log message, the slave
servers get that change also:
#!/bin/sh
# Post-revprop-change script to replicate revprop-changes to slaves
REV=${2}
svnsync copy-revprops http://slave1.example.com/svn-proxy-sync ${REV} > /dev/null 2>&1
svnsync copy-revprops http://slave2.example.com/svn-proxy-sync ${REV} > /dev/null 2>&1
svnsync copy-revprops http://slave3.example.com/svn-proxy-sync ${REV} > /dev/null 2>&1
The only thing we've left out here is what to do about
locks. Because locks are strictly enforced by the master
server (the only place where commits happen), we don't
technically need to do anything. Many teams don't use
Subversion's locking features at all, so it may be a
nonissue for you. However, if lock changes aren't
replicated from master to slaves, it means that clients
won't be able to query the status of locks
(e.g., svn status -u will show no
information about repository locks). If this bothers you,
you can write post-lock and
post-unlock hook scripts that run
svn lock and svn
unlock on each slave machine, presumably through
a remote shell method such as SSH. That's left as an
exercise for the reader!
Your master/slave replication system should now be ready to use. A couple words of warning are in order, however. Remember that this replication isn't entirely robust in the face of computer or network crashes. For example, if one of the automated svnsync commands fails to complete for some reason, the slaves will begin to fall behind. For example, your remote users will see that they've committed revision 100, but then when they run svn update, their local server will tell them than revision 100 doesn't yet exist! Of course, the problem will be automatically fixed the next time another commit happens and the subsequent svnsync is successful—the sync will replicate all waiting revisions. But still, you may want to set up some sort of out-of-band monitoring to notice synchronization failures and force svnsync to run when things go wrong.
Several of the features already provided by Apache in
its role as a robust web server can be leveraged for
increased functionality or security in Subversion as well.
The Subversion client is able to use SSL (the Secure Socket
Layer, discussed earlier). If your Subversion client is
built to support SSL, then it can access your Apache server
using http:// and enjoy a high-quality
encrypted network session.
Equally useful are other features of the Apache and Subversion relationship, such as the ability to specify a custom port (instead of the default HTTP port 80) or a virtual domain name by which the Subversion repository should be accessed, or the ability to access the repository through an HTTP proxy.
Finally, because mod_dav_svn is speaking a subset of the WebDAV/DeltaV protocol, it's possible to access the repository via third-party DAV clients. Most modern operating systems (Win32, OS X, and Linux) have the built-in ability to mount a DAV server as a standard network “shared folder.” This is a complicated topic, but also wondrous when implemented. For details, read 附录 C, WebDAV和自动版本.
Note that there are number of other small tweaks one can
make to mod_dav_svn that are too obscure
to mention in this chapter. For a complete list of
all httpd.conf directives
that mod_dav_svn responds to, see
“指示”一节.
Apache和svnserve都可以给用户赋予(或拒绝)访问许可,通常是对整个版本库:一个用户可以读版本库(或不),而且他可以写版本库(或不)。如果可能,也可以定义细粒度的访问规则。一组用户可以有版本库的一个目录的读写权限,但是没有其它的;另一个目录可以是只对一少部分用户可读。
Both servers use a common file format to describe these
path-based access rules. In the case of Apache, one needs to
load the mod_authz_svn module and then add
the AuthzSVNAccessFile directive (within
the httpd.conf file) pointing to your own
rules file. (For a full explanation, see
“Per-directory access control”一节.) If
you're using svnserve, then you need to make
the authz-db variable
(within svnserve.conf) point to your
rules file.
Once your server knows where to find your rules file, it's time to define the rules.
The syntax of the file is the same familiar one used
by svnserve.conf and the runtime
configuration files. Lines that start with a hash
(#) are ignored. In its simplest form, each
section names a repository and path within it, as well as the
authenticated usernames are the option names within each
section. The value of each option describes the user's level of
access to the repository path: either
r (read-only) or rw
(read-write). If the user is not mentioned at all, no access is
allowed.
To be more specific: the value of the section names are
either of the form [repos-name:path] or the
form [path]. If you're using the
SVNParentPath directive, then it's important
to specify the repository names in your sections. If you omit
them, then a section such as
[/some/dir] will match the path
/some/dir in every
repository. If you're using the SVNPath
directive, however, then it's fine to only define paths in your
sections—after all, there's only one repository.
[calc:/branches/calc/bug-142] harry = rw sally = r
在第一个例子里,用户harry对calc版本库中/branches/calc/bug-142具备完全的读写权利,但是用户sally只有读权利,任何其他用户禁止访问这个目录。
当然,访问控制是父目录传递给子目录的,这意味着我们可以为Sally指定一个子目录的不同访问策略:
[calc:/branches/calc/bug-142] harry = rw sally = r # give sally write access only to the 'testing' subdir [calc:/branches/calc/bug-142/testing] sally = rw
现在Sally可以读取分支的testing子目录,但对其他部分还是只可以读,同时,Harry对整个分支还继续有完全的读写权限。
也可以通过继承规则明确的的拒绝某人的访问,只需要设置用户名参数为空:
[calc:/branches/calc/bug-142] harry = rw sally = r [calc:/branches/calc/bug-142/secret] harry =
在这个例子里,Harry对bug-142目录树有完全的读写权限,但是对其中的secret子目录没有任何访问权利。
提示
需要记住的是最详细的的路径会被匹配,服务器首先找到匹配自己的目录,然后父目录,然后父目录的父目录,就这样继续下去,更具体的路径控制会覆盖所有继承下来的访问控制。
缺省情况下,没有人对版本库有任何访问,这意味着如果你已经从一个空文件开始,你会希望给所有用户对版本库根目录具备读权限,你可以使用星号(*)实现,用来代表“所有用户”:
[/] * = r
This is a common setup; notice that there's no repository
name mentioned in the section name. This makes all repositories
world-readable to all users. Once all users have read-access to
the repositories, you can give explicit
rw permission to certain users on specific
subdirectories within specific repositories.
The asterisk variable (*) is also worth
special mention because it's the
only pattern that matches an anonymous
user. If you've configured your server block to allow a mixture
of anonymous and authenticated access, all users start out
accessing anonymously. The server looks for a
* value defined for the path being accessed;
if it can't find one, then it demands real authentication from
the client.
访问文件也允许你定义一组的用户,很像Unix的/etc/group文件:
[groups] calc-developers = harry, sally, joe paint-developers = frank, sally, jane everyone = harry, sally, joe, frank, sally, jane
组可以被赋予通用户一样的访问权限,使用“at”(@)前缀来加以区别:
[calc:/projects/calc] @calc-developers = rw [paint:/projects/paint] jane = r @paint-developers = rw
Another important fact is that
the first matching rule is the one which gets
applied to a user. In the prior example, even though Jane is a
member of the paint-developers group (which has
read-write access), the jane = r rule will be
discovered and matched before the group rule, thus denying Jane
write access.
组中也可以定义为包含其它的组:
[groups] calc-developers = harry, sally, joe paint-developers = frank, sally, jane everyone = @calc-developers, @paint-developers
你已经看到了一个版本库可以用多种方式访问,但是可以—或者说安全的—用几种方式同时并行的访问你的版本库吗?回答是可以,倘若你有一些深谋远虑的使用。
在任何给定的时间,这些进程会要求读或者写访问你的版本库:
-
Regular system users using a Subversion client (as themselves) to access the repository directly via
file://URLs -
Regular system users connecting to SSH-spawned private svnserve processes (running as themselves), which access the repository
-
An svnserve process—either a daemon or one launched by inetd—running as a particular fixed user
-
An Apache httpd process, running as a particular fixed user
The most common problem administrators run into is
repository ownership and permissions. Does every process (or
user) in the previous list have the rights to read and write the
repository's underlying data files? Assuming you have a
Unix-like operating system, a straightforward approach might be
to place every potential repository user into a
new svn group, and make the repository wholly
owned by that group. But even that's not enough, because a
process may write to the database files using an unfriendly
umask—one that prevents access by other users.
所以下一步我们不选择为每个版本库用户设置一个共同的组的方法,而是强制每个版本库访问进程使用一个健全的umask。对直接访问版本库的用户,你可以使用svn的包裹脚本来首先设置umask 002,然后运行真实的svn客户端程序,你可以为svnserve写相同的脚本,并且增加umask 002命令到Apache自己的启动脚本apachectl中。例如:
$ cat /usr/bin/svn #!/bin/sh umask 002 /usr/bin/svn-real "$@"
Another common problem is often encountered on Unix-like
systems. If your repository is backed by Berkeley DB, for
example, it occasionally creates new log files to journal its
actions. Even if the Berkeley DB repository is wholly owned by
the svn group, these newly created log files
won't necessarily be owned by that same group, which then
creates more permissions problems for your users. A good
workaround is to set the group SUID bit on the
repository's db directory. This causes all
newly created log files to have the same group owner as the
parent directory.
一旦你跳过了这些障碍,你的版本库一定是可以通过各种可能的手段访问了,这看起来有点凌乱和复杂,但是这个让多个用户分享对一个文件的写权限的问题是一个经典问题,并且经常是没有优雅的解决。
Fortunately, most repository administrators will never
need to have such a complex configuration.
Users who wish to access repositories that live on the same
machine are not limited to using file://
access URLs—they can typically contact the Apache HTTP
server or svnserve using
localhost for the server name in their
http:// or svn:// URLs.
And maintaining multiple server processes for your Subversion
repositories is likely to be more of a headache than necessary.
We recommend you choose a single server that best meets your
needs and stick with it!
[39] 见RFC 2195。
[40] 请注意,使用svnserve的访问控制进行权限控制将会失去意义,因为用户已经直接访问到了版本库数据。
[41] 我们实际上不支持这个,因为RSH在安全性上显著不如SSH。
[42] 他们讨厌这样做。
[43] While self-signed server certificates are still vulnerable to a “man-in-the-middle” attack, such an attack is much more difficult for a casual observer to pull off, compared to sniffing unprotected passwords.
[44] 更多有安全意识的人不会希望在运行中servers文件保存客户端证书密码。
[45] 之前叫做“ViewCVS”。
[46] 本书的共同主题!
目录
Version control can be a complex subject, as much art as science, that offers myriad ways of getting stuff done. Throughout this book, you've read of the various Subversion command-line client subcommands and the options that modify their behavior. In this chapter, we'll look into still more ways to customize the way Subversion works for you—setting up the Subversion runtime configuration, using external helper applications, Subversion's interaction with the operating system's configured locale, and so on.
Subversion provides many optional behaviors that can be controlled by the user. Many of these options are of the kind that a user would wish to apply to all Subversion operations. So, rather than forcing users to remember command-line arguments for specifying these options and to use them for every operation they perform, Subversion uses configuration files, segregated into a Subversion configuration area.
The Subversion configuration area is a two-tiered hierarchy of option names and their values. Usually, this boils down to a special directory that contains configuration files (the first tier), which are just text files in standard INI format (with “sections” providing the second tier). These files can be easily edited using your favorite text editor (such as Emacs or vi), and that contain directives read by the client to determine which of several optional behaviors the user prefers.
The first time that the svn
command-line client is executed, it creates a per-user
configuration area. On Unix-like systems, this area appears
as a directory named .subversion in the
user's home directory. On Win32 systems, Subversion creates a
folder named Subversion, typically inside
the Application Data area of the user's
profile directory (which, by the way, is usually a hidden
directory). However, on this platform, the exact location
differs from system to system and is dictated by the Windows
registry.
[47]
We will refer to the per-user configuration area using its Unix
name, .subversion.
除了用户配置区,Subversion也提供了系统配置区,通过系统配置区,系统管理员可以为某个机器的所有用户建立缺省配置值。注意系统配置区不会规定强制性的策略—每个用户配置区都可以覆盖系统配置区中的配置项,而svn的命令行参数决定了最后的行为。在类Unix的平台上,系统配置区位于/etc/subversion目录下,在Windows平台上,系统配置区位于Application Data(再说一次,是由Windows注册表决定的)的Subversion目录中。与每用户配置区不同,svn不会试图创建系统配置区。
The per-user configuration area currently contains three
files—two configuration files (config and
servers), and a README.txt
file, which describes the INI format. At the time of their
creation, the files contain default values for each of the
supported Subversion options, mostly commented out and grouped
with textual descriptions about how the values for the key
affect Subversion's behavior. To change a certain behavior,
you need only to load the appropriate configuration file into
a text editor, and to modify the desired option's value. If at
any time you wish to have the default configuration settings
restored, you can simply remove (or rename) your configuration
directory and then run some innocuous svn
command, such as svn --version. A new
configuration directory with the default contents will be
created.
用户配置区也缓存了认证信息,auth目录下的子目录中缓存了一些Subversion支持的各种认证方法的信息,这个目录需要相应的用户权限才可以访问。
除了基于INI文件的配置区,运行在Windows平台的Subversion客户端也可以使用Windows注册表来保存配置数据。注册表中保存的选项名称和值的含义与INI文件中相同,“file/section”在注册表中表现为注册表键树的层级,使得双层结构得以保留下来。
Subversion的系统配置值保存在键HKEY_LOCAL_MACHINE\Software\Tigris.org\Subversion下。举个例子,global-ignores选项位于config文件的miscellany小节,在Windows注册表中,则位于HKEY_LOCAL_MACHINE\Software\Tigris.org\Subversion\Config\Miscellany\global-ignores。用户配置值存放在HKEY_CURRENT_USER\Software\Tigris.org\Subversion下。
基于注册表的配置项在基于文件的配置项之前解析,所以其配置项的值会被配置文件中相同配置项的值覆盖,换句话说,在Windows系统下这样查找配置信息;低位的位置优先于高位的位置:
-
命令行选项
-
用户INI配置文件
-
用户注册表值
-
系统INI配置文件
-
系统注册表值
Also, the Windows Registry doesn't really support the
notion of something being “commented out.”
However, Subversion will ignore any option key whose name
begins with a hash (#) character. This
allows you to effectively comment out a Subversion option
without deleting the entire key from the Registry, obviously
simplifying the process of restoring that option.
The svn command-line client never
attempts to write to the Windows Registry and will not attempt
to create a default configuration area there. You can create
the keys you need using the REGEDIT
program. Alternatively, you can create a
.reg file (such as the one in 例 7.1 “Sample registration entries (.reg) file.”), and
then double-click on that file's icon in the Explorer shell,
which will cause the data to be merged into your
registry.
例 7.1. Sample registration entries (.reg) file.
REGEDIT4 [HKEY_LOCAL_MACHINE\Software\Tigris.org\Subversion\Servers\groups] [HKEY_LOCAL_MACHINE\Software\Tigris.org\Subversion\Servers\global] "#http-proxy-host"="" "#http-proxy-port"="" "#http-proxy-username"="" "#http-proxy-password"="" "#http-proxy-exceptions"="" "#http-timeout"="0" "#http-compression"="yes" "#neon-debug-mask"="" "#ssl-authority-files"="" "#ssl-trust-default-ca"="" "#ssl-client-cert-file"="" "#ssl-client-cert-password"="" [HKEY_CURRENT_USER\Software\Tigris.org\Subversion\Config\auth] "#store-passwords"="yes" "#store-auth-creds"="yes" [HKEY_CURRENT_USER\Software\Tigris.org\Subversion\Config\helpers] "#editor-cmd"="notepad" "#diff-cmd"="" "#diff3-cmd"="" "#diff3-has-program-arg"="" [HKEY_CURRENT_USER\Software\Tigris.org\Subversion\Config\tunnels] [HKEY_CURRENT_USER\Software\Tigris.org\Subversion\Config\miscellany] "#global-ignores"="*.o *.lo *.la #*# .*.rej *.rej .*~ *~ .#* .DS_Store" "#log-encoding"="" "#use-commit-times"="" "#no-unlock"="" "#enable-auto-props"="" [HKEY_CURRENT_USER\Software\Tigris.org\Subversion\Config\auto-props]
The previous example shows the contents of a
.reg file, which contains some of the most
commonly used configuration options and their default values.
Note the presence of both system-wide (for network
proxy-related options) and per-user settings (editor programs
and password storage, among others). Also note that all the
options are effectively commented out. You need only to
remove the hash (#) character from the
beginning of the option names and set the values as you
desire.
In this section, we will discuss the specific runtime configuration options that are currently supported by Subversion.
The servers file contains
Subversion configuration options related to the network
layers. There are two special section names in this
file—groups and
global. The groups
section is essentially a cross-reference table. The keys in
this section are the names of other sections in the file;
their values are globs—textual
tokens that possibly contain wildcard
characters—that are compared against the hostnames of
the machine to which Subversion requests are sent.
[groups] beanie-babies = *.red-bean.com collabnet = svn.collab.net [beanie-babies] … [collabnet] …
When Subversion is used over a network, it attempts to
match the name of the server it is trying to reach with a
group name under the groups section. If
a match is made, Subversion then looks for a section in the
servers file whose name is the matched
group's name. From that section, it reads the actual network
configuration settings.
The global section contains the
settings that are meant for all of the servers not matched
by one of the globs under the groups
section. The options available in this section are
exactly the same as those that are valid for the other server
sections in the file (except, of course, the special
groups section), and are as
follows:
-
http-proxy-exceptions -
This specifies a comma-separated list of patterns for repository hostnames that should be accessed directly, without using the proxy machine. The pattern syntax is the same as is used in the Unix shell for filenames. A repository hostname matching any of these patterns will not be proxied.
-
http-proxy-host -
代理服务器的详细主机名,是HTTP为基础的Subversion请求必须通过的,缺省值为空,意味着Subversion不会尝试通过代理服务器进行HTTP请求,而会尝试直接连接目标机器。
-
http-proxy-port -
代理服务器的详细端口,缺省值为空。
-
http-proxy-username -
代理服务器的用户名,缺省值为空。
-
http-proxy-password -
代理服务器的密码,缺省为空。
-
http-timeout -
等待服务器响应的时间,以秒为单位,如果你的网络速度较慢,导致Subversion的操作超时,你可以加大这个数值,缺省值是
0,意思是让HTTP库Neon使用自己的缺省值。 -
http-compression -
这说明是否在与设置好DAV的服务器通讯时使用网络压缩请求,缺省值是
yes(尽管只有在这个功能编译到网络层时压缩才会有效),设置no来关闭压缩,如调试网络传输时。 -
http-library -
Subversion provides a pair of repository access modules that understand its WebDAV network protocol. The original one, which shipped with Subversion 1.0, is
libsvn_ra_neon(though back then it was calledlibsvn_ra_dav). Newer Subversion versions also providelibsvn_ra_serf, which uses a different underlying implementation and aims to support some of the newer HTTP concepts.At this point,
libsvn_ra_serfis still considered experimental, though it appears to work in the common cases quite well. To encourage experimentation, Subversion provides thehttp-libraryruntime configuration option to allow users to specify (generally, or in a per-server-group fashion) which WebDAV access module they'd prefer to use—neonorserf. -
http-auth-types -
This option is a semicolon-delimited list of authentication types supported by the Neon-based WebDAV repository access modules. Valid members of this list are
basic,digest, andnegotiate. -
neon-debug-mask -
只是一个整形的掩码,底层的HTTP库Neon用来选择产生调试的输出,缺省值是
0,意思是关闭所有的调试输出,关于Subversion使用Neon的详细信息,见第 8 章 嵌入Subversion。 -
ssl-authority-files -
这是一个分号分割的路径和文件列表,这些文件包含了Subversion客户端在用HTTPS访问时可以接受的认证授权(或者CA)证书。
-
ssl-trust-default-ca -
如果你希望Subversion可以自动相信OpenSSL携带的缺省的CA,可以设置为
yes。 -
ssl-client-cert-file -
如果一个主机(或是一些主机)需要一个SSL客户端证书,你会收到一个提示说需要证书的路径。通过设置这个路径你的Subversion客户端可以自动找到你的证书而不会打扰你。没有标准的存放位置;Subversion会从任何你指定的路径得到这个文件。
-
ssl-client-cert-password -
如果你的SSL客户端证书文件是用密码加密的,Subversion会在每次使用证书时请你输入密码,如果你发现这很讨厌(并且不介意把密码存放在
servers文件中),你可以设置这个参数为证书的密码,这样就不会再收到密码输入提示了。
The config file contains the rest
of the currently available Subversion runtime
options—those not related to networking. There are
only a few options in use as of this writing, but they are
again grouped into sections in expectation of future
additions.
The auth section contains settings
related to Subversion's authentication and authorization
against the repository. It contains the following:
-
store-passwords -
这告诉Subversion是否缓存服务器认证要求时用户提供的密码,缺省值是
yes。设置为no可以关闭在存盘的密码缓存,你可以通过svn的--no-auth-cache命令行参数(那些支持这个参数的子命令)来覆盖这个设置,详细信息请见“客户端凭证缓存”一节。 -
store-auth-creds -
这个设置与
store-passwords相似,不过设置了这个选项将会保存所有认证信息,如用户名、密码、服务器证书,以及其他任何类型的可以缓存的凭证。
helpers小节控制完成Subversion任务的外部程序,正确的选项包括:
-
editor-cmd -
This specifies the program Subversion will use to query the user for certain types of textual metadata or when interactively resolving conflicts. See “Using External Editors”一节 for more details on using external text editors with Subversion.
-
diff-cmd -
This specifies the absolute path of a differencing program, used when Subversion generates “diff” output (such as when using the svn diff command). By default, Subversion uses an internal differencing library—setting this option will cause it to perform this task using an external program. See “Using External Differencing and Merge Tools”一节 for more details on using such programs.
-
diff3-cmd -
This specifies the absolute path of a three-way differencing program. Subversion uses this program to merge changes made by the user with those received from the repository. By default, Subversion uses an internal differencing library—setting this option will cause it to perform this task using an external program. See “Using External Differencing and Merge Tools”一节 for more details on using such programs.
-
diff3-has-program-arg -
如果
diff3-cmd选项设置的程序接受一个--diff-program命令行参数,这个标记必须设置为true。 -
merge-tool-cmd -
This specifies the program that Subversion will use to perform three-way merge operations on your versioned files. See “Using External Differencing and Merge Tools”一节 for more details on using such programs.
tunnels小节允许你定义一个svnserve和svn://客户端连接使用的管道模式,更多细节见“SSH 隧道”一节。
miscellany小节是一些没法归到别处的选项。 [48]在本小节,你会找到:
-
global-ignores -
When running the svn status command, Subversion lists unversioned files and directories along with the versioned ones, annotating them with a
?character (see “查看你的修改概况”一节). Sometimes, it can be annoying to see uninteresting, unversioned items—for example, object files that result from a program's compilation—in this display. Theglobal-ignoresoption is a list of whitespace-delimited globs that describe the names of files and directories that Subversion should not display unless they are versioned. The default value is*.o *.lo *.la #*# .*.rej *.rej .*~ *~ .#* .DS_Store.As well as svn status, the svn add and svn import commands also ignore files that match the list when they are scanning a directory. You can override this behavior for a single instance of any of these commands by explicitly specifying the filename, or by using the
--no-ignorecommand-line flag.For information on more fine-grained control of ignored items, see “忽略未版本控制的条目”一节.
-
enable-auto-props -
This instructs Subversion to automatically set properties on newly added or imported files. The default value is
no, so set this toyesto enable this feature. Theauto-propssection of this file specifies which properties are to be set on which files. -
log-encoding -
This variable sets the default character set encoding for commit log messages. It's a permanent form of the
--encodingoption (see “svn选项”一节). The Subversion repository stores log messages in UTF-8 and assumes that your log message is written using your operating system's native locale. You should specify a different encoding if your commit messages are written in any other encoding. -
use-commit-times -
通常你的工作拷贝文件会有最后一次被进程访问的时间戳,不管是你自己的编辑器还是用svn子命令。这通常对人们开发软件提供了便利,因为编译系统通常会通过查看时间戳来决定那些文件需要重新编译。
在其他情形,有时候如果工作拷贝的文件时间戳反映了上一次在版本库中更改的时间会非常好,svn export命令会一直放置这些“上次提交的时间戳”放到它创建的目录树。通过设置这个config参数为
yes,svn checkout、svn update、 svn switch和svn revert命令也会为它们操作的文件设置上次提交的时间戳。 -
mime-types-file -
This option, new to Subversion 1.5, specifies the path of a MIME types mapping file, such as the
mime.typesfile provided by the Apache HTTP Server. Subversion uses this file to assign MIME types to newly added or imported files. See “自动设置属性”一节 and “文件内容类型”一节 for more about Subversion's detection and use of file content types. -
preserved-conflict-file-exts -
The value of this option is a space-delimited list of file extensions that Subversion should preserve when generating conflict filenames. By default, the list is empty. This option is new to Subversion 1.5.
When Subversion detects conflicting file content changes, it defers resolution of that conflict to the user. To assist in the resolution, Subversion keeps pristine copies of the various competing versions of the file in the working copy. By default, those conflict files have names constructed by appending to the original filename a custom extension such as
.mineor.(whereREVREVis a revision number). A mild annoyance with this naming scheme is that on operating systems where a file's extension determines the default application used to open and edit that file, appending a custom extension prevents the file from being easily opened by its native application. For example, if the fileReleaseNotes.pdfwas conflicted, the conflict files might be namedReleaseNotes.pdf.mineorReleaseNotes.pdf.r4231. While your system might be configured to use Adobe's Acrobat Reader to open files whose extensions are.pdf, there probably isn't an application configured on your system to open all files whose extensions are.r4231.You can fix this annoyance by using this configuration option, though. For files with one of the specified extensions, Subversion will append to the conflict file names the custom extension just as before, but then also re-append the file's original extension. Using the previous example, and assuming that
pdfis one of the extensions configured in this list thereof, the conflict files generated forReleaseNotes.pdfwould instead be namedReleaseNotes.pdf.mine.pdfandReleaseNotes.pdf.r4231.pdf. Because each of these files end in.pdf, the correct default application will be used to view them. -
interactive-conflicts -
This is a boolean option that specifies whether Subversion should try to resolve conflicts interactively. If its value is
yes(which is the default value), Subversion will prompt the user for how to handle conflicts in the manner demonstrated in “解决冲突(合并别人的修改)”一节. Otherwise, it will simply flag the conflict and continue its operation, postponing resolution to a later time. -
no-unlock -
This boolean option corresponds to svn commit's
--no-unlockoption, which tells Subversion not to release locks on files you've just committed. If this runtime option is set toyes, Subversion will never release locks automatically, leaving you to run svn unlock explicitly. It defaults tono.
The auto-props section controls
the Subversion client's ability to automatically set
properties on files when they are added or imported.
It contains any number of key-value pairs in the
format PATTERN = PROPNAME=PROPVALUE,
where PATTERN is a file pattern
that matches a set of filenames and the rest of the
line is the property and its value. Multiple matches
on a file will result in multiple propsets for that
file; however, there is no guarantee that auto-props
will be applied in the order in which they are listed
in the config file, so you can't have one rule
“override” another. You can find several
examples of auto-props usage in the
config file. Lastly, don't
forget to set enable-auto-props to
yes in the miscellany
section if you want to enable auto-props.
Localization is the act of making programs behave in a region-specific way. When a program formats numbers or dates in a way specific to your part of the world or prints messages (or accepts input) in your native language, the program is said to be localized. This section describes steps Subversion has made towards localization.
许多现代操作系统都有一个“当前地区”的概念—也就是本地化习惯服务的国家和地区。这些习惯—通常是被一些运行配置机制选择—影响程序展现数据的方式,也有接受用户输入的方式。
在类Unix的系统,你可以运行locale命令来检查本地关联的运行配置的选项值:
$ locale LANG= LC_COLLATE="C" LC_CTYPE="C" LC_MESSAGES="C" LC_MONETARY="C" LC_NUMERIC="C" LC_TIME="C" LC_ALL="C" $
输出是一个本地相关的环境变量和它们的值,在这个例子里,所有的变量设置为缺省的C地区,但是用户可以设置这些变量为特定的国家/语言代码组合。举个例子,如果有人设置LC_TIME变量为fr_CA,然后程序会知道使用讲法语的加拿大期望的格式来显示时间和日期信息。如果一个人会设置LC_MESSAGES变量为zh_TW,程序会知道使用繁体中文显示可读信息。如果设置LC_ALL的效果同分别设置所有的位置变量为同一个值有相同的效果。LANG用来作为没有设置地区变量的缺省值,为了查看Unix系统所有的地区列表,运行locale -a命令。
在Windows,地区配置是通过“地区和语言选项”控制面板管理的,可以从已存在的地区查看选择,甚至可以自定义(会是个很讨厌的复杂事情)许多显示格式习惯。
Subversion客户端,svn通过两种方式支持当前的地区配置。首先,它会注意LC_MESSAGES的值,然后尝试使用特定的语言打印所有的信息,例如:
$ export LC_MESSAGES=de_DE $ svn help cat cat: Gibt den Inhalt der angegebenen Dateien oder URLs aus. Aufruf: cat ZIEL[@REV]... …
这个行为在Unix和Windows上同样工作,注意,尽管有时你的操作系统支持某个地区,Subversion客户端可能不能讲特定的语言。为了制作本地化信息,志愿者可以提供各种语言的翻译。翻译使用GNU gettext包编写,相关的翻译模块使用.mo作为后缀名。举个例子,德国翻译文件为de.mo。翻译文件安装到你的系统的某个位置,在Unix它们会在/usr/share/locale/,而在Windows它们通常会在Subversion安装的\share\locale\目录。一旦安装,一个命名在程序后面的模块会为此提供翻译。举个例子,de.mo会最终安装到/usr/share/locale/de/LC_MESSAGES/subversion.mo,通过查看安装的.mo文件,我们可以看到Subversion支持的语言。
第二种支持地区设置的方式包括svn怎样解释你的输入,版本库使用UTF-8保存了所有的路径,文件名和日志信息。在这种情况下,版本库是国际化的—也就是版本库准备接受任何人类的语言。这意味着,无论如何Subversion客户端要负责发送UTF-8的文件名和日志信息到版本库,为此,必须将数据从本地位置转化为UTF-8。
For example, suppose you create a file named
caffè.txt, and then when committing the
file, you write the log message as “Adesso il caffè è
più forte.” Both the filename and log message contain
non-ASCII characters, but because your locale is set to
it_IT, the Subversion client knows to
interpret them as Italian. It uses an Italian character set
to convert the data to UTF-8 before sending it off to the
repository.
注意当版本库要求UTF-8文件名和日志信息时,它不会注意到文件的内容,Subversion会把文件内容看作字节串,没有任何客户端和服务器会尝试理解或是编码这些内容。
The most obvious way to get data into Subversion is through
the addition of files to version control, committing changes to
those files, and so on. But there are other pieces of
information besides merely versioned file data that live in your
Subversion repository. Some of these bits of
information—commit log messages, lock comments, and some
property values—tend to be textual in nature and are
provided explicitly by users. Most of this information can be
provided to the Subversion command-line client using the
--message (-m) and
--file (-F) options with the
appropriate subcommands.
Each of these options has its pros and cons. For example,
when performing a commit, --file
(-F) works well if you've already prepared a
text file that holds your commit log message. If you didn't,
though, you can use --message
(-m) to provide a log message on the command
line. Unfortunately, it can be tricky to compose anything more
than a simple one-line message on the command line. Users want
more flexibility—multiline, free-form log message editing
on demand.
Subversion supports this by allowing you to specify an external text editor that it will launch as necessary in order to give you a more powerful input mechanism for this textual metadata. There are several ways to tell Subversion which editor you'd like use. Subversion checks the following things, in the order specified, when it wants to launch such an editor:
-
--editor-cmdcommand-line option -
SVN_EDITORenvironment variable -
editor-cmdruntime configuration option -
VISUALenvironment variable -
EDITORenvironment variable -
Possibly, a fallback value built into the Subversion libraries (not present in the official builds)
The value of any of these options or variables is the beginning of a command line to be executed by the shell. Subversion appends to that command line a space and the pathname of a temporary file to be edited. So, in order to be used with Subversion, the configured or specified editor needs to support an invocation in which its last command-line parameter is a file to be edited, and it should be able to save the file in place and return a zero exit code to indicate success.
As noted, external editors can be used to provide commit log
messages to any of the committing subcommands (such as
svn commit or import,
svn mkdir or delete when
provided a URL target, and so on), and Subversion will try to
launch the editor automatically if you don't specify either of
the --message (-m) or
--file (-F) options. The
svn propedit command is built almost entirely
around the use of an external editor. And beginning in version
1.5, Subversion will also use the configured external text
editor when the user asks it to launch an editor during
interactive conflict resolution. Oddly, there doesn't appear to
be a way to use external editors to interactively provide lock
comments.
The interface between Subversion and external two- and three-way
differencing tools harkens back to a time when Subversion's only
contextual differencing capabilities were built around
invocations of the GNU diffutils toolchain, specifically the
diff and diff3 utilities.
To get the kind of behavior Subversion needed, it called these
utilities with more than a handful of options and parameters,
most of which were quite specific to the utilities. Some time
later, Subversion grew its own internal differencing library,
and as a failover mechanism, the --diff-cmd and
--diff3-cmd options were added to the
Subversion command-line client so users could more easily
indicate that they preferred to use the GNU diff and diff3
utilities instead of the newfangled internal diff library. If
those options were used, Subversion would simply ignore the
internal diff library, and fall back to running those external
programs, lengthy argument lists and all. And that's where
things remain today.
It didn't take long for folks to realize that having such easy configuration mechanisms for specifying that Subversion should use the external GNU diff and diff3 utilities located at a particular place on the system could be applied toward the use of other differencing tools, too. After all, Subversion didn't actually verify that the things it was being told to run were members of the GNU diffutils toolchain. But the only configurable aspect of using those external tools is their location on the system—not the option set, parameter order, etc. Subversion continues throwing all those GNU utility options at your external diff tool regardless of whether or not that program can understand those options. And that's where things get unintuitive for most users.
The key to using external two- and three-way differencing tools (other than GNU diff and diff3, of course) with Subversion is to use wrapper scripts, which convert the input from Subversion into something that your differencing tool can understand, and then to convert the output of your tool back into a format that Subversion expects—the format that the GNU tools would have used. The following sections cover the specifics of those expectations.
注意
The decision on when to fire off a contextual two- or three-way
diff as part of a larger Subversion operation is made entirely
by Subversion and is affected by, among other things, whether
or not the files being operated on are human-readable as
determined by their svn:mime-type property.
This means, for example, that even if you had the niftiest
Microsoft Word-aware differencing or merging tool in the
Universe, it would never be invoked by Subversion so long as
your versioned Word documents had a configured MIME type that
denoted that they were not human-readable (such as
application/msword). For more about MIME
type settings, see “文件内容类型”一节
Subversion 1.5 introduces interactive resolution of
conflicts (described in “解决冲突(合并别人的修改)”一节), and one of the options provided to users is the ability
launch a third-party merge tool. If this action is taken,
Subversion will consult the merge-tool-cmd
runtime configuration option to find the name of an external
merge tool and, upon finding one, launch that tool with the
appropriate input files. This differs from the configurable
three-way differencing tool in a couple of ways. First, the
differencing tool is always used to handle three-way
differences, whereas the merge tool is only employed when
three-way difference application has detected a conflict.
Secondly, the interface is much cleaner—your configured
merge tool need only accept as command-line parameters four path
specifications: the base file, the “theirs” file
(which contains upstream changes), the “mine” file
(which contains local modifications), and the path of the file
where the final resolved contents should be stored.
Subversion calls external diff programs with parameters suitable for the GNU diff utility, and expects only that the external program return with a successful error code. For most alternative diff programs, only the sixth and seventh arguments—the paths of the files that represent the left and right sides of the diff, respectively—are of interest. Note that Subversion runs the diff program once per modified file covered by the Subversion operation, so if your program runs in an asynchronous fashion (or “backgrounded”), you might have several instances of it all running simultaneously. Finally, Subversion expects that your program return an error code of 1 if your program detected differences, or 0 if it did not—any other error code is considered a fatal error. [49]
例 7.2 “diffwrap.sh”和例 7.3 “diffwrap.bat”分别是Bourne shell和Windows批处理外置diff工具的包裹器模版。
例 7.2. diffwrap.sh
#!/bin/sh
# Configure your favorite diff program here.
DIFF="/usr/local/bin/my-diff-tool"
# Subversion provides the paths we need as the sixth and seventh
# parameters.
LEFT=${6}
RIGHT=${7}
# Call the diff command (change the following line to make sense for
# your diff program).
$DIFF --left $LEFT --right $RIGHT
# Return an errorcode of 0 if no differences were detected, 1 if some were.
# Any other errorcode will be treated as fatal.
例 7.3. diffwrap.bat
@ECHO OFF REM Configure your favorite diff program here. SET DIFF="C:\Program Files\Funky Stuff\My Diff Tool.exe" REM Subversion provides the paths we need as the sixth and seventh REM parameters. SET LEFT=%6 SET RIGHT=%7 REM Call the diff command (change the following line to make sense for REM your diff program). %DIFF% --left %LEFT% --right %RIGHT% REM Return an errorcode of 0 if no differences were detected, 1 if some were. REM Any other errorcode will be treated as fatal.
Subversion calls external merge programs with parameters suitable for the GNU diff3 utility, expecting that the external program return with a successful error code and that the full file contents that result from the completed merge operation are printed on the standard output stream (so that Subversion can redirect them into the appropriate version controlled file). For most alternative merge programs, only the ninth, tenth, and eleventh arguments, the paths of the files which represent the “mine,” “older,” and “yours” inputs, respectively, are of interest. Note that because Subversion depends on the output of your merge program, your wrapper script must not exit before that output has been delivered to Subversion. When it finally does exit, it should return an error code of 0 if the merge was successful, or 1 if unresolved conflicts remain in the output—any other error code is considered a fatal error.
例 7.4 “diff3wrap.sh”和例 7.5 “diff3wrap.bat”分别是Bourne shell和Windows批处理外置diff工具的包裹器模版。
例 7.4. diff3wrap.sh
#!/bin/sh
# Configure your favorite diff3/merge program here.
DIFF3="/usr/local/bin/my-merge-tool"
# Subversion provides the paths we need as the ninth, tenth, and eleventh
# parameters.
MINE=${9}
OLDER=${10}
YOURS=${11}
# Call the merge command (change the following line to make sense for
# your merge program).
$DIFF3 --older $OLDER --mine $MINE --yours $YOURS
# After performing the merge, this script needs to print the contents
# of the merged file to stdout. Do that in whatever way you see fit.
# Return an errorcode of 0 on successful merge, 1 if unresolved conflicts
# remain in the result. Any other errorcode will be treated as fatal.
例 7.5. diff3wrap.bat
@ECHO OFF REM Configure your favorite diff3/merge program here. SET DIFF3="C:\Program Files\Funky Stuff\My Merge Tool.exe" REM Subversion provides the paths we need as the ninth, tenth, and eleventh REM parameters. But we only have access to nine parameters at a time, so we REM shift our nine-parameter window twice to let us get to what we need. SHIFT SHIFT SET MINE=%7 SET OLDER=%8 SET YOURS=%9 REM Call the merge command (change the following line to make sense for REM your merge program). %DIFF3% --older %OLDER% --mine %MINE% --yours %YOURS% REM After performing the merge, this script needs to print the contents REM of the merged file to stdout. Do that in whatever way you see fit. REM Return an errorcode of 0 on successful merge, 1 if unresolved conflicts REM remain in the result. Any other errorcode will be treated as fatal.
目录
Subversion有一个模块化的设计,以库的形式由C编写和实现。每个库都有一个定义良好的目的和API,而且这些接口不仅仅为了Subversion本身使用,也可以为任何希望嵌入编程方式控制Subversion的软件。此外,Subversion的API不仅仅可以为C程序使用,也可以使用如Ptyhon、Perl、Java或Ruby等高级语言调用。
本章是为那些希望编写代码或其他语言绑定与Subversion交互的人准备的。如果你围绕Subversion功能编写健壮的脚本来简化你的生活,设法开发Subversion与其他软件的复杂集成,或者只是对Subversion不同库模块提供功能感兴趣,这一章是为你准备的。然而,如果你不能预见你会以此种程度参与Subversion,你可以放心的跳过本章,略过本章不会影响你对Subversion使用的体验。
Each of Subversion's core libraries can be said to exist in
one of three main layers—the Repository Layer, the
Repository Access (RA) Layer, or the Client Layer (see 图 1 “Subversion's architecture”). We will examine
these layers shortly, but first, let's briefly summarize
Subversion's various libraries. For the sake of consistency, we
will refer to the libraries by their extensionless Unix library
names (libsvn_fs, libsvn_wc,
mod_dav_svn, etc.).
- libsvn_client
-
客户端程序的主要接口
- libsvn_delta
-
目录树和文本区别程序
- libsvn_diff
-
上下文区别和合并例程
- libsvn_fs
-
Subversion文件系统库和模块加载器
- libsvn_fs_base
-
The Berkeley DB filesystem backend
- libsvn_fs_fs
-
The native filesystem (FSFS) backend
- libsvn_ra
-
版本库访问通用组件和模块装载器
- libsvn_ra_neon
-
WebDAV版本库访问模块
- libsvn_ra_local
-
本地版本库访问模块
- libsvn_ra_serf
-
另一个(实验性的) WebDAV 版本库访问模块
- libsvn_ra_svn
-
一个自定义版本库访问模块
- libsvn_repos
-
版本库接口
- libsvn_subr
-
各色各样的有用的子程序
- libsvn_wc
-
工作拷贝管理库
- mod_authz_svn
-
使用WebDAV访问Subversion版本库的Apache授权模块
- mod_dav_svn
-
影射WebDAV操作为Subversion操作的Apache模块
The fact that the word “miscellaneous” appears only once in the previous list is a good sign. The Subversion development team is serious about making sure that functionality lives in the right layer and libraries. Perhaps the greatest advantage of the modular design is its lack of complexity from a developer's point of view. As a developer, you can quickly formulate that kind of “big picture” that allows you to pinpoint the location of certain pieces of functionality with relative ease.
Another benefit of modularity is the ability to replace a
given module with a whole new library that implements the same
API without affecting the rest of the code base. In some sense,
this happens within Subversion already. The
libsvn_ra_neon,
libsvn_ra_local,
libsvn_ra_serf, and
libsvn_ra_svn libraries each implement the
same interface, all working as plug-ins to
libsvn_ra. And all four communicate with
the Repository Layer—libsvn_ra_local connects to the
repository directly; the other three do so over a network. The
libsvn_fs_base and
libsvn_fs_fs libraries are another pair of
libraries that implement the same functionality in different
ways—both are plug-ins to the common
libsvn_fs library.
The client itself also highlights the benefits of modularity
in the Subversion design. Subversion's
libsvn_client library is a one-stop shop
for most of the functionality necessary for designing a working
Subversion client (see “客户端层”一节). So while the
Subversion distribution provides only the svn
command-line client program, there are several third-party
programs that provide various forms of graphical client UIs.
These GUIs use the same APIs that the stock command-line client
does. This type of modularity has played a large role in the
proliferation of available Subversion clients and IDE
integrations and, by extension, to the tremendous adoption rate
of Subversion itself.
When referring to Subversion's Repository Layer, we're
generally talking about two basic concepts—the versioned
filesystem implementation (accessed via
libsvn_fs, and supported by its
libsvn_fs_base and
libsvn_fs_fs plug-ins), and the repository
logic that wraps it (as implemented in
libsvn_repos). These libraries provide
the storage and reporting mechanisms for the various revisions
of your version-controlled data. This layer is connected to
the Client Layer via the Repository Access Layer, and is, from
the perspective of the Subversion user, the stuff at the
“other end of the line.”
The Subversion Filesystem is not a kernel-level filesystem that one would install in an operating system (such as the Linux ext2 or NTFS), but instead is a a virtual filesystem. Rather than storing “files” and “directories” as real files and directories (the kind you can navigate through using your favorite shell program), it uses one of two available abstract storage backends—either a Berkeley DB database environment or a flat-file representation. (To learn more about the two repository backends, see “选择数据存储格式”一节.) There has even been considerable interest by the development community in giving future releases of Subversion the ability to use other backend database systems, perhaps through a mechanism such as Open Database Connectivity (ODBC). In fact, Google did something similar to this before launching the Google Code Project Hosting service: they announced in mid-2006 that members of its open source team had written a new proprietary Subversion filesystem plug-in that used their ultra-scalable Bigtable database for its storage.
The filesystem API exported by
libsvn_fs contains the kinds of
functionality you would expect from any other filesystem
API—you can create and remove files and directories,
copy and move them around, modify file contents, and so on.
It also has features that are not quite as common, such as the
ability to add, modify, and remove metadata
(“properties”) on each file or directory.
Furthermore, the Subversion Filesystem is a versioning
filesystem, which means that as you make changes to your
directory tree, Subversion remembers what your tree looked
like before those changes. And before the previous changes.
And the previous ones. And so on, all the way back through
versioning time to (and just beyond) the moment you first
started adding things to the filesystem.
所有你对目录树的修改包含在Subversion事务的上下文中,下面描述了修改文件系统的例程:
-
开始 Subversion 的提交事务。
-
作出修改(添加、删除、属性修改等等。)。
-
提交事务。
一旦你提交了你的事务,你的文件系统修改就会永久的作为历史保存起来,每个这样的周期会产生一个新的树,所有的修订版本都是永远可以访问的一个不变的快照。
Most of the functionality provided by the filesystem
interface deals with actions that occur on individual
filesystem paths. That is, from outside of the filesystem, the
primary mechanism for describing and accessing the individual
revisions of files and directories comes through the use of
path strings such as /foo/bar, just as if
you were addressing files and directories through your
favorite shell program. You add new files and directories by
passing their paths-to-be to the right API functions. You
query for information about them by the same mechanism.
Unlike most filesystems, though, a path alone is not enough information to identify a file or directory in Subversion. Think of a directory tree as a two-dimensional system, where a node's siblings represent a sort of left-and-right motion, and navigating into the node's subdirectories represents a downward motion. 图 8.1 “二维的文件和目录” shows a typical representation of a tree as exactly that.
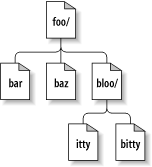
The difference here is that the Subversion filesystem has a
nifty third dimension that most filesystems do not
have—Time!
[50]
In the filesystem interface, nearly every function that has a
path argument also expects a
root argument. This
svn_fs_root_t argument describes
either a revision or a Subversion transaction (which is simply
a revision in the making) and provides that third-dimensional
context needed to understand the difference between
/foo/bar in revision 32, and the same
path as it exists in revision 98. 图 8.2 “版本时间—第三维!” shows revision
history as an added dimension to the Subversion filesystem
universe.
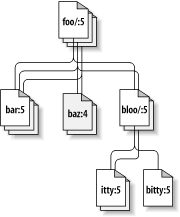
As we mentioned earlier, the
libsvn_fs API looks and feels like any
other filesystem, except that it has this wonderful versioning
capability. It was designed to be usable by any program
interested in a versioning filesystem. Not coincidentally,
Subversion itself is interested in that functionality. But
while the filesystem API should be sufficient for basic file
and directory versioning support, Subversion wants
more—and that is where libsvn_repos
comes in.
The Subversion repository library
(libsvn_repos) sits (logically speaking)
atop the libsvn_fs API, providing
additional functionality beyond that of the underlying
versioned filesystem logic. It does not completely wrap each
and every filesystem function—only certain major steps
in the general cycle of filesystem activity are wrapped by the
repository interface. Some of these include the creation and
commit of Subversion transactions and the modification of
revision properties. These particular events are wrapped by
the repository layer because they have hooks associated with
them. A repository hook system is not strictly related to
implementing a versioning filesystem, so it lives in the
repository wrapper library.
The hooks mechanism is but one of the reasons for the
abstraction of a separate repository library from the rest of
the filesystem code. The libsvn_repos
API provides several other important utilities to Subversion.
These include the abilities to:
-
Create, open, destroy, and perform recovery steps on a Subversion repository and the filesystem included in that repository.
-
Describe the differences between two filesystem trees.
-
Query for the commit log messages associated with all (or some) of the revisions in which a set of files was modified in the filesystem.
-
Generate a human-readable “dump” of the filesystem—a complete representation of the revisions in the filesystem.
-
Parse that dump format, loading the dumped revisions into a different Subversion repository.
伴随着Subversion的发展,版本库库会随着文件系统提供更多的功能和配置选项而不断成长。
If the Subversion Repository Layer is at “the other
end of the line,” the Repository Access (RA) Layer is
the line itself. Charged with marshaling data between the
client libraries and the repository, this layer includes the
libsvn_ra module loader library, the RA
modules themselves (which currently includes
libsvn_ra_neon,
libsvn_ra_local,
libsvn_ra_serf, and
libsvn_ra_svn), and any additional
libraries needed by one or more of those RA modules (such as
the mod_dav_svn Apache module or
libsvn_ra_svn's server,
svnserve).
因为Subversion使用URL来识别版本库资源,URL模式的协议部分(通常是file:、http:、https:或svn:)用来监测那个RA模块用来处理通讯。每个模块注册一组它们知道如何“说话”的协议,所以RA加载器可以在运行中监测在手边的任务中使用哪个模块。通过运行svn --version,你可以监测Subversion命令行客户端所支持的RA模块和它们声明支持的协议:
$ svn --version svn, version 1.5.0 (Beta 1) compiled Mar 19 2008, 14:19:42 Copyright (C) 2000-2008 CollabNet. Subversion is open source software, see http://subversion.tigris.org/ This product includes software developed by CollabNet (http://www.Collab.Net/). The following repository access (RA) modules are available: * ra_neon : Module for accessing a repository via WebDAV protocol using Neon. - handles 'http' scheme - handles 'https' scheme * ra_svn : Module for accessing a repository using the svn network protocol. - handles 'svn' scheme * ra_local : Module for accessing a repository on local disk. - handles 'file' scheme * ra_serf : Module for accessing a repository via WebDAV protocol using serf. - handles 'http' scheme - handles 'https' scheme $
The public API exported by the RA Layer contains
functionality necessary for sending and receiving versioned
data to and from the repository. And each of the available RA
plug-ins is able to perform that task using a specific
protocol—libsvn_ra_dav speaks
HTTP/WebDAV (optionally using SSL encryption) with an Apache
HTTP Server that is running the
mod_dav_svn Subversion server module;
libsvn_ra_svn speaks a custom network
protocol with the svnserve program; and so
on.
For those who wish to access a Subversion repository using still another protocol, that is precisely why the Repository Access Layer is modularized! Developers can simply write a new library that implements the RA interface on one side and communicates with the repository on the other. Your new library can use existing network protocols or you can invent your own. You could use interprocess communication (IPC) calls, or—let's get crazy, shall we?—you could even implement an email-based protocol. Subversion supplies the APIs; you supply the creativity.
On the client side, the Subversion working copy is where all the action takes place. The bulk of functionality implemented by the client-side libraries exists for the sole purpose of managing working copies—directories full of files and other subdirectories that serve as a sort of local, editable “reflection” of one or more repository locations—and propagating changes to and from the Repository Access layer.
Subversion's working copy library,
libsvn_wc, is directly responsible for
managing the data in the working copies. To accomplish this,
the library stores administrative information about each
working copy directory within a special subdirectory. This
subdirectory, named .svn, is present in
each working copy directory and contains various other files
and directories that record state and provide a private
workspace for administrative action. For those familiar with
CVS, this .svn subdirectory is similar in
purpose to the CVS administrative
directories found in CVS working copies. For more information
about the .svn administrative area, see
“进入工作拷贝的管理区”一节 later in this
chapter.
The Subversion client library,
libsvn_client, has the broadest
responsibility; its job is to mingle the functionality of the
working copy library with that of the Repository Access Layer,
and then to provide the highest-level API to any application
that wishes to perform general revision control actions. For
example, the function
svn_client_checkout() takes a URL as an
argument. It passes this URL to the RA layer and opens an
authenticated session with a particular repository. It then
asks the repository for a certain tree, and sends this tree
into the working copy library, which then writes a full
working copy to disk (.svn directories
and all).
The client library is designed to be used by any
application. While the Subversion source code includes a
standard command-line client, it should be very easy to write
any number of GUI clients on top of the client library. New
GUIs (or any new client, really) for Subversion need not be
clunky wrappers around the included command-line
client—they have full access via the
libsvn_client API to the same functionality,
data, and callback mechanisms that the command-line client
uses. In fact, the Subversion source code tree contains a
small C program (which can be found at
tools/examples/minimal_client.c) that
exemplifies how to wield the Subversion API to create a simple
client program.
As we mentioned earlier, each directory of a Subversion
working copy contains a special subdirectory called
.svn that houses administrative data about
that working copy directory. Subversion uses the information in
.svn to keep track of things like:
-
工作拷贝中展示的目录和文件在版本库中的位置。
-
工作拷贝中当前展示的文件和目录的修订版本。
-
所有附加在文件和目录上的用户定义属性。
-
Pristine (unedited) copies of the working copy files.
Subversion工作拷贝管理区域的布局和内容主要是考虑的实现细节,不是被人来使用的。开发者被鼓励使用Subversion的API或工具来访问和处理工作拷贝数据,反对直接读写操作组成工作拷贝管理区域的文件。工作拷贝中管理数据采用的文件格式会不断改变—只是公共API成功的隐藏了这种改变。在本小节,我们将会探讨一些实现细节来安抚你们的焦虑。
Perhaps the single most important file in the
.svn directory is the
entries file. It
contains the bulk of the administrative
information about the versioned items in a working copy
directory. It is this one file that tracks the repository
URLs, pristine revision, file checksums, pristine text and
property timestamps, scheduling and conflict state
information, last-known commit information (author, revision,
timestamp), local copy history—practically everything
that a Subversion client is interested in knowing about a
versioned (or to-be-versioned) resource!
熟悉CVS管理目录的人可能会发现,Subversion的.svn/entries实现了CVS的CVS/Entries、CVS/Root和CVS/Repository的功能。
The format of the .svn/entries file
has changed over time. Originally an XML file, it now uses a
custom—though still human-readable—file format.
While XML was a great choice for early developers of
Subversion who were frequently debugging the file's contents
(and Subversion's behavior in light of them), the need for
easy developer debugging has diminished as Subversion has
matured and has been replaced by the user's need for snappier
performance. Be aware that Subversion's working copy library
automatically upgrades working copies from one format to
another—it reads the old formats and writes the
new—which saves you the hassle of checking out a new
working copy, but can also complicate situations where
different versions of Subversion might be trying to use the
same working copy.
如我们前面提到的,.svn也包含了一些原始的“text-base”文件版本,可以在.svn/text-base看到。这些原始文件的好处是多方面的—察看本地修改和区别不需要经过网络访问,减少传递修改时的数据—但是随之而来的代价是每个版本化的文件都在磁盘至少保存两次,现在看来这是对大多数文件可以忽略不计的一个惩罚。但是,当你版本控制的文件增多之后形势会变得很严峻,我们已经注意到了应该可以选择使用“text-base”,但是具有讽刺意味的是,当版本化文件增大时,“text-base”文件的存在会更加重要—谁会希望在提交一个小修改时在网络上传递一个大文件?
Similar in purpose to the “text-base” files
are the property files and their pristine
“prop-base” copies, located in
.svn/props and
.svn/prop-base respectively. Since
directories can have properties too, there are also
.svn/dir-props and
.svn/dir-prop-base files.
Developing applications against the Subversion library APIs
is fairly straightforward. Subversion is primarily a set of C
libraries, with header (.h) files that live
in the subversion/include directory of the
source tree. These headers are copied into your system
locations (for example, /usr/local/include)
when you build and install Subversion itself from source. These
headers represent the entirety of the functions and types meant
to be accessible by users of the Subversion libraries. The
Subversion developer community is meticulous about ensuring that
the public API is well-documented—refer directly to the
header files for that documentation.
When examining the public header files, the first thing you
might notice is that Subversion's datatypes and functions are
namespace-protected. That is, every public Subversion symbol
name begins with svn_, followed by a short
code for the library in which the symbol is defined (such as
wc, client,
fs, etc.), followed by a single underscore
(_), and then the rest of the symbol name.
Semi-public functions (used among source files of a given
library but not by code outside that library, and found inside
the library directories themselves) differ from this naming
scheme in that instead of a single underscore after the library
code, they use a double underscore
(_ _). Functions that are private to
a given source file have no special prefixing and are declared
static. Of course, a compiler isn't
interested in these naming conventions, but they help to clarify
the scope of a given function or datatype.
Another good source of information about programming against
the Subversion APIs is the project's own hacking guidelines,
which can be found at http://subversion.tigris.org/hacking.html. This
document contains useful information, which, while aimed at
developers and would-be developers of Subversion itself, is
equally applicable to folks developing against Subversion as a
set of third-party libraries.
[51]
Along with Subversion's own datatypes, you will see many
references to datatypes that begin with
apr_—symbols from the Apache Portable
Runtime (APR) library. APR is Apache's portability library,
originally carved out of its server code as an attempt to
separate the OS-specific bits from the OS-independent portions
of the code. The result was a library that provides a generic
API for performing operations that differ mildly—or
wildly—from OS to OS. While the Apache HTTP Server was
obviously the first user of the APR library, the Subversion
developers immediately recognized the value of using APR as
well. This means that there is practically no OS-specific
code in Subversion itself. Also, it means that the Subversion
client compiles and runs anywhere that Apache HTTP Server
does. Currently this list includes all flavors of Unix,
Win32, BeOS, OS/2, and Mac OS X.
In addition to providing consistent implementations of
system calls that differ across operating systems,
[52]
APR gives Subversion immediate access to many custom
datatypes, such as dynamic arrays and hash tables. Subversion
uses these types extensively. But
perhaps the most pervasive APR datatype, found in nearly every
Subversion API prototype, is the
apr_pool_t—the APR memory pool.
Subversion uses pools internally for all its memory allocation
needs (unless an external library requires a different memory
management mechanism for data passed through its API),
[53]
and while a person coding against the Subversion APIs is not
required to do the same, they are
required to provide pools to the API functions that need them.
This means that users of the Subversion API must also link
against APR, must call apr_initialize()
to initialize the APR subsystem, and then must create and
manage pools for use with Subversion API calls, typically by
using svn_pool_create(),
svn_pool_clear(), and
svn_pool_destroy().
With remote version control operation as the whole point
of Subversion's existence, it makes sense that some attention
has been paid to internationalization (i18n) support. After
all, while “remote” might mean “across the
office,” it could just as well mean “across the
globe.” To facilitate this, all of Subversion's public
interfaces that accept path arguments expect those paths to be
canonicalized—which is most easily accomplished by passing
them through the svn_path_canonicalize()
function—and encoded in UTF-8. This means, for example, that
any new client binary that drives the
libsvn_client interface needs to first
convert paths from the locale-specific encoding to UTF-8
before passing those paths to the Subversion libraries, and
then re-convert any resultant output paths from Subversion
back into the locale's encoding before using those paths for
non-Subversion purposes. Fortunately, Subversion provides a
suite of functions (see
subversion/include/svn_utf.h) that can be
used by any program to do these conversions.
Also, Subversion APIs require all URL parameters to be
properly URI-encoded. So, instead of passing
file:///home/username/My File.txt as the URL of a
file named My File.txt, you need to pass
file:///home/username/My%20File.txt. Again,
Subversion supplies helper functions that your application can
use—svn_path_uri_encode() and
svn_path_uri_decode(), for URI encoding
and decoding, respectively.
除C语言以外,如果你对使用其他语言结合Subversion库感兴趣—如Python脚本或是Java应用—Subversion通过简单包裹生成器(SWIG)提供了最初的支持。Subversion的SWIG绑定位于subversion/bindings/swig,并且慢慢的走向成熟进入可用状态。这个绑定允许你直接调用Subversion的API方法,使用包裹器会把脚本数据类型转化为Subversion需要的C语言库类型。
Significant efforts have been made towards creating
functional SWIG-generated bindings for Python, Perl, and Ruby.
To some extent, the work done preparing the SWIG interface
files for these languages is reusable in efforts to generate
bindings for other languages supported by SWIG (which include
versions of C#, Guile, Java, MzScheme, OCaml, PHP, and Tcl,
among others). However, some extra programming is required to
compensate for complex APIs that SWIG needs some help
translating between languages. For more information on SWIG
itself, see the project's web site at http://www.swig.org/.
Subversion also has language bindings for Java. The
javahl bindings (located in
subversion/bindings/java in the
Subversion source tree) aren't SWIG-based, but are instead a
mixture of Java and hand-coded JNI. Javahl covers most
Subversion client-side APIs and is specifically targeted at
implementors of Java-based Subversion clients and IDE
integrations.
Subversion's language bindings tend to lack the level of developer attention given to the core Subversion modules, but can generally be trusted as production-ready. A number of scripts and applications, alternative Subversion GUI clients, and other third-party tools are successfully using Subversion's language bindings today to accomplish their Subversion integrations.
It's worth noting here that there are other options for
interfacing with Subversion using other languages: alternative
bindings for Subversion that aren't provided by the
Subversion development community at all. You can find links
to these alternative bindings on the Subversion project's
links page (at http://subversion.tigris.org/links.html), but there
are a couple of popular ones we feel are especially
noteworthy. First, Barry Scott's PySVN bindings (http://pysvn.tigris.org/) are a popular option for
binding with Python. PySVN boasts of a more Pythonic
interface than the more C-like APIs provided by Subversion's
own Python bindings. And if you're looking for a pure Java
implementation of Subversion, check out SVNKit (http://svnkit.com/), which is Subversion re-written
from the ground up in Java.
例 8.1 “使用版本库层”包含了一段C代码(C编写)描述了我们讨论的概念,它使用了版本库和文件系统接口(可以通过方法名svn_repos_和svn_fs_分辨)创建了一个添加目录的修订版本。你可以看到APR库的使用,为了内存分配而传递,这些代码也揭开了一些关于Subversion错误处理的晦涩事实—所有的Subversion错误必须需要明确的处理以防止内存泄露(在某些情况下,应用失败)。
例 8.1. 使用版本库层
/* Convert a Subversion error into a simple boolean error code.
*
* NOTE: Subversion errors must be cleared (using svn_error_clear())
* because they are allocated from the global pool, else memory
* leaking occurs.
*/
#define INT_ERR(expr) \
do { \
svn_error_t *__temperr = (expr); \
if (__temperr) \
{ \
svn_error_clear(__temperr); \
return 1; \
} \
return 0; \
} while (0)
/* Create a new directory at the path NEW_DIRECTORY in the Subversion
* repository located at REPOS_PATH. Perform all memory allocation in
* POOL. This function will create a new revision for the addition of
* NEW_DIRECTORY. Return zero if the operation completes
* successfully, non-zero otherwise.
*/
static int
make_new_directory(const char *repos_path,
const char *new_directory,
apr_pool_t *pool)
{
svn_error_t *err;
svn_repos_t *repos;
svn_fs_t *fs;
svn_revnum_t youngest_rev;
svn_fs_txn_t *txn;
svn_fs_root_t *txn_root;
const char *conflict_str;
/* Open the repository located at REPOS_PATH.
*/
INT_ERR(svn_repos_open(&repos, repos_path, pool));
/* Get a pointer to the filesystem object that is stored in REPOS.
*/
fs = svn_repos_fs(repos);
/* Ask the filesystem to tell us the youngest revision that
* currently exists.
*/
INT_ERR(svn_fs_youngest_rev(&youngest_rev, fs, pool));
/* Begin a new transaction that is based on YOUNGEST_REV. We are
* less likely to have our later commit rejected as conflicting if we
* always try to make our changes against a copy of the latest snapshot
* of the filesystem tree.
*/
INT_ERR(svn_repos_fs_begin_txn_for_commit2(&txn, repos, youngest_rev,
apr_hash_make(pool), pool));
/* Now that we have started a new Subversion transaction, get a root
* object that represents that transaction.
*/
INT_ERR(svn_fs_txn_root(&txn_root, txn, pool));
/* Create our new directory under the transaction root, at the path
* NEW_DIRECTORY.
*/
INT_ERR(svn_fs_make_dir(txn_root, new_directory, pool));
/* Commit the transaction, creating a new revision of the filesystem
* which includes our added directory path.
*/
err = svn_repos_fs_commit_txn(&conflict_str, repos,
&youngest_rev, txn, pool);
if (! err)
{
/* No error? Excellent! Print a brief report of our success.
*/
printf("Directory '%s' was successfully added as new revision "
"'%ld'.\n", new_directory, youngest_rev);
}
else if (err->apr_err == SVN_ERR_FS_CONFLICT)
{
/* Uh-oh. Our commit failed as the result of a conflict
* (someone else seems to have made changes to the same area
* of the filesystem that we tried to modify). Print an error
* message.
*/
printf("A conflict occurred at path '%s' while attempting "
"to add directory '%s' to the repository at '%s'.\n",
conflict_str, new_directory, repos_path);
}
else
{
/* Some other error has occurred. Print an error message.
*/
printf("An error occurred while attempting to add directory '%s' "
"to the repository at '%s'.\n",
new_directory, repos_path);
}
INT_ERR(err);
}
Note that in 例 8.1 “使用版本库层”, the code could
just as easily have committed the transaction using
svn_fs_commit_txn(). But the filesystem
API knows nothing about the repository library's hook
mechanism. If you want your Subversion repository to
automatically perform some set of non-Subversion tasks every
time you commit a transaction (for example, sending an
email that describes all the changes made in that transaction
to your developer mailing list), you need to use the
libsvn_repos-wrapped version of that
function, which adds the hook triggering
functionality—in this case,
svn_repos_fs_commit_txn(). (For more
information regarding Subversion's repository hooks, see “实现版本库钩子”一节.)
Now let's switch languages. 例 8.2 “使用 Python 处理版本库层” is a sample program that uses Subversion's SWIG Python bindings to recursively crawl the youngest repository revision, and to print the various paths reached during the crawl.
例 8.2. 使用 Python 处理版本库层
#!/usr/bin/python
"""Crawl a repository, printing versioned object path names."""
import sys
import os.path
import svn.fs, svn.core, svn.repos
def crawl_filesystem_dir(root, directory):
"""Recursively crawl DIRECTORY under ROOT in the filesystem, and return
a list of all the paths at or below DIRECTORY."""
# Print the name of this path.
print directory + "/"
# Get the directory entries for DIRECTORY.
entries = svn.fs.svn_fs_dir_entries(root, directory)
# Loop over the entries.
names = entries.keys()
for name in names:
# Calculate the entry's full path.
full_path = directory + '/' + name
# If the entry is a directory, recurse. The recursion will return
# a list with the entry and all its children, which we will add to
# our running list of paths.
if svn.fs.svn_fs_is_dir(root, full_path):
crawl_filesystem_dir(root, full_path)
else:
# Else it's a file, so print its path here.
print full_path
def crawl_youngest(repos_path):
"""Open the repository at REPOS_PATH, and recursively crawl its
youngest revision."""
# Open the repository at REPOS_PATH, and get a reference to its
# versioning filesystem.
repos_obj = svn.repos.svn_repos_open(repos_path)
fs_obj = svn.repos.svn_repos_fs(repos_obj)
# Query the current youngest revision.
youngest_rev = svn.fs.svn_fs_youngest_rev(fs_obj)
# Open a root object representing the youngest (HEAD) revision.
root_obj = svn.fs.svn_fs_revision_root(fs_obj, youngest_rev)
# Do the recursive crawl.
crawl_filesystem_dir(root_obj, "")
if __name__ == "__main__":
# Check for sane usage.
if len(sys.argv) != 2:
sys.stderr.write("Usage: %s REPOS_PATH\n"
% (os.path.basename(sys.argv[0])))
sys.exit(1)
# Canonicalize the repository path.
repos_path = svn.core.svn_path_canonicalize(sys.argv[1])
# Do the real work.
crawl_youngest(repos_path)
This same program in C would need to deal with APR's memory pool system. But Python handles memory usage automatically, and Subversion's Python bindings adhere to that convention. In C, you'd be working with custom datatypes (such as those provided by the APR library) for representing the hash of entries and the list of paths, but Python has hashes (called “dictionaries”) and lists as built-in datatypes, and it provides a rich collection of functions for operating on those types. So SWIG (with the help of some customizations in Subversion's language bindings layer) takes care of mapping those custom datatypes into the native datatypes of the target language. This provides a more intuitive interface for users of that language.
The Subversion Python bindings can be used for working
copy operations, too. In the previous section of this
chapter, we mentioned the libsvn_client
interface and how it exists for the sole purpose of
simplifying the process of writing a Subversion client. 例 8.3 “A Python status crawler” is a brief
example of how that library can be accessed via the SWIG
Python bindings to recreate a scaled-down version of the
svn status command.
例 8.3. A Python status crawler
#!/usr/bin/env python
"""Crawl a working copy directory, printing status information."""
import sys
import os.path
import getopt
import svn.core, svn.client, svn.wc
def generate_status_code(status):
"""Translate a status value into a single-character status code,
using the same logic as the Subversion command-line client."""
code_map = { svn.wc.svn_wc_status_none : ' ',
svn.wc.svn_wc_status_normal : ' ',
svn.wc.svn_wc_status_added : 'A',
svn.wc.svn_wc_status_missing : '!',
svn.wc.svn_wc_status_incomplete : '!',
svn.wc.svn_wc_status_deleted : 'D',
svn.wc.svn_wc_status_replaced : 'R',
svn.wc.svn_wc_status_modified : 'M',
svn.wc.svn_wc_status_merged : 'G',
svn.wc.svn_wc_status_conflicted : 'C',
svn.wc.svn_wc_status_obstructed : '~',
svn.wc.svn_wc_status_ignored : 'I',
svn.wc.svn_wc_status_external : 'X',
svn.wc.svn_wc_status_unversioned : '?',
}
return code_map.get(status, '?')
def do_status(wc_path, verbose):
# Build a client context baton.
ctx = svn.client.svn_client_ctx_t()
def _status_callback(path, status):
"""A callback function for svn_client_status."""
# Print the path, minus the bit that overlaps with the root of
# the status crawl
text_status = generate_status_code(status.text_status)
prop_status = generate_status_code(status.prop_status)
print '%s%s %s' % (text_status, prop_status, path)
# Do the status crawl, using _status_callback() as our callback function.
revision = svn.core.svn_opt_revision_t()
revision.type = svn.core.svn_opt_revision_head
svn.client.svn_client_status2(wc_path, revision, _status_callback,
svn.core.svn_depth_infinity, verbose,
0, 0, 1, ctx)
def usage_and_exit(errorcode):
"""Print usage message, and exit with ERRORCODE."""
stream = errorcode and sys.stderr or sys.stdout
stream.write("""Usage: %s OPTIONS WC-PATH
Options:
--help, -h : Show this usage message
--verbose, -v : Show all statuses, even uninteresting ones
""" % (os.path.basename(sys.argv[0])))
sys.exit(errorcode)
if __name__ == '__main__':
# Parse command-line options.
try:
opts, args = getopt.getopt(sys.argv[1:], "hv", ["help", "verbose"])
except getopt.GetoptError:
usage_and_exit(1)
verbose = 0
for opt, arg in opts:
if opt in ("-h", "--help"):
usage_and_exit(0)
if opt in ("-v", "--verbose"):
verbose = 1
if len(args) != 1:
usage_and_exit(2)
# Canonicalize the repository path.
wc_path = svn.core.svn_path_canonicalize(args[0])
# Do the real work.
try:
do_status(wc_path, verbose)
except svn.core.SubversionException, e:
sys.stderr.write("Error (%d): %s\n" % (e.apr_err, e.message))
sys.exit(1)
As was the case in 例 8.2 “使用 Python 处理版本库层”, this
program is pool-free and uses, for the most part, normal
Python data types. The call to
svn_client_ctx_t() is deceiving because
the public Subversion API has no such function—this just
happens to be a case where SWIG's automatic language
generation bleeds through a little bit (the function is a sort
of factory function for Python's version of the corresponding
complex C structure). Also note that the path passed to this
program (like the last one) gets run through
svn_path_canonicalize(), because to
not do so runs the risk of triggering the
underlying Subversion C library's assertions about such
things, which translates into rather immediate and
unceremonious program abortion.
目录
This chapter is intended to be a complete reference to using Subversion. This includes the command-line client (svn) and all its subcommands, as well as the repository administration programs (svnadmin and svnlook) and their respective subcommands.
To use the command-line client, type svn, the subcommand you wish to use, and [54] any options or targets that you wish to operate on—there is no specific order that the subcommand and the options must appear in. For example, all of the following are valid ways to use svn status:
$ svn -v status $ svn status -v $ svn status -v myfile
你可以在第 2 章 基本使用发现更多使用客户端命令的例子,以及“属性”一节中的管理属性的命令。
While Subversion has different options for its
subcommands, all options are global—that is, each
option is guaranteed to mean the same thing regardless of
the subcommand you use it with. For example,
--verbose (-v) always
means “verbose output,” regardless of the
subcommand you use it with.
-
--acceptACTION -
Specify action for automatic conflict resolution. Possible actions are (
postpone,base,mine-full,theirs-full,edit, andlaunch. -
--auto-props -
开启auto-props,覆盖
config文件中的enable-auto-props指示。 --change(-c)ARG-
作为引用特定“修改”(也叫做修订版本)的方法,这个选项是“-r ARG-1:ARG”语法上的甜头。
-
--changelistARG -
Operate only on members of the changelist named
ARG. This option can be used multiple times to specify sets of changelists. -
--clARG -
This is an alias for the
--changelistoption. -
--config-dirDIR -
指导Subversion从指定目录而不是默认位置(用户主目录的
.subversion)读取配置信息。 -
--depthARG -
Limit the scope of an operation to a particular tree depth.
ARGis one ofempty,files,immediates, orinfinity. -
--diff-cmdCMD -
指定用来表示文件区别的外部程序,当svn diff调用时,会使用Subversion的内置区别引擎,默认会提供统一区别输出,如果你希望使用一个外置区别程序,使用
--diff-cmd。你可以通过--extensions(本小节后面有更多介绍)把选项传递到区别程序。 -
--diff3-cmdCMD -
指定一个外置程序用来合并文件。
-
--dry-run -
检验运行一个命令的效果,但没有实际的修改—可以用在磁盘和版本库。
-
--editor-cmdCMD -
指定一个外部程序来编辑日志信息或是属性值。如何设定缺省编辑器见“配置”一节的
editor-cmd小节。 -
--encodingENC -
告诉Subversion你的提交日志信息是通过提供的字符集编码的,缺省时是你的操作系统的本地编码,如果你的提交信息使用其它编码,你一定要指定这个值。
--extensions(-x)ARGS-
指定一个或多个Subversion传递给提供文件区别的外部区别程序的参数,如果你要传递多个参数,你一定能够要用引号(例如,svn diff --diff-cmd /usr/bin/diff -x "-b -E")括起所有的参数。这个选项只有在使用
--diff-cmd选项时使用。 --file(-F)FILENAME-
为特定子命令使用命名文件的的内容,尽管不同的子命令对这些内容做不同的事情。例如,svn commit使用内容作为提交日志,而svn propset使用它作为属性值。
-
--force -
Forces a particular command or operation to run. There are some operations that Subversion will prevent you from doing in normal usage, but you can pass the force option to tell Subversion “I know what I'm doing as well as the possible repercussions of doing it, so let me at 'em.” This option is the programmatic equivalent of doing your own electrical work with the power on—if you don't know what you're doing, you're likely to get a nasty shock.
-
--force-log -
将传递给
--message(-m)或者--file(-F)的可疑参数指定为有效可接受。缺省情况下,如果选项的参数看起来会成为子命令的目标,Subversion会提出一个错误,例如,你传递一个版本化的文件路径给--file(-F)选项,Subversion会认为出了点错误,认为你将目标对象当成了参数,而你并没有提供其它的—未版本化的文件作为日志信息的文件。为了确认你的意图并且不考虑这类错误,传递--force-log选项给命令来接受它作为日志信息。 --help(-h) or-?)-
If used with one or more subcommands, shows the built-in help text for each. If used alone, it displays the general client help text.
-
--ignore-ancestry -
告诉Subversion在计算区别(只依赖于路径内容)时忽略祖先。
-
--ignore-externals -
告诉Subversion忽略外部定义和外部定义管理的工作拷贝。
-
--incremental -
打印适合串联的输出格式。
-
--keep-changelist -
Don't delete the changelist after commit.
-
--keep-local -
Keep the local copy of a file or directory (used with the svn delete command).
-
--limitNUM -
只显示第一个
NUM日志信息。 --message(-m)MESSAGE-
Indicates that you will specify either a log message or a lock comment on the command line, following this option. For example:
$ svn commit -m "They don't make Sunday."
-
--newARG -
使用
ARG作为新的目标(结合svn diff使用)。 -
--no-auth-cache -
Prevents caching of authentication information (e.g., username and password) in the Subversion administrative directories.
-
--no-auto-props -
关闭auto-props,覆盖
config文件中的enable-auto-props指示。 -
--no-diff-deleted -
防止Subversion打印删除文件的区别信息,缺省的行为方式是当你删除了一个文件后运行svn diff打印的区别与删除文件所有的内容得到的结果一样。
-
--no-ignore -
在状态列表中显示
global-ignores配置选项或者是svn:ignore属性忽略的文件。见“配置”一节和“忽略未版本控制的条目”一节查看详情。 -
--no-unlock -
不自动解锁文件(缺省的提交行为是解锁提交列出的所有文件),更多信息见“锁定”一节。
-
--non-interactive -
In the case of an authentication failure or insufficient credentials, prevents prompting for credentials (e.g., username or password). This is useful if you're running Subversion inside of an automated script, and it's more appropriate to have Subversion fail than to prompt for more information.
--non-recursive(-N)-
Deprecated. Stops a subcommand from recursing into subdirectories. Most subcommands recurse by default, but some subcommands—usually those that have the potential to remove or undo your local modifications—do not.
-
--notice-ancestry -
在计算区别时关注祖先。
-
--oldARG -
使用
ARG作为旧的目标(结合svn diff使用)。 -
--parents -
Create and add nonexistent or nonversioned parent subdirectories to the working copy or repository as part of an operation. This is useful for automatically creating multiple subdirectories where none currently exist. If performed on a URL, all the directories will be created in a single commit.
-
--passwordPASS -
指出在命令行中提供你的密码—另外,如果它是需要的,Subversion会提示你输入。
--quiet(-q)-
请求客户端在执行操作时只显示重要信息。
-
--record-only -
Mark revisions as merged (for use with
--revision(-r) --recursive(-R)-
Deprecated. Makes a subcommand recurse into subdirectories. Most subcommands recurse by default.
--reintegrate(-R)-
Used with the svn merge subcommand, merges all of the source URL's changes into the working copy. See “Keeping a Branch in Sync”一节 for details.
-
--relocate目的路径[PATH...] -
svn switch子命令中使用,用来修改你的工作拷贝所引用的版本库位置。当版本库的位置修改了,而你有一个工作拷贝,希望继续使用时非常有用。见svn switch的例子。
-
--removeARG -
Disassociate
ARGfrom a changelist --revision(-r)REV-
Indicates that you're going to supply a revision (or range of revisions) for a particular operation. You can provide revision numbers, keywords, or dates (in curly braces) as arguments to the revision option. If you wish to offer a range of revisions, you can provide two revisions separated by a colon. For example:
$ svn log -r 1729 $ svn log -r 1729:HEAD $ svn log -r 1729:1744 $ svn log -r {2001-12-04}:{2002-02-17} $ svn log -r 1729:{2002-02-17}见“修订版本关键字”一节查看更多信息。
-
--revprop -
操作针对修订版本属性,而不是Subversion文件或目录的属性。这个选项需要你传递
--revision(-r)参数。 -
--set-depthARG -
Set the sticky depth on a directory in a working copy to one of
empty,files,immediates, orinfinity. --show-updates(-u)-
Causes the client to display information about which files in your working copy are out of date. This doesn't actually update any of your files—it just shows you which files will be updated if you run svn update.
-
--stop-on-copy -
Causes a Subversion subcommand that traverses the history of a versioned resource to stop harvesting that historical information when a copy—that is, a location in history where that resource was copied from another location in the repository—is encountered.
-
--strict -
Causes Subversion to use strict semantics, a notion that is rather vague unless talking about specific subcommands (namely, svn propget).
-
--targetsFILENAME -
Tells Subversion to get the list of files that you wish to operate on from the filename that you provide instead of listing all the files on the command line.
-
--usernameNAME -
表示你要在命令行提供认证的用户名—否则如果需要,Subversion会提示你这一点。
--use-merge-history(-g)-
Use or display additional information from merge history.
--verbose(-v)-
请求客户端在运行子命令打印尽量多的信息,会导致Subversion打印额外的字段,每个文件的细节信息或者是关于动作的附加信息。
-
--version -
打印客户端版本信息,这个信息不仅仅包括客户端的版本号,也有所有客户端可以用来访问Subversion版本库的版本库访问模块列表。
-
--with-all-revprops -
Used with svn log --xml, this option will retrieve and display all revision properties in the log output.
-
--with-revpropARG -
When used with any command that writes to the repository, this sets the revision property, using the
NAME=VALUEformat,NAMEtoVALUE. When used with svn log --xml, this displays the value ofARGin the log output. -
--xml -
使用XML格式打印输出。
Here are the various subcommands.
名称
svn add — 添加文件、目录或符号链。
选项
--targets FILENAME --quiet (-q) --config-dir DIR --no-ignore --auto-props --no-auto-props --force --depth ARG --parents
例子
添加一个文件到工作拷贝:
$ svn add foo.c A foo.c
当添加一个目录,svn add缺省的行为方式是递归的:
$ svn add testdir A testdir A testdir/a A testdir/b A testdir/c A testdir/d
你可以只添加一个目录而不包括其内容:
$ svn add --depth=empty otherdir A otherdir
通常情况下,命令svn add *会忽略所有已经在版本控制之下的目录,有时候,你会希望添加所有工作拷贝的未版本化文件,包括那些隐藏在深处的文件,可以使用svn add的--force递归到版本化的目录下:
$ svn add * --force A foo.c A somedir/bar.c A otherdir/docs/baz.doc …
名称
svn blame — Show author and revision information inline for the specified files or URLs.
描述
Show author and revision information inline for the specified files or URLs. Each line of text is annotated at the beginning with the author (username) and the revision number for the last change to that line.
选项
--revision (-r) ARG --verbose (-v) --incremental --xml --extensions (-x) ARG --force --use-merge-history(-g) --username ARG --password ARG --no-auth-cache --non-interactive --config-dir ARG
例子
如果你希望在测试版本库看到blame标记的readme.txt源代码:
$ svn blame http://svn.red-bean.com/repos/test/readme.txt
3 sally This is a README file.
5 harry You should read this.
Even if svn blame says that Harry
last modified readme.txt in revision
5, you'll have to examine exactly what the revision
changed to be sure that Harry changed
the context of the line—he may
have just adjusted the whitespace.
If you use the --xml option, you can
get xml output describing the blame annotations, but not
the contents of the lines themselves:
$ svn blame --xml http://svn.red-bean.com/repos/test/readme.txt <?xml version="1.0"?> <blame> <target path="sandwich.txt"> <entry line-number="1"> <commit revision="3"> <author>sally</author> <date>2008-05-25T19:12:31.428953Z</date> </commit> </entry> <entry line-number="2"> <commit revision="5"> <author>harry</author> <date>2008-05-29T03:26:12.293121Z</date> </commit> </entry> </target> </blame>
名称
svn cat — 输出特定文件或URL的内容。
描述
Output the contents of the specified files or URLs. For listing the contents of directories, see svn list later.
选项
--revision (-r) REV --username USER --password PASS --no-auth-cache --non-interactive --config-dir DIR
例子
If you want to view readme.txt in
your repository without checking it out:
$ svn cat http://svn.red-bean.com/repos/test/readme.txt This is a README file. You should read this.
提示
If your working copy is out of date (or you have
local modifications) and you want to see the
HEAD revision of a file in your
working copy, svn cat -r HEAD will
automatically fetch the HEAD revision
when you give it a path:
$ cat foo.c This file is in my local working copy and has changes that I've made. $ svn cat -r HEAD foo.c Latest revision fresh from the repository!
名称
svn changelist — Associate (or deassociate) local paths with a changelist.
描述
Used for dividing files in a working copy into a changelist (logical named grouping) in order to allow users to easily work on multiple file collections within a single working copy.
例子
Edit three files, add them to a changelist, then commit only files in that changelist:
$ svn cl issue1729 foo.c bar.c baz.c Path 'foo.c' is now a member of changelist 'issue1729'. Path 'bar.c' is now a member of changelist 'issue1729'. Path 'baz.c' is now a member of changelist 'issue1729'. $ svn status A someotherfile.c A test/sometest.c --- Changelist 'issue1729': A foo.c A bar.c A baz.c $ svn commit --changelist issue1729 -m "Fixing Issue 1729." Adding bar.c Adding baz.c Adding foo.c Transmitting file data ... Committed revision 2. $ svn status A someotherfile.c A test/sometest.c
Note that only the files in changelist
issue1729 were
committed.
名称
svn checkout — 从版本库取出一个工作拷贝。
描述
Check out a working copy from a repository. If
PATH is omitted, the
basename of the URL will be used as the destination.
If multiple URLs are given, each will be checked out into a
subdirectory of PATH, with the
name of the subdirectory being the basename of the
URL.
选项
--revision (-r) REV --quiet (-q) --depth ARG --force --accept ARG --username USER --password PASS --no-auth-cache --non-interactive --ignore-externals --config-dir DIR
例子
取出一个工作拷贝到mine目录:
$ svn checkout file:///var/svn/repos/test mine A mine/a A mine/b A mine/c A mine/d Checked out revision 20. $ ls mine
检出两个目录到两个单独的工作拷贝:
$ svn checkout file:///var/svn/repos/test file:///var/svn/repos/quiz A test/a A test/b A test/c A test/d Checked out revision 20. A quiz/l A quiz/m Checked out revision 13. $ ls quiz test
检出两个目录到两个单独的工作拷贝,但是将两个目录都放到working-copies:
$ svn checkout file:///var/svn/repos/test file:///var/svn/repos/quiz working-copies A working-copies/test/a A working-copies/test/b A working-copies/test/c A working-copies/test/d Checked out revision 20. A working-copies/quiz/l A working-copies/quiz/m Checked out revision 13. $ ls working-copies
If you interrupt a checkout (or something else interrupts your checkout, such as loss of connectivity, etc.), you can restart it either by issuing the identical checkout command again or by updating the incomplete working copy:
$ svn checkout file:///var/svn/repos/test mine A mine/a A mine/b ^C svn: The operation was interrupted svn: caught SIGINT $ svn checkout file:///var/svn/repos/test mine A mine/c ^C svn: The operation was interrupted svn: caught SIGINT $ svn update mine A mine/d Updated to revision 20.
If you wish to check out some revision other than the
most recent one, you can do so by providing the
--revision (-r) option
to the svn checkout command:
$ svn checkout -r 2 file:///var/svn/repos/test mine A mine/a Checked out revision 2.
名称
svn cleanup — 递归清理工作拷贝。
描述
Recursively clean up the working copy, removing
working copy locks and resuming unfinished operations. If
you ever get a working copy locked
error, run this command to remove stale locks and get your
working copy into a usable state again.
If, for some reason, an svn update
fails due to a problem running an external diff program
(e.g., user input or network failure), pass the
--diff3-cmd to allow cleanup to complete
any merging with your external diff program. You can also
specify any configuration directory with the
--config-dir option, but you should need
these options extremely infrequently.
名称
svn commit — 将修改从工作拷贝发送到版本库。
描述
将修改从工作拷贝发送到版本库。如果你没有使用--file或--message提供一个提交日志信息,svn会启动你的编辑器来编写一个提交信息,见“配置”一节的editor-cmd小节。
svn commit will send any lock
tokens that it finds and will release locks on all
PATHS committed (recursively)
unless --no-unlock is passed.
提示
如果你开始一个提交并且Subversion启动了你的编辑器来编辑提交信息,你仍可以退出而不会提交你的修改,如果你希望取消你的提交,只需要退出编辑器而不保存你的提交信息,Subversion会提示你是选择取消提交、空信息继续还是重新编辑信息。
选项
--message (-m) TEXT --file (-F) FILE --quiet (-q) --no-unlock --targets FILENAME --force-log --depth ARG --with-revprop ARG --username USER --password PASS --no-auth-cache --non-interactive --encoding ENC --config-dir DIR --changelist ARG --keep-changelist
例子
使用命令行提交一个包含日志信息的文件修改,当前目录(“.”)是没有说明的目标路径:
$ svn commit -m "added howto section." Sending a Transmitting file data . Committed revision 3.
提交一个修改到foo.c(在命令行明确指明),并且msg文件中保存了提交信息:
$ svn commit -F msg foo.c Sending foo.c Transmitting file data . Committed revision 5.
如果你希望使用在--file选项中使用在版本控制之下的文件作为参数,你需要使用--force-log选项:
$ svn commit --file file_under_vc.txt foo.c svn: The log message file is under version control svn: Log message file is a versioned file; use '--force-log' to override $ svn commit --force-log --file file_under_vc.txt foo.c Sending foo.c Transmitting file data . Committed revision 6.
提交一个已经预定要删除的文件:
$ svn commit -m "removed file 'c'." Deleting c Committed revision 7.
名称
svn copy — 拷贝工作拷贝的一个文件或目录到版本库。
描述
Copy one or more files in a working copy or in the
repository. When copying multiple sources, they will be
added as children of DST, which must be a directory.
SRC and
DST can each be either a
working copy (WC) path or URL:
- WC → WC
-
拷贝并且预定一个添加的项目(包含历史)。
- WC → URL
-
将WC或URL的拷贝立即提交。
- URL → WC
-
Check out URL into WC and schedule it for addition.
- URL → URL
-
完全的服务器端拷贝,通常用在分支和标签。
When copying multiple sources, they will be added as
children of DST, which must be
a directory.
If no peg revision (i.e.,
@REV) is supplied, by default,
the BASE revision will be used for
files copied from the working copy, while the
HEAD revision will be used for files
copied from a URL.
注意
你只可以在单个版本库中拷贝文件,Subversion还不支持跨版本库的拷贝。
是否访问版本库
Yes, if source or destination is in the repository, or if needed to look up the source revision number.
选项
--message (-m) TEXT --file (-F) FILE --revision (-r) REV --quiet (-q) --parents --with-revprop ARG --username USER --password PASS --no-auth-cache --non-interactive --force-log --editor-cmd EDITOR --encoding ENC --config-dir DIR
例子
拷贝工作拷贝的一个项目(只是预定要拷贝—在提交之前不会影响版本库):
$ svn copy foo.txt bar.txt A bar.txt $ svn status A + bar.txt
Copy several files in a working copy into a subdirectory:
$ svn cp bat.c baz.c qux.c src A src/bat.c A src/baz.c A src/qux.c
Copy revision 8 of bat.c into your
working copy under a different name:
$ svn cp bat.c ya-old-bat.c A ya-old-bat.c
拷贝你的工作拷贝的一个项目到版本库的URL(直接的提交,所以需要提供一个提交信息):
$ svn copy near.txt file:///var/svn/repos/test/far-away.txt -m "Remote copy." Committed revision 8.
拷贝版本库的一个项目到你的工作拷贝(只是预定要拷贝—在提交之前不会影响版本库):
$ svn copy file:///var/svn/repos/test/far-away near-here A near-here
提示
这是恢复死掉文件的推荐方式!
And finally, copy between two URLs:
$ svn copy file:///var/svn/repos/test/far-away file:///var/svn/repos/test/over-there -m "remote copy." Committed revision 9.
$ svn copy file:///var/svn/repos/test/trunk \
file:///var/svn/repos/test/tags/0.6.32-prerelease -m "tag tree"
Committed revision 12.
提示
这是在版本库里作“标签”最简单的方法—svn copy那个修订版本(通常是HEAD)到你的tags目录。
不要担心忘记作标签—你可以在以后任何时候给一个旧版本作标签:
$ svn copy -r 11 file:///var/svn/repos/test/trunk \
file:///var/svn/repos/test/tags/0.6.32-prerelease -m "Forgot to tag at rev 11"
Committed revision 13.
名称
svn delete — 从工作拷贝或版本库删除一个项目。
描述
Items specified by PATH are
scheduled for deletion upon the next commit. Files (and
directories that have not been committed) are immediately
removed from the working copy unless the
--keep-local option is given. The
command will not remove any unversioned or modified items;
use the --force option to override this
behavior.
URL指定的项目会在直接提交中从版本库删除,多个URL的提交是原子操作。
选项
--force --force-log --message (-m) TEXT --file (-F) FILE --quiet (-q) --targets FILENAME --with-revprop ARG --keep-local --username USER --password PASS --no-auth-cache --non-interactive --editor-cmd EDITOR --encoding ENC --config-dir DIR
例子
Using svn to delete a file from your working copy deletes your local copy of the file, but it merely schedules the file to be deleted from the repository. When you commit, the file is deleted in the repository.
$ svn delete myfile D myfile $ svn commit -m "Deleted file 'myfile'." Deleting myfile Transmitting file data . Committed revision 14.
然而直接删除一个URL,你需要提供一个日志信息:
$ svn delete -m "Deleting file 'yourfile'" file:///var/svn/repos/test/yourfile Committed revision 15.
如下是强制删除本地已修改文件的例子:
$ svn delete over-there svn: Attempting restricted operation for modified resource svn: Use --force to override this restriction svn: 'over-there' has local modifications $ svn delete --force over-there D over-there
名称
svn diff — 比较两条路径的区别。
概要
diff [-c M | -r N[:M]] [TARGET[@REV]...]
diff [-r N[:M]] --old=OLD-TGT[@OLDREV] [--new=NEW-TGT[@NEWREV]] [PATH...]
diff OLD-URL[@OLDREV] NEW-URL[@NEWREV]
描述
-
Display the differences between two paths. You can use svn diff in the following ways:
-
Use just svn diffto display local modifications in a working copy.
-
Display the changes made to
TARGETs as they are seen inREVbetween two revisions.TARGETs may be all working copy paths or allURLs. IfTARGETs are working copy paths,Ndefaults toBASEandMto the working copy; ifTARGETs areURLs,Nmust be specified andMdefaults toHEAD. The-c Moption is equivalent to-r N:MwhereN = M-1. Using-c -Mdoes the reverse:-r M:NwhereN = M-1. -
Display the differences between
OLD-TGTas it was seen inOLDREVandNEW-TGTas it was seen inNEWREV.PATHs, if given, are relative toOLD-TGTandNEW-TGTand restrict the output to differences for those paths.OLD-TGTandNEW-TGTmay be working copy paths orURL[@REV].NEW-TGTdefaults toOLD-TGTif not specified.-r NmakesOLDREVdefault to N;-r N:MmakesOLDREVdefault toNandNEWREVdefault toM.
diff OLD-URL[@OLDREV] NEW-URL[@NEWREV] is shorthand for svn diff --old=OLD-URL[@OLDREV] --new=NEW-URL[@NEWREV].
svn diff -r N:M URL是svn diff -r N:M --old=URL --new=URL的简写。
svn diff [-r N[:M]] URL1[@N] URL2[@M]是 svn diff [-r N[:M]] --old=URL1 --new=URL2的简写。
If TARGET is a URL, then
revs N and M can be given either via the
--revision option or by using the
“@” notation as described earlier.
如果TARGET是工作拷贝路径,则--revision选项的含义是:
-
--revision N:M -
The server compares
TARGET@NandTARGET@M. -
--revision N -
The client compares
TARGET@Nagainst working copy. - (无
--revision) -
客户端比较base和
TARGET的TARGET。
如果使用其他语法,服务器会比较URL1和URL2各自的N和M。如果省掉N或M,会假定为HEAD。
By default, svn diff ignores the
ancestry of files and merely compares the contents of the
two files being compared. If you use
--notice-ancestry, the ancestry of the
paths in question will be taken into consideration when
comparing revisions (that is, if you run svn
diff on two files with identical contents but
different ancestry, you will see the entire contents of
the file as having been removed and added again).
选项
--revision (-r) ARG --change (-c) ARG --old ARG --new ARG --depth ARG --diff-cmd CMD --extensions (-x) "ARGS" --no-diff-deleted --notice-ancestry --summarize --force --username USER --password PASS --no-auth-cache --non-interactive --config-dir DIR --changelist ARG --xml
例子
比较BASE和你的工作拷贝(svn diff最经常的用法):
$ svn diff COMMITTERS Index: COMMITTERS =================================================================== --- COMMITTERS (revision 4404) +++ COMMITTERS (working copy)
查看文件COMMITTERS在修订版本9115修改的内容:
$ svn diff -c 9115 COMMITTERS Index: COMMITTERS =================================================================== --- COMMITTERS (revision 3900) +++ COMMITTERS (working copy)
察看你的工作拷贝对旧的修订版本的修改:
$ svn diff -r 3900 COMMITTERS Index: COMMITTERS =================================================================== --- COMMITTERS (revision 3900) +++ COMMITTERS (working copy)
使用“@”语法与修订版本3000和35000比较:
$ svn diff http://svn.collab.net/repos/svn/trunk/COMMITTERS@3000 \
http://svn.collab.net/repos/svn/trunk/COMMITTERS@3500
Index: COMMITTERS
===================================================================
--- COMMITTERS (revision 3000)
+++ COMMITTERS (revision 3500)
…
Compare revision 3000 to revision 3500 using range notation (pass only the one URL in this case):
$ svn diff -r 3000:3500 http://svn.collab.net/repos/svn/trunk/COMMITTERS Index: COMMITTERS =================================================================== --- COMMITTERS (revision 3000) +++ COMMITTERS (revision 3500)
Compare revision 3000 to revision 3500 of all the files in
trunk using range notation:
$ svn diff -r 3000:3500 http://svn.collab.net/repos/svn/trunk
使用范围符号比较修订版本3000和3500trunk中的三个文件:
$ svn diff -r 3000:3500 --old http://svn.collab.net/repos/svn/trunk COMMITTERS README HACKING
如果你有工作拷贝,你不必输入这么长的URL:
$ svn diff -r 3000:3500 COMMITTERS Index: COMMITTERS =================================================================== --- COMMITTERS (revision 3000) +++ COMMITTERS (revision 3500)
Use --diff-cmd
CMD -x to
pass arguments directly to the external diff
program:
$ svn diff --diff-cmd /usr/bin/diff -x "-i -b" COMMITTERS Index: COMMITTERS =================================================================== 0a1,2 > This is a test >
Lastly, you can use the --xml option
along with the --summarize option to view
xml describing the changes that occurred between
revisions, but not the contents of the diff itself:
$ svn diff --summarize --xml http://svn.red-bean.com/repos/test@r2 http://svn.red-bean.com/repos/test <?xml version="1.0"?> <diff> <paths> <path props="none" kind="file" item="modified">http://svn.red-bean.com/repos/test/sandwich.txt</path> <path props="none" kind="file" item="deleted">http://svn.red-bean.com/repos/test/burrito.txt</path> <path props="none" kind="dir" item="added">http://svn.red-bean.com/repos/test/snacks</path> </paths> </diff>
名称
svn export — 导出一个干净的目录树。
描述
The first form exports a clean directory tree from the
repository specified by URL—at revision
REV if it is given, otherwise
at HEAD, into
PATH. If
PATH is omitted, the last
component of the URL is used
for the local directory name.
从工作拷贝导出干净目录树的第二种形式是指定PATH1到PATH2,所有的本地修改将会保留,但是不再版本控制下的文件不会拷贝。
选项
--revision (-r) REV --quiet (-q) --force --username USER --password PASS --no-auth-cache --non-interactive --depth ARG --config-dir DIR --native-eol EOL --ignore-externals
例子
从你的工作拷贝导出(不会打印每一个文件和目录):
$ svn export a-wc my-export Export complete.
从版本库导出目录(打印所有的文件和目录):
$ svn export file:///var/svn/repos my-export A my-export/test A my-export/quiz … Exported revision 15.
When rolling operating system-specific release
packages, it can be useful to export a tree that uses a
specific EOL character for line endings. The
--native-eol option will do this, but it
affects only files that have svn:eol-style =
native properties attached to them. For
example, to export a tree with all CRLF line endings
(possibly for a Windows .zip file
distribution):
$ svn export file:///var/svn/repos my-export --native-eol CRLF A my-export/test A my-export/quiz … Exported revision 15.
You can specify LR,
CR, or CRLF as a
line-ending type with the --native-eol
option.
名称
svn import — 递归提交一个路径的拷贝到版本库。
描述
Recursively commit a copy of
PATH to
URL. If
PATH is omitted,
“.” is assumed. Parent
directories are created in the repository as necessary.
Unversionable items such as device files and pipes are
ignored even if --force is
specified.
选项
--message (-m) TEXT --file (-F) FILE --quiet (-q) --depth ARG --force --with-revprop ARG --username USER --password PASS --no-auth-cache --non-interactive --force-log --editor-cmd EDITOR --encoding ENC --config-dir DIR --auto-props --no-auto-props --ignore-externals
例子
这将本地目录myproj导入到版本库的trunk/misc,trunk/misc在导入之前不需要存在—svn import会递归的为你创建目录。
$ svn import -m "New import" myproj http://svn.red-bean.com/repos/trunk/misc Adding myproj/sample.txt … Transmitting file data ......... Committed revision 16.
需要知道这样不会在版本库创建目录myproj,如果你希望这样,请在URL后添加myproj:
$ svn import -m "New import" myproj http://svn.red-bean.com/repos/trunk/misc/myproj Adding myproj/sample.txt … Transmitting file data ......... Committed revision 16.
在导入数据之后,你会发现原先的目录树并没有纳入版本控制,为了开始工作,你还是要运行svn checkout得到一个干净的目录树工作拷贝。
名称
svn info — 显示本地或远程条目的信息。
描述
打印你的工作拷贝路径和URL的信息,包括:
-
路经
-
名称
-
URL
-
Repository root
-
版本库的UUID
-
Revision
-
Node kind
-
Last changed author
-
Last changed revision
-
Last changed date
-
Lock token
-
Lock owner
-
Lock created (date)
-
Lock expires (date)
Additional kinds of information available only for working copy paths are:
-
Schedule
-
Copied from URL
-
Copied from rev
-
Text last updated
-
Properties last updated
-
Checksum
-
Conflict previous base file
-
Conflict previous working file
-
Conflict current base file
-
Conflict properties file
选项
--revision (-r) REV --depth ARG --targets FILENAME --incremental --xml --username USER --password PASS --no-auth-cache --non-interactive --config-dir DIR --changelist ARG
例子
svn info会展示工作拷贝所有项目的所有有用信息,它会显示文件的信息:
$ svn info foo.c Path: foo.c Name: foo.c URL: http://svn.red-bean.com/repos/test/foo.c Repository Root: http://svn.red-bean.com/repos/test Repository UUID: 5e7d134a-54fb-0310-bd04-b611643e5c25 Revision: 4417 Node Kind: file Schedule: normal Last Changed Author: sally Last Changed Rev: 20 Last Changed Date: 2003-01-13 16:43:13 -0600 (Mon, 13 Jan 2003) Text Last Updated: 2003-01-16 21:18:16 -0600 (Thu, 16 Jan 2003) Properties Last Updated: 2003-01-13 21:50:19 -0600 (Mon, 13 Jan 2003) Checksum: /3L38YwzhT93BWvgpdF6Zw==
它也会展示目录的信息:
$ svn info vendors Path: vendors URL: http://svn.red-bean.com/repos/test/vendors Repository Root: http://svn.red-bean.com/repos/test Repository UUID: 5e7d134a-54fb-0310-bd04-b611643e5c25 Revision: 19 Node Kind: directory Schedule: normal Last Changed Author: harry Last Changed Rev: 19 Last Changed Date: 2003-01-16 23:21:19 -0600 (Thu, 16 Jan 2003)
svn info also acts on URLs (also
note that the file readme.doc in
this example is locked, so lock information is also
provided):
$ svn info http://svn.red-bean.com/repos/test/readme.doc Path: readme.doc Name: readme.doc URL: http://svn.red-bean.com/repos/test/readme.doc Repository Root: http://svn.red-bean.com/repos/test Repository UUID: 5e7d134a-54fb-0310-bd04-b611643e5c25 Revision: 1 Node Kind: file Schedule: normal Last Changed Author: sally Last Changed Rev: 42 Last Changed Date: 2003-01-14 23:21:19 -0600 (Tue, 14 Jan 2003) Text Last Updated: 2003-01-14 23:21:19 -0600 (Tue, 14 Jan 2003) Checksum: d41d8cd98f00b204e9800998ecf8427e Lock Token: opaquelocktoken:14011d4b-54fb-0310-8541-dbd16bd471b2 Lock Owner: harry Lock Created: 2003-01-15 17:35:12 -0600 (Wed, 15 Jan 2003)
Lastly, svn info output is
available in xml format by passing
the--xml option:
$ svn info --xml http://svn.red-bean.com/repos/test <?xml version="1.0"?> <info> <entry kind="dir" path="." revision="1"> <url>http://svn.red-bean.com/repos/test</url> <repository> <root>http://svn.red-bean.com/repos/test</root> <uuid>5e7d134a-54fb-0310-bd04-b611643e5c25</uuid> </repository> <wc-info> <schedule>normal</schedule> <depth>infinity</depth> </wc-info> <commit revision="1"> <author>sally</author> <date>2003-01-15T23:35:12.847647Z</date> </commit> </entry> </info>
名称
svn list — 列出版本库目录的条目。
描述
列出每一个TARGET文件和TARGET目录的内容,如果TARGET是工作拷贝路径,会使用对应的版本库URL。
缺省的TARGET是“.”,意味着当前工作拷贝的版本库URL。
如果一个客户端连接到svnserve进程,如下事情会发生:
-
最后一次提交的修订版本号
-
最后一次提交的作者
-
如果锁定,字符为“O”(更多细节见svn info)
-
大小(单位字节)
-
最后提交的日期时间
使用选项--xml,输出是XML格式(如果没有指定--incremental,会包括一个头和一个围绕的元素)。会展示所有的信息;不接受--verbose选项。
选项
--revision (-r) REV --verbose (-v) --depth ARG --incremental --xml --username USER --password PASS --no-auth-cache --non-interactive --config-dir DIR
例子
如果你希望在没有下载工作拷贝时查看版本库有哪些文件,svn list会非常有用:
$ svn list http://svn.red-bean.com/repos/test/support README.txt INSTALL examples/ …
You can pass the --verbose option for
additional information, rather like the Unix command
ls -l:
$ svn list --verbose file:///var/svn/repos
16 sally 28361 Jan 16 23:18 README.txt
27 sally 0 Jan 18 15:27 INSTALL
24 harry Jan 18 11:27 examples/
You can also get svn list output in
xml format with the --xml option:
$ svn list --xml http://svn.red-bean.com/repos/test <?xml version="1.0"?> <lists> <list path="http://svn.red-bean.com/repos/test"> <entry kind="dir"> <name>examples</name> <size>0</size> <commit revision="24"> <author>harry</author> <date>2008-01-18T06:35:53.048870Z</date> </commit> </entry> ... </list> </lists>
For further details, see the earlier section “ svn list ”一节.
名称
svn lock — 锁定版本库的工作拷贝路径或URL,所以没有其他用户可以提交这些文件的修改。
选项
--targets FILENAME --message (-m) TEXT --file (-F) FILE --force-log --encoding ENC --username USER --password PASS --no-auth-cache --non-interactive --config-dir DIR
例子
在工作拷贝锁定两个文件:
$ svn lock tree.jpg house.jpg 'tree.jpg' locked by user 'harry'. 'house.jpg' locked by user 'harry'.
锁定工作拷贝的一个被其它用户锁定的文件:
$ svn lock tree.jpg
svn: warning: Path '/tree.jpg is already locked by user 'sally in \
filesystem '/var/svn/repos/db'
$ svn lock --force tree.jpg
'tree.jpg' locked by user 'harry'.
没有工作拷贝的情况下锁定文件:
$ svn lock http://svn.red-bean.com/repos/test/tree.jpg 'tree.jpg' locked by user 'harry'.
更多细节见“锁定”一节。
名称
svn log — 显示提交日志信息。
描述
缺省目标是你的当前目录的路径,如果没有提供参数,svn log会显示当前目录下的所有文件和目录的日志信息,你可以通过指定路径来精炼结果,一个或多个修订版本,或者是任何两个的组合。对于本地路径的缺省修订版本范围BASE:1。
如果你只是指定一个URL,就会打印这个URL上所有的日志信息,如果添加部分路径,只有这条路径下的URL信息会被打印,URL缺省的修订版本范围是HEAD:1。
svn log使用--verbose选项也会打印所有影响路径的日志信息,使用--quiet选项不会打印日志信息正文本身(这与--verbose协调一致)。
每个日志信息只会打印一次,即使是那些明确请求不止一次的路径,日志会跟随在拷贝过程中,使用--stop-on-copy可以关闭这个特性,可以用来监测分支点。
选项
--revision (-r) REV --quiet (-q) --verbose (-v) --targets FILENAME --use-merge-history (-g) --change (-c) --stop-on-copy --incremental --limit (-l) NUM --with-all-revprops --with-revprop ARG --xml --username USER --password PASS --no-auth-cache --non-interactive --config-dir DIR
例子
你可以在顶级目录运行svn log看到工作拷贝中所有修改的路径的日志信息:
$ svn log ------------------------------------------------------------------------ r20 | harry | 2003-01-17 22:56:19 -0600 (Fri, 17 Jan 2003) | 1 line Tweak. ------------------------------------------------------------------------ r17 | sally | 2003-01-16 23:21:19 -0600 (Thu, 16 Jan 2003) | 2 lines …
检验一个特定文件所有的日志信息:
$ svn log foo.c ------------------------------------------------------------------------ r32 | sally | 2003-01-13 00:43:13 -0600 (Mon, 13 Jan 2003) | 1 line Added defines. ------------------------------------------------------------------------ r28 | sally | 2003-01-07 21:48:33 -0600 (Tue, 07 Jan 2003) | 3 lines …
如果你手边没有工作拷贝,你可以查看一个URL的日志:
$ svn log http://svn.red-bean.com/repos/test/foo.c ------------------------------------------------------------------------ r32 | sally | 2003-01-13 00:43:13 -0600 (Mon, 13 Jan 2003) | 1 line Added defines. ------------------------------------------------------------------------ r28 | sally | 2003-01-07 21:48:33 -0600 (Tue, 07 Jan 2003) | 3 lines …
If you want several distinct paths underneath the
same URL, you can use the URL [PATH...]
syntax:
$ svn log http://svn.red-bean.com/repos/test/ foo.c bar.c ------------------------------------------------------------------------ r32 | sally | 2003-01-13 00:43:13 -0600 (Mon, 13 Jan 2003) | 1 line Added defines. ------------------------------------------------------------------------ r31 | harry | 2003-01-10 12:25:08 -0600 (Fri, 10 Jan 2003) | 1 line Added new file bar.c ------------------------------------------------------------------------ r28 | sally | 2003-01-07 21:48:33 -0600 (Tue, 07 Jan 2003) | 3 lines …
The --verbose option causes
svn log to include information about
the paths that were changed in each displayed revision.
These paths appear, one path per line of output, with
action codes that indicate what type of change was made to
the path.
$ svn log -v http://svn.red-bean.com/repos/test/ foo.c bar.c ------------------------------------------------------------------------ r32 | sally | 2003-01-13 00:43:13 -0600 (Mon, 13 Jan 2003) | 1 line Changed paths: M /foo.c Added defines. ------------------------------------------------------------------------ r31 | harry | 2003-01-10 12:25:08 -0600 (Fri, 10 Jan 2003) | 1 line Changed paths: A /bar.c Added new file bar.c ------------------------------------------------------------------------ r28 | sally | 2003-01-07 21:48:33 -0600 (Tue, 07 Jan 2003) | 3 lines …
There are just a handful of action codes used by svn log, and they are similar to the ones used by the svn update command:
-
A -
The item was added.
-
D -
The item was deleted.
-
M -
Properties or textual contents on the item were changed.
-
R -
The item was replaced by a different one at the same location.
In addition to the action codes which precede the
changed paths, svn log --verbose will
note a path was added or replaced as the result of a copy
operation. It does so by printing (from
after such paths.
COPY-FROM-PATH:COPY-FROM-REV)
当你想连接多个对日志命令的调用结果,你会希望使用--incremental选项。svn log通常会在日志信息的开头和每一小段间打印一行虚线,如果你对一段修订版本运行svn log,你会得到下面的结果:
$ svn log -r 14:15 ------------------------------------------------------------------------ r14 | ... ------------------------------------------------------------------------ r15 | ... ------------------------------------------------------------------------
However, if you wanted to gather two nonsequential log messages into a file, you might do something like this:
$ svn log -r 14 > mylog $ svn log -r 19 >> mylog $ svn log -r 27 >> mylog $ cat mylog ------------------------------------------------------------------------ r14 | ... ------------------------------------------------------------------------ ------------------------------------------------------------------------ r19 | ... ------------------------------------------------------------------------ ------------------------------------------------------------------------ r27 | ... ------------------------------------------------------------------------
You can avoid the clutter of the double dashed lines
in your output by using the --incremental
option:
$ svn log --incremental -r 14 > mylog $ svn log --incremental -r 19 >> mylog $ svn log --incremental -r 27 >> mylog $ cat mylog ------------------------------------------------------------------------ r14 | ... ------------------------------------------------------------------------ r19 | ... ------------------------------------------------------------------------ r27 | ...
The --incremental option provides
similar output control when using the
--xml option:
$ svn log --xml --incremental -r 1 sandwich.txt <logentry revision="1"> <author>harry</author> <date>2008-06-03T06:35:53.048870Z</date> <msg>Initial Import.</msg> </logentry>
提示
If you run svn log on a specific path and provide a specific revision and get no output at all as in the following:
$ svn log -r 20 http://svn.red-bean.com/untouched.txt ------------------------------------------------------------------------
That just means that the path was not modified in that revision. If you log from the top of the repository or know the file that changed in that revision, you can specify it explicitly:
$ svn log -r 20 touched.txt ------------------------------------------------------------------------ r20 | sally | 2003-01-17 22:56:19 -0600 (Fri, 17 Jan 2003) | 1 line Made a change. ------------------------------------------------------------------------
名称
svn merge — 应用两组源文件的差别到工作拷贝路径。
概要
svn merge sourceURL1[@N] sourceURL2[@M] [WCPATH]
svn merge sourceWCPATH1@N sourceWCPATH2@M [WCPATH]
svn merge [[-c M]... | [-r N:M]...] [SOURCE[@REV] [WCPATH]]
描述
In the first form, the source URLs are specified at
revisions N and M.
These are the two sources to be compared. The revisions
default to HEAD if omitted.
In the second form, the URLs corresponding to the source working copy paths define the sources to be compared. The revisions must be specified.
In the third form, SOURCE
can be either a URL or a working copy path (in which case
its corresponding URL is used). If not specified,
SOURCE will be the same as
WCPATH.
SOURCE in revision
REV is compared as it existed
between revisions N and
M for each revision range
provided. If REV is not
specified, HEAD is assumed.
-c M is equivalent to -r
<M-1>:M, and -c -M does
the reverse: -r M:<M-1>. If no
revision ranges are specified, the default range of
1:HEAD is used. Multiple
-c and/or -r
instances may be specified, and mixing of forward and
reverse ranges is allowed—the ranges are internally
compacted to their minimum representation before merging
begins (which may result in no-op).
WCPATH is the working copy
path that will receive the changes. If
WCPATH is omitted, a default
value of “.” is assumed,
unless the sources have identical basenames that match a
file within “.”. In
this case, the differences will be applied to that
file.
Subversion will only internally track metadata about the merge operation if the two sources are ancestrally related—if the first source is an ancestor of the second or vice-versa. This is guaranteed to be the case when using the third form. Unlike svn diff, the merge command takes the ancestry of a file into consideration when performing a merge operation. This is very important when you're merging changes from one branch into another and you've renamed a file on one branch but not the other.
选项
--revision (-r) REV --change (-c) REV --depth ARG --record-only --accept ARG --reintegrate --quiet (-q) --force --dry-run --diff3-cmd CMD --extensions (-x) ARG --ignore-ancestry --username USER --password PASS --no-auth-cache --non-interactive --config-dir DIR
例子
Merge a branch back into the trunk (assuming that you have an up to date working copy of the trunk).
$ svn merge --reintegrate http://svn.example.com/repos/calc/branches/my-calc-branch --- Merging differences between repository URLs into '.': U button.c U integer.c U Makefile U . $ # build, test, verify, ... $ svn commit -m "Merge my-calc-branch back into trunk!" Sending . Sending button.c Sending integer.c Sending Makefile Transmitting file data .. Committed revision 391.
合并一个单独文件的修改:
$ cd myproj $ svn merge -r 30:31 thhgttg.txt U thhgttg.txt
名称
svn mergeinfo — Query merge-related information. See “Mergeinfo and Previews”一节 for details.
名称
svn mkdir — 创建一个纳入版本控制的新目录。
描述
Create a directory with a name given by the final
component of the PATH or URL.
A directory specified by a working copy
PATH is scheduled for addition
in the working copy. A directory specified by a URL is
created in the repository via an immediate commit.
Multiple directory URLs are committed atomically. In both
cases, all the intermediate directories must already exist
unless the --parents option is
used.
名称
svn move — 移动一个文件或目录。
描述
This command moves files or directories in your working copy or in the repository.
提示
这个命令同svn copy加一个svn delete等同。
When moving multiple sources, they will be added as
children of DST, which must be
a directory.
注意
Subversion不支持在工作拷贝和URL之间拷贝,此外,你只可以一个版本库内移动文件—Subversion不支持跨版本库的移动。
- WC → WC
-
移动和预订一个文件或目录将要添加(包含历史)。
- URL → URL
-
完全服务器端的重命名。
选项
--message (-m) TEXT
--file (-F) FILE
--revision (-r) REV (废弃的)
--quiet (-q)
--force
--parents
--with-revprop ARG
--username USER
--password PASS
--no-auth-cache
--non-interactive
--editor-cmd EDITOR
--encoding ENC
--force-log
--config-dir DIR
例子
移动工作拷bede一个文件:
$ svn move foo.c bar.c A bar.c D foo.c
Move several files in your working copy into a subdirectory:
$ svn move baz.c bat.c qux.c src A src/baz.c D baz.c A src/bat.c D bat.c A src/qux.c D qux.c
移动版本库中的一个文件(一个立即提交,所以需要提交信息):
$ svn move -m "Move a file" http://svn.red-bean.com/repos/foo.c \
http://svn.red-bean.com/repos/bar.c
Committed revision 27.
名称
svn propdel — 删除一个项目的一个属性。
描述
This removes properties from files, directories, or
revisions. The first form removes versioned properties in
your working copy, while the second removes unversioned
remote properties on a repository revision
(TARGET determines only which
repository to access).
名称
svn propedit — Edit the property of one or more items under version control. See svn propset.
描述
Edit one or more properties using your favorite
editor. The first form edits versioned properties in
your working copy, while the second edits unversioned
remote properties on a repository revision
(TARGET determines only which
repository to access).
选项
--revision (-r) REV --revprop --message (-m) ARG --file (-F) ARG --force-log --with-revprop ARG --username USER --password PASS --no-auth-cache --non-interactive --encoding ENC --editor-cmd EDITOR --config-dir DIR
例子
svn propedit对修改多个值的属性非常简单:
$ svn propedit svn:keywords foo.c
<svn will launch your favorite editor here, with a buffer open
containing the current contents of the svn:keywords property. You
can add multiple values to a property easily here by entering one
value per line.>
Set new value for property 'svn:keywords' on 'foo.c'
名称
svn propget — 打印一个属性的值。
选项
--depth ARG --revision (-r) REV --revprop --strict --xml --username USER --password PASS --no-auth-cache --non-interactive --config-dir DIR --changelist ARG
例子
检查工作拷贝的一个文件的一个属性:
$ svn propget svn:keywords foo.c Author Date Rev
对于修订版本属性相同:
$ svn propget svn:log --revprop -r 20 Began journal.
Lastly, you can get svn propget
output in xml format with the --xml
option:
$ svn propget --xml svn:ignore . <?xml version="1.0"?> <properties> <target path=""> <property name="svn:ignore">*.o </property> </target> </properties>
名称
svn proplist — 列出所有的属性。
描述
List all properties on files, directories, or
revisions. The first form lists versioned properties in
your working copy, while the second lists unversioned remote
properties on a repository revision
(TARGET determines only which
repository to access).
选项
--verbose (-v) --depth ARG --revision (-r) REV --quiet (-q) --revprop --xml --username USER --password PASS --no-auth-cache --non-interactive --config-dir DIR --changelist ARG
例子
你可以使用proplist察看你的工作拷贝的一个项目的属性:
$ svn proplist foo.c Properties on 'foo.c': svn:mime-type svn:keywords owner
通过--verbose选项,svn proplist也可以非常便利的显示属性的值:
$ svn proplist --verbose foo.c Properties on 'foo.c': svn:mime-type : text/plain svn:keywords : Author Date Rev owner : sally
Lastly, you can get svn proplist
output in xml format with the --xml
option:
$ svn proplist --xml <?xml version="1.0"?> <properties> <target path="."> <property name="svn:ignore"/> </target> </properties>
名称
svn propset — 设置文件、目录或者修订版本的属性PROPNAME为PROPVAL。
概要
svn propset PROPNAME [PROPVAL | -F VALFILE] PATH...
svn propset PROPNAME --revprop -r REV [PROPVAL | -F VALFILE] [TARGET]
描述
Set PROPNAME to
PROPVAL on files, directories,
or revisions. The first example creates a versioned, local
property change in the working copy, and the second
creates an unversioned, remote property change on a
repository revision
(TARGET determines only which
repository to access).
提示
Subversion有一系列“特殊的”影响行为方式的属性,关于这些属性的详情请见“Subversion Properties”一节。
选项
--file (-F) FILE --quiet (-q) --revision (-r) REV --targets FILENAME --depth ARG --revprop --username USER --password PASS --no-auth-cache --non-interactive --encoding ENC --force --config-dir DIR --changelist ARG
例子
设置文件的mimetype:
$ svn propset svn:mime-type image/jpeg foo.jpg property 'svn:mime-type' set on 'foo.jpg'
On a Unix system, if you want a file to have the executable permission set:
$ svn propset svn:executable ON somescript property 'svn:executable' set on 'somescript'
或许为了合作者的利益你有一个内部的属性设置:
$ svn propset owner sally foo.c property 'owner' set on 'foo.c'
如果你在特定修订版本的日志信息里有一些错误,并且希望修改,可以使用--revprop设置svn:log为新的日志信息:
$ svn propset --revprop -r 25 svn:log "Journaled about trip to New York." property 'svn:log' set on repository revision '25'
Or, if you don't have a working copy, you can provide a URL:
$ svn propset --revprop -r 26 svn:log "Document nap." http://svn.red-bean.com/repos property 'svn:log' set on repository revision '25'
最后,你可以告诉propset从一个文件得到输入,你甚至可以使用这个方式来设置一个属性为二进制内容:
$ svn propset owner-pic -F sally.jpg moo.c property 'owner-pic' set on 'moo.c'
注意
缺省,你不可以在Subversion版本库修改修订版本属性,你的版本库管理员必须显示的通过创建一个名字为pre-revprop-change的钩子来允许修订版本属性修改,关于钩子脚本的详情请见“实现版本库钩子”一节。
名称
svn resolve — Resolve conflicts on working copy files or directories.
描述
Resolve “conflicted” state on working
copy files or directories. This routine does not
semantically resolve conflict markers, however, it
replaces PATH with the version
specified by the --accept argument and
then removes conflict-related artifact files. This allows
PATH to be committed
again—that is, it tells Subversion that the
conflicts have been
“resolved.”. You can pass the following
arguments to the --accept command
depending on your desired resolution:
- base
-
Choose the file that was the
BASErevision before you updated your working copy. That is, the file that you checked out before you made your latest edits. - working
-
Assuming that you've manually handled the conflict resolution, choose the version of the file as it currently stands in your working copy.
- mine-full
-
Resolve all conflicted files with copies of the files as they stood immediately before you ran svn update.
- theirs-full
-
Resolve all conflicted files with copies of the files that were fetched from the server when you ran svn update.
See “解决冲突(合并别人的修改)”一节 for an in-depth look at resolving conflicts.
例子
Here's an example where, after a postponed conflict
resolution during update, svn resolve
replaces the all conflicts in
file foo.c with your edits:
$ svn up
Conflict discovered in 'foo.c'.
Select: (p) postpone, (df) diff-full, (e) edit,
(h) help for more options: p
C foo.c
Updated to revision 5.
$ svn resolve --accept mine-full foo.c
Resolved conflicted state of 'foo.c'
名称
svn resolved — 废弃的. Remove “冲突” state on working copy files or directories.
描述
This command has been deprecated in favor of running svn resolve --accept working. See svn resolve for details.
Remove “conflicted” state on working copy
files or directories. This routine does not semantically
resolve conflict markers; it merely removes
conflict-related artifact files and allows
PATH to be committed again;
that is, it tells Subversion that the conflicts have been
“resolved.” See “解决冲突(合并别人的修改)”一节 for an in-depth look at
resolving conflicts.
名称
svn revert — 取消所有的本地编辑。
描述
Reverts any local changes to a file or directory and resolves any conflicted states. svn revert will not only revert the contents of an item in your working copy, but also any property changes. Finally, you can use it to undo any scheduling operations that you may have done (e.g., files scheduled for addition or deletion can be “unscheduled”).
例子
丢弃对一个文件的修改:
$ svn revert foo.c Reverted foo.c
If you want to revert a whole directory of files,
use the --depth=infinity option:
$ svn revert --depth=infinity . Reverted newdir/afile Reverted foo.c Reverted bar.txt
最后,你可以取消预定的操作:
$ svn add mistake.txt whoops A mistake.txt A whoops A whoops/oopsie.c $ svn revert mistake.txt whoops Reverted mistake.txt Reverted whoops $ svn status ? mistake.txt ? whoops
警告
svn revert本身有固有的危险,因为它的目的是放弃数据—未提交的修改。一旦你选择了恢复,Subversion没有方法找回未提交的修改。
如果你没有给svn revert提供了目标,它不会做任何事情—为了保护你不小心失去对工作拷贝的修改,svn revert需要你提供至少一个目标。
名称
svn status — 打印工作拷贝文件和目录的状态。
描述
Print the status of working copy files and
directories. With no arguments, it prints only locally
modified items (no repository access). With
--show-updates, it adds working revision
and server out-of-date information. With
--verbose, it prints full revision
information on every item. With --quiet,
it prints only summary information about locally modified
items.
输出的前六列都是一个字符宽,每一列给出了工作拷贝项目的每一方面的信息。
第一列指出一个项目的是添加、删除还是其它的修改。
-
' ' -
没有修改。
-
'A' -
Item is scheduled for addition.
-
'D' -
Item is scheduled for deletion.
-
'M' -
项目已经修改了。
-
'R' -
项目在工作拷贝中已经被替换了。这意味着文件预定要删除,然后有一个同样名称的文件要在同一个位置替换它。
-
'C' -
项目的内容(相对于属性)与更新得到的数据冲突了。
-
'X' -
项目与外部定义相关。
-
'I' -
Item is being ignored (e.g., with the
svn:ignoreproperty). -
'?' -
项目不在版本控制之下。
-
'!' -
项目已经丢失(例如,你使用svn移动或者删除了它)。这也说明了一个目录不是完整的(一个检出或更新中断)。
-
'~' -
项目作为一种对象(文件、目录或链接)纳入版本控制,但是已经被另一种对象替代。
第二列告诉一个文件或目录的属性的状态。
-
' ' -
没有修改。
-
'M' -
这个项目的属性已经修改。
-
'C' -
这个项目的属性与从版本库得到的更新有冲突。
第三列只在工作拷贝锁定时才会出现。(见“有时你只需要清理”一节。)
-
' ' -
项目没有锁定。
-
'L' -
项目已经锁定。
第四列只在预定包含历史添加的项目出现。
-
' ' -
没有历史预定要提交。
-
'+' -
历史预定要伴随提交。
第五列只在项目跳转到相对于它的父目录时出现(见“使用分支”一节)。
-
' ' -
项目是它的父目录的孩子。
-
'S' -
项目已经转换。
第六列显示锁定信息。
-
' ' -
当使用
--show-updates,文件没有锁定。如果不使用--show-updates,这意味着文件在工作拷贝被锁定。 - K
-
文件锁定在工作拷贝。
- O
-
File is locked either by another user or in another working copy. This appears only when
--show-updatesis used. - T
-
File was locked in this working copy, but the lock has been “stolen” and is invalid. The file is currently locked in the repository. This appears only when
--show-updatesis used. - B
-
File was locked in this working copy, but the lock has been “broken” and is invalid. The file is no longer locked. This appears only when
--show-updatesis used.
过期信息出现在第七列(只在使用--show-updates选项时出现)。
-
' ' -
The item in your working copy is up to date.
-
'*' -
在服务器这个项目有了新的修订版本。
余下的字段是可变得宽度且使用空格分隔,如果使用--show-updates或--verbose选项,工作修订版本是下一个字段。
如果传递--verbose选项,最后提交的修订版本和最后的提交作者会在后面显示。
工作拷贝路径永远是最后一个字段,所以它可以包括空格。
选项
--show-updates (-u) --verbose (-v) --depth ARG --quiet (-q) --no-ignore --incremental --xml --username USER --password PASS --no-auth-cache --non-interactive --config-dir DIR --ignore-externals --changelist ARG
例子
这是查看你在工作拷贝所做的修改的最简单的方法。
$ svn status wc M wc/bar.c A + wc/qax.c
如果你希望找出工作拷贝哪些文件是最新的,使用--show-updates选项(这不会对工作拷贝有任何修改)。这里你会看到wc/foo.c在上次更新后有了修改:
$ svn status --show-updates wc
M 965 wc/bar.c
* 965 wc/foo.c
A + 965 wc/qax.c
Status against revision: 981
注意
--show-updates只会在过期的项目(如果你运行svn update,就会更新的项目)旁边安置一个星号。--show-updates不会导致状态列表反映项目的版本库版本(尽管你可以通过--verbose选项查看版本库的修订版本号)。
And finally, the most information you can get out of the status subcommand is as follows:
$ svn status --show-updates --verbose wc
M 965 938 sally wc/bar.c
* 965 922 harry wc/foo.c
A + 965 687 harry wc/qax.c
965 687 harry wc/zig.c
Head revision: 981
Lastly, you can get svn status
output in xml format with the --xml
option:
$ svn status --xml wc <?xml version="1.0"?> <status> <target path="wc"> <entry path="qax.c"> <wc-status props="none" item="added" revision="0"> </wc-status> </entry> <entry path="bar.c"> <wc-status props="normal" item="modified" revision="965"> <commit revision="965"> <author>sally</author> <date>2008-05-28T06:35:53.048870Z</date> </commit> </wc-status> </entry> </target> </status>
关于svn status的更多例子可以见“查看你的修改概况”一节。
名称
svn switch — 把工作拷贝更新到别的URL。
描述
The first variant of this subcommand (without the
--relocate option) updates your working
copy to point to a new URL—usually a URL that
shares a common ancestor with your working copy, although
not necessarily. This is the Subversion way to move a
working copy to a new branch. If specified,
PEGREV determines in which
revision the target is first looked up. See “使用分支”一节 for an in-depth look
at switching.
If --force is used, unversioned
obstructing paths in the working copy do not automatically
cause a failure if the switch attempts to add the same
path. If the obstructing path is the same type (file or
directory) as the corresponding path in the repository, it
becomes versioned but its contents are left untouched in
the working copy. This means that an obstructing
directory's unversioned children may also obstruct and
become versioned. For files, any content differences
between the obstruction and the repository are treated
like a local modification to the working copy. All
properties from the repository are applied to the
obstructing path.
As with most subcommands, you can limit the scope of
the switch operation to a particular tree depth using the
--depth option. Alternatively, you can
use the --set-depth option to set a new
“sticky” working copy depth on the switch
target. Currently, the depth of a working copy directory
can only be increased (telescoped more deeply); you cannot
make a directory more shallow.
--relocate选项导致svn switch做不同的事情:它更新你的工作拷贝指向到同一个版本库目录,但是不同的URL(通常因为管理员将版本库转移了服务器,或到了同一个服务器的另一个URL)。
选项
--revision (-r) REV --depth ARG --set-depth ARG --ignore-externals --force --accept ARG --quiet (-q) --diff3-cmd CMD --relocate FROM TO --username USER --password PASS --no-auth-cache --non-interactive --config-dir DIR
例子
如果你目前所在目录vendors分支到vendors-with-fix,你希望转移到那个分支:
$ svn switch http://svn.red-bean.com/repos/branches/vendors-with-fix . U myproj/foo.txt U myproj/bar.txt U myproj/baz.c U myproj/qux.c Updated to revision 31.
为了跳转回来,只需要提供最初取出工作拷贝的版本库URL:
$ svn switch http://svn.red-bean.com/repos/trunk/vendors . U myproj/foo.txt U myproj/bar.txt U myproj/baz.c U myproj/qux.c Updated to revision 31.
提示
如果你不希望跳转所有的工作拷贝,你可以只跳转一部分。
Sometimes an administrator might change the location
(or apparent location) of your repository—in other
words, the content of the repository doesn't change, but
the repository's root URL does. For example, the hostname
may change, the URL scheme may change, or any part of the
URL that leads to the repository itself may change.
Rather than check out a new working copy, you can have the
svn switch command
“rewrite” your working copy's administrative
metadata to refer to the new repository location. If you
use the --relocate option to svn
switch, Subversion will contact the repository
to validate the relocation request (looking for the
repository at the new URL, of course), and then do this
metadata rewriting. No file contents will be changed as
the result of this type of switch operation—this is
a metadata-only modification to the working copy.
$ svn checkout file:///var/svn/repos test A test/a A test/b … $ mv repos newlocation $ cd test/ $ svn update svn: Unable to open an ra_local session to URL svn: Unable to open repository 'file:///var/svn/repos' $ svn switch --relocate file:///var/svn/repos file:///tmp/newlocation . $ svn update At revision 3.
警告
小心使用--relocate选项,如果你输入了错误的选项,你会在工作拷贝创建无意义的URL,会导致整个工作区不可用并且难于修复。理解何时应该使用--relocate也是非常重要的,下面是一些规则:
-
如果工作拷贝需要反映一个版本库的新目录,只需要使用svn switch。
-
如果你的工作拷贝还是反映相同的版本库目录,但是版本库本身的位置改变了,使用svn switch --relocate。
名称
svn unlock — 解锁工作拷贝路径或URL。
选项
--targets FILENAME --username USER --password PASS --no-auth-cache --non-interactive --config-dir DIR --force
例子
解锁工作拷贝中的两个文件:
$ svn unlock tree.jpg house.jpg 'tree.jpg' unlocked. 'house.jpg' unlocked.
解锁工作拷贝的一个被其他用户锁定的文件:
$ svn unlock tree.jpg svn: 'tree.jpg' is not locked in this working copy $ svn unlock --force tree.jpg 'tree.jpg' unlocked.
没有工作拷贝时解锁一个文件:
$ svn unlock http://svn.red-bean.com/repos/test/tree.jpg 'tree.jpg unlocked.
更多细节见“锁定”一节。
名称
svn update — 更新你的工作拷贝。
描述
svn update brings changes from the
repository into your working copy. If no revision is given,
it brings your working copy up to date with the
HEAD revision. Otherwise, it
synchronizes the working copy to the revision given by the
--revision option. As part of the
synchronization, svn update also
removes any stale locks (see “有时你只需要清理”一节) found in the
working copy.
对于每一个更新的项目开头都有一个表示所做动作的字符,这些字符有下面的意思:
-
A -
添加
-
B -
Broken Lock (third column only)
-
D -
删除
-
U -
更新
-
C -
冲突
-
G -
合并
-
E -
Existed
A character in the first column signifies an update to the actual file, while updates to the file's properties are shown in the second column. Lock information is printed in the third column.
As with most subcommands, you can limit the scope of
the update operation to a particular tree depth using the
--depth option. Alternatively, you can
use the --set-depth option to set a new
“sticky” working copy depth on the update
target. Currently, the depth of a working copy directory
can only be increased (telescoped more deeply); you cannot
make a directory more shallow.
选项
--revision (-r) REV --depth ARG --set-depth ARG --force --quiet (-q) --no-ignore --incremental --diff3-cmd CMD --editor-cmd ARG --accept ARG --username USER --password PASS --no-auth-cache --non-interactive --config-dir DIR --ignore-externals --changelist
例子
获取你上次更新之后版本库的修改:
$ svn update A newdir/toggle.c A newdir/disclose.c A newdir/launch.c D newdir/README Updated to revision 32.
你也可以将工作拷贝更新到旧的修订版本(Subversion没有CVS的“sticky”文件的概念;见附录 B, CVS用户的Subversion指南):
$ svn update -r30 A newdir/README D newdir/toggle.c D newdir/disclose.c D newdir/launch.c U foo.c Updated to revision 30.
提示
如果你希望检查单个文件的旧的修订版本,你会希望使用svn cat。
svnadmin is the administrative tool for monitoring and repairing your Subversion repository. For detailed information, see the maintenance section for “svnadmin”一节.
因为svnadmin直接访问版本库(因此只可以在存放版本库的机器上使用),它通过路径访问版本库,而不是URL。
-
--bdb-log-keep -
(Berkeley DB-specific.) Disable automatic log removal of database log files. Having these log files around can be convenient if you need to restore from a catastrophic repository failure.
-
--bdb-txn-nosync -
(Berkeley DB-specific.) Disables fsync when committing database transactions. Used with the svnadmin create command to create a Berkeley DB-backed repository with
DB_TXN_NOSYNCenabled (which improves speed but has some risks associated with it). -
--bypass-hooks -
绕过版本库钩子系统。
-
--clean-logs -
Remove unused Berkeley DB logs.
-
--force-uuid -
缺省情况下,当版本库加载已经包含修订版本的数据时svnadmin会忽略流中的
UUID,这个选项会导致版本库的UUID设置为流的UUID。 -
--ignore-uuid -
缺省情况下,当加载空版本库时,svnadmin会使用来自流中的
UUID,这个选项会导致忽略UUID(如果你的配置文件已经设置了--force-uuid,将会用于将其覆盖)。 -
--incremental -
导出一个修订版本针对前一个修订版本的区别,而不是通常的完全结果。
-
--parent-dirDIR -
当加载一个转储文件时,根路径为
DIR而不是/。 --revision(-r)ARG-
指定一个操作的修订版本。
-
--quiet -
不显示通常的过程—只显示错误。
-
--use-post-commit-hook -
当导入使用一个转储文件时,在每次新的修订版本产生时运行版本库post-commit钩子。
-
--use-post-revprop-change-hook -
When changing a revision property, run the repository's post-revprop-change hook after changing the revision property.
-
--use-pre-commit-hook -
当加载一个转储文件时,每次新加修订版本之前运行版本库的pre-commit钩子。如果钩子失败,终止提交并中断加载进程。
-
--use-pre-revprop-change-hook -
When changing a revision property, run the repository's pre-revprop-change hook before changing the revision property. If the hook fails, abort the modification and terminate.
名称
svnadmin crashtest — Simulate a process that crashes.
名称
svnadmin create — 创建一个新的空的版本库。
描述
Create a new, empty repository at the path provided.
If the provided directory does not exist, it will be
created for you.
[55]
As of Subversion 1.2, svnadmin
creates new repositories with the
fsfs filesystem backend by
default.
While svnadmin create will create
the base directory for a new repository, it will not
create intermediate directories. For example, if you
have an empty directory named
/var/svn, creating
/var/svn/repos will work, while
attempting to create
/var/svn/subdirectory/repos will
fail with an error.
名称
svnadmin deltify — 修订版本范围的路径的增量变化。
名称
svnadmin dump — 将文件系统的内容转储到标准输出。
描述
使用“dumpfile”可移植格式将文件系统的内容转储到标准输出,将反馈发送到标准错误,导出的修订版本从LOWER到UPPER。如果没有提供修订版本,会导出所有的修订版本树,如果只提供LOWER,导出一个修订版本树,通常的用法见“版本库数据的移植”一节。
By default, the Subversion dumpfile stream contains a single revision (the first revision in the requested revision range) in which every file and directory in the repository in that revision is presented as if that whole tree was added at once, followed by other revisions (the remainder of the revisions in the requested range), which contain only the files and directories that were modified in those revisions. For a modified file, the complete fulltext representation of its contents, as well as all of its properties, are presented in the dumpfile; for a directory, all of its properties are presented.
There are two useful options that modify the dumpfile
generator's behavior. The first is the
--incremental option, which simply causes
that first revision in the dumpfile stream to contain only
the files and directories modified in that revision,
instead of being presented as the addition of a new tree,
and in exactly the same way that every other revision in
the dumpfile is presented. This is useful for generating
a relatively small dumpfile to be loaded into another
repository that already has the files and directories
that exist in the original repository.
The second useful option is --deltas.
This option causes svnadmin dump to,
instead of emitting fulltext representations of file
contents and property lists, emit only deltas of those
items against their previous versions. This reduces (in
some cases, drastically) the size of the dumpfile that
svnadmin dump creates. There are, however,
disadvantages to using this option—deltified
dumpfiles are more CPU-intensive to create, cannot be
operated on by svndumpfilter, and tend
not to compress as well as their nondeltified counterparts
when using third-party tools such as gzip
and bzip2.
例子
转储整个版本库:
$ svnadmin dump /var/svn/repos SVN-fs-dump-format-version: 1 Revision-number: 0 * Dumped revision 0. Prop-content-length: 56 Content-length: 56 …
从版本库增量转储一个单独的事务:
$ svnadmin dump /var/svn/repos -r 21 --incremental * Dumped revision 21. SVN-fs-dump-format-version: 1 Revision-number: 21 Prop-content-length: 101 Content-length: 101 …
名称
svnadmin hotcopy — 制作一个版本库的热备份。
名称
svnadmin list-dblogs — 询问Berkeley DB在给定的Subversion版本库有哪些日志文件存在(只有在版本库使用bdb作为后端时使用)。
描述
Berkeley DB创建了记录所有版本库修改的日志,允许我们在面对大灾难时恢复。除非你开启了DB_LOG_AUTOREMOVE,否则日志文件会累积,尽管大多数是不再使用可以从磁盘删除得到空间。详情见“管理磁盘空间”一节。
名称
svnadmin list-unused-dblogs — 询问Berkeley DB哪些日志文件可以安全的删除(只有在版本库使用bdb作为后端时使用)。
描述
Berkeley DB创建了记录所有版本库修改的日志,允许我们在面对大灾难时恢复。除非你开启了DB_LOG_AUTOREMOVE,否则日志文件会累积,尽管大多数是不再使用可以从磁盘删除得到空间。详情见“管理磁盘空间”一节。
名称
svnadmin load — 从标准输入读进一个“svnadmin load”格式化的流。
选项
--quiet (-q) --ignore-uuid --force-uuid --use-pre-commit-hook --use-post-commit-hook --parent-dir
例子
这里显示了加载一个备份文件到版本库(当然,使用svnadmin dump):
$ svnadmin load /var/svn/restored < repos-backup
<<< Started new txn, based on original revision 1
* adding path : test ... done.
* adding path : test/a ... done.
…
或者你希望加载到一个子目录:
$ svnadmin load --parent-dir new/subdir/for/project /var/svn/restored < repos-backup
<<< Started new txn, based on original revision 1
* adding path : test ... done.
* adding path : test/a ... done.
…
名称
svnadmin lslocks — 打印所有锁定的描述。
例子
This lists the one locked file in the repository at
/var/svn/repos:
$ svnadmin lslocks /var/svn/repos Path: /tree.jpg UUID Token: opaquelocktoken:ab00ddf0-6afb-0310-9cd0-dda813329753 Owner: harry Created: 2005-07-08 17:27:36 -0500 (Fri, 08 Jul 2005) Expires: Comment (1 line): Rework the uppermost branches on the bald cypress in the foreground.
名称
svnadmin recover — 将版本库数据库恢复到稳定状态(只有在版本库使用bdb作为后端时使用),此外,如果repos/conf/passwd不存在,它会创建一个默认的密码文件。
例子
恢复挂起的版本库:
$ svnadmin recover /var/svn/repos/ Repository lock acquired. Please wait; recovering the repository may take some time... Recovery completed. The latest repos revision is 34.
恢复数据库需要一个版本库的独占锁(这是一个“数据库锁”;见The Three Meanings of “Lock”),如果另一个进程访问版本库,svnadmin recover会出错:
$ svnadmin recover /var/svn/repos svn: Failed to get exclusive repository access; perhaps another process such as httpd, svnserve or svn has it open? $
--wait选项可以导致svnadmin recover一直等待其它进程断开连接:
$ svnadmin recover /var/svn/repos --wait Waiting on repository lock; perhaps another process has it open? ### time goes by… Repository lock acquired. Please wait; recovering the repository may take some time... Recovery completed. The latest repos revision is 34.
名称
svnadmin setlog — Set the log message on a revision.
描述
Set the log message on
revision REVISION to the
contents of FILE.
This is similar to using svn propset
--revprop to set the svn:log property
on a revision, except that you can also use the option
--bypass-hooks to avoid running any pre-
or post-commit hooks, which is useful if the modification
of revision properties has not been enabled in
the pre-revprop-change hook.
警告
修订版本属性不在版本控制之下的,所以这个命令会永久覆盖前一个日志信息。
名称
svnadmin setrevprop — Set the property name on a revision.
名称
svnadmin setuuid — Reset the repository UUID.
描述
Reset the repository UUID for the repository located
at REPOS_PATH.
If NEW_UUID is provided, use
that as the new repository UUID; otherwise, generate a
brand new UUID for the repository.
例子
If you've svnsynced /var/svn/repos to /var/svn/repos-new and intend to use repos-new as your canonical repository, you may want to change the UUID for repos-new to the UUID of repos so that your users don't have to check out a new working copy to accomodate the change:
$ svnadmin setuuid /var/svn/repos-new 2109a8dd-854f-0410-ad31-d604008985ab
As you can see, svnadmin setuuid has no output upon success.
名称
svnadmin upgrade — Upgrade a repository to the latest supported schema version.
描述
Upgrade the repository located
at REPOS_PATH to the latest
supported schema version.
This functionality is provided as a convenience for repository administrators who wish to make use of new Subversion functionality without having to undertake a potentially costly full repository dump and load operation. As such, the upgrade performs only the minimum amount of work needed to accomplish this while still maintaining the integrity of the repository. While a dump and subsequent load guarantees the most optimized repository state, svnadmin upgrade does not.
警告
You should always backup your repository before upgrading.
名称
svnadmin verify — 验证版本库保存的数据。
描述
Run this command if you wish to verify the integrity of your repository. This basically iterates through all revisions in the repository by internally dumping all revisions and discarding the output—it's a good idea to run this on a regular basis to guard against latent hard disk failures and “bitrot.” If this command fails—which it will do at the first sign of a problem—that means that your repository has at least one corrupted revision, and you should restore the corrupted revision from a backup (you did make a backup, didn't you?).
svnlook is a command-line utility for examining different aspects of a Subversion repository. It does not make any changes to the repository—it's just used for “peeking.” svnlook is typically used by the repository hooks, but a repository administrator might find it useful for diagnostic purposes.
因为svnlook通过直接版本库访问(因此只可以在保存版本库的机器上工作)工作,所以他通过版本库的路径访问,而不是URL。
如果没有指定修订版本或事物,svnlook缺省的是版本库最年轻的(最新的)修订版本。
Options in svnlook are global, just like in svn and svnadmin; however, most options apply only to one subcommand since the functionality of svnlook is (intentionally) limited in scope.
-
--copy-info -
Causes svnlook changed to show detailed copy source information.
-
--no-diff-deleted -
Prevents svnlook diff from printing differences for deleted files. The default behavior when a file is deleted in a transaction/revision is to print the same differences that you would see if you had left the file but removed all the content.
-
--no-diff-added -
Prevents svnlook diff from printing differences for added files. The default behavior when you add a file is to print the same differences that you would see if you had added the entire contents of an existing (empty) file.
--revision(-r)-
指定要进行检查的特定修订版本。
-
--revprop -
操作针对修订版本属性,而不是Subversion文件或目录的属性。这个选项需要你传递
--revision(-r)参数。 --transaction(-t)-
指定一个希望检查的特定事物ID。
-
--show-ids -
显示文件系统树中每条路径的文件系统节点修订版本ID。
名称
svnlook cat — 打印一个文件的内容。
例子
这会显示事物ax8中一个文件的内容,位于/trunk/README:
$ svnlook cat -t ax8 /var/svn/repos /trunk/README
Subversion, a version control system.
=====================================
$LastChangedDate: 2003-07-17 10:45:25 -0500 (Thu, 17 Jul 2003) $
Contents:
I. A FEW POINTERS
II. DOCUMENTATION
III. PARTICIPATING IN THE SUBVERSION COMMUNITY
…
名称
svnlook changed — 打印修改的路径。
描述
打印在特定修订版本或事物修改的路径,也是在前两列使用“svn update样式的”状态字符:
-
'A ' -
Item added to repository
-
'D ' -
Item deleted from repository
-
'U ' -
File contents changed
-
' U' -
Properties of item changed; note the leading space
-
'UU' -
File contents and properties changed
Files and directories can be distinguished, as
directory paths are displayed with a
trailing “/”
character.
例子
这里显示了在测试版本库中修订版本39改变的文件和目录,注意修改的第一个项目是一个目录,证据就是结尾的/:
$ svnlook changed -r 39 /var/svn/repos A trunk/vendors/deli/ A trunk/vendors/deli/chips.txt A trunk/vendors/deli/sandwich.txt A trunk/vendors/deli/pickle.txt U trunk/vendors/baker/bagel.txt U trunk/vendors/baker/croissant.txt UU trunk/vendors/baker/pretzel.txt D trunk/vendors/baker/baguette.txt
Here's an example that shows a revision in which a file was renamed:
$ svnlook changed -r 64 /var/svn/repos A trunk/vendors/baker/toast.txt D trunk/vendors/baker/bread.txt
Unfortunately, nothing in the previous output reveals
the connection between the deleted and added files. Use
the --copy-info option to make this
relationship more apparent:
$ svnlook changed -r 64 --copy-info /var/svn/repos
A trunk/vendors/baker/toast.txt
(from trunk/vendors/baker/bread.txt:r63)
D trunk/vendors/baker/bread.txt
名称
svnlook diff — 打印修改的文件和属性的区别。
例子
这显示了一个新添加的(空的)文件,一个删除的文件和一个拷贝的文件:
$ svnlook diff -r 40 /var/svn/repos/ Copied: egg.txt (from rev 39, trunk/vendors/deli/pickle.txt) Added: trunk/vendors/deli/soda.txt ============================================================================== Modified: trunk/vendors/deli/sandwich.txt ============================================================================== --- trunk/vendors/deli/sandwich.txt (original) +++ trunk/vendors/deli/sandwich.txt 2003-02-22 17:45:04.000000000 -0600 @@ -0,0 +1 @@ +Don't forget the mayo! Modified: trunk/vendors/deli/logo.jpg ============================================================================== (Binary files differ) Deleted: trunk/vendors/deli/chips.txt ============================================================================== Deleted: trunk/vendors/deli/pickle.txt ==============================================================================
If a file has a nontextual
svn:mime-type property, then the
differences are not explicitly shown.
名称
svnlook help — 求助!
名称
svnlook history — 打印版本库(如果没有路径,则是根目录)某一个路径的历史。
例子
This shows the history output for the path
/tags/1.0 as of revision 20 in our
sample repository:
$ svnlook history -r 20 /var/svn/repos /tags/1.0 --show-ids
REVISION PATH <ID>
-------- ---------
19 /tags/1.0 <1.2.12>
17 /branches/1.0-rc2 <1.1.10>
16 /branches/1.0-rc2 <1.1.x>
14 /trunk <1.0.q>
13 /trunk <1.0.o>
11 /trunk <1.0.k>
9 /trunk <1.0.g>
8 /trunk <1.0.e>
7 /trunk <1.0.b>
6 /trunk <1.0.9>
5 /trunk <1.0.7>
4 /trunk <1.0.6>
2 /trunk <1.0.3>
1 /trunk <1.0.2>
名称
svnlook info — 打印作者、时间戳、日志信息大小和日志信息。
名称
svnlook lock — 如果版本库路径已经被锁定,描述它。
例子
This describes the lock on the file
tree.jpg:
$ svnlook lock /var/svn/repos tree.jpg UUID Token: opaquelocktoken:ab00ddf0-6afb-0310-9cd0-dda813329753 Owner: harry Created: 2005-07-08 17:27:36 -0500 (Fri, 08 Jul 2005) Expires: Comment (1 line): Rework the uppermost branches on the bald cypress in the foreground.
名称
svnlook tree — 打印树。
svnsync是Subversion的远程版本库镜像工具,它允许你把一个版本库的内容录入到另一个。
在任何镜像场景中,有两个版本库:源版本库,镜像(或“sink”)版本库,源版本库就是svnsync获取修订版本的库,镜像版本库是源版本库修订版本的目标,两个版本库可以是在本地或远程—它们只是通过URL跟踪。
svnsync进程只需要对源版本库有读权限;它不会尝试修改它。但是很明显,svnsync可以读写访问镜像版本库。
警告
svnsync对于不能作为镜像操作一部分的修改非常敏感,为了防止发生这个情况,最好保证svnsync是唯一可以修改镜像版本库的进程。
-
--config-dirDIR -
指导Subversion从指定目录而不是默认位置(用户主目录的
.subversion)读取配置信息。 -
--no-auth-cache -
Prevents caching of authentication information (e.g., username and password) in the Subversion administrative directories.
-
--non-interactive -
In the case of an authentication failure or insufficient credentials, prevents prompting for credentials (e.g., username or password). This is useful if you're running Subversion inside of an automated script and it's more appropriate to have Subversion fail than to prompt for more information.
-
--passwordPASS -
指出在命令行中提供你的密码—另外,如果它是需要的,Subversion会提示你输入。
-
--usernameNAME -
表示你要在命令行提供认证的用户名—否则如果需要,Subversion会提示你这一点。
The following lists the various subcommands.
名称
svnsync copy-revprops — 从源版本库拷贝所有的修订版本属性到镜像版本库。
描述
Because Subversion revision properties can be changed at any time, it's possible that the properties for some revision might be changed after that revision has already been synchronized to another repository. Because the svnsync synchronize command operates only on the range of revisions that have not yet been synchronized, it won't notice a revision property change outside that range. Left as is, this causes a deviation in the values of that revision's properties between the source and mirror repositories. svnsync copy-revprops is the answer to this problem. Use it to resynchronize the revision properties for a particular revision.
名称
svnsync help — 求助!
名称
svnsync initialize — 为与另一个版本库的同步初而始化目标版本库。
描述
svnsync initialize verifies that a repository meets the requirements of a new mirror repository—that it has no previous existing version history and that it allows revision property modifications—and records the initial administrative information that associates the mirror repository with the source repository. This is the first svnsync operation you run on a would-be mirror repository.
例子
因为无法修改修订版本属性而初始化镜像版本库失败:
$ svnsync initialize file:///var/svn/repos-mirror http://svn.example.com/repos svnsync: Repository has not been enabled to accept revision propchanges; ask the administrator to create a pre-revprop-change hook $
Initialize a repository as a mirror, having already
created a pre-revprop-change hook that
permits all revision property changes:
$ svnsync initialize file:///var/svn/repos-mirror http://svn.example.com/repos Copied properties for revision 0. $
名称
svnsync synchronize — 将所有未完成的修订版本从源版本库转移到镜像版本库。
描述
svnsync synchronize命令做了版本库镜像工作的所有体力活,通过讯问镜像版本库来查看已经拷贝的修订版本,然后开始拷贝未镜像修订版本到镜像版本库。
svnsync synchronize可以优雅的取消并重新开始。
例子
从源版本库拷贝未同步修订版本到镜像版本库:
$ svnsync synchronize file:///var/svn/repos-mirror Committed revision 1. Copied properties for revision 1. Committed revision 2. Copied properties for revision 2. Committed revision 3. Copied properties for revision 3. … Committed revision 45. Copied properties for revision 45. Committed revision 46. Copied properties for revision 46. Committed revision 47. Copied properties for revision 47. $
当对远程源版本库使用svnsync时,使用Subversion的自定义网络协议。
svnserve允许Subversion版本库使用svn网络协议,你可以作为独立服务器进程运行svnserve,或者是使用其它进程,如inetd、xinetd(也是svn://)或使用svn+ssh://访问方法的sshd为你启动进程。
一旦客户端已经选择了一个版本库来传递它的URL,svnserve会读取版本库目录的conf/svnserve.conf文件,来检测版本库特定的设置,如使用哪个认证数据库和应用怎样的授权策略。关于svnserve.conf文件的详情见“svnserve, a Custom Server”一节。
Unlike the previous commands we've described, svnserve has no subcommands—it is controlled exclusively by options.
--daemon(-d)-
Causes svnserve to run in daemon mode. svnserve backgrounds itself and accepts and serves TCP/IP connections on the
svnport (3690, by default). -
--foreground -
When used together with
-d, this option causes svnserve to stay in the foreground. This is mainly useful for debugging. --inetd(-i)-
导致svnserve使用标准输出/标准输入文件描述符,更准确的是使用inetd作为守护进程。
--help(-h)-
显示有用的摘要和选项。
--listen-host=HOST-
svnserve监听的
HOST,可能是一个主机名或是一个IP地址。 --listen-once(-X)-
Causes svnserve to accept one connection on the
svnport, serve it, and exit. This option is mainly useful for debugging. --listen-port=PORT-
Causes svnserve to listen on
PORTwhen run in daemon mode. (FreeBSD daemons listen only on tcp6 by default—this option tells them to also listen on tcp4.) -
--pid-fileFILENAME -
Causes svnserve to write its process ID to
FILENAME, which must be writeable by the user under which svnserve is running. --root=ROOT(-r=ROOT)-
Sets the virtual root for repositories served by svnserve. The pathname in URLs provided by the client will be interpreted relative to this root and will not be allowed to escape this root.
--threads(-T)-
When running in daemon mode, causes svnserve to spawn a thread instead of a process for each connection (e.g., for when running on Windows). The svnserve process still backgrounds itself at startup time.
--tunnel(-t)-
Causes svnserve to run in tunnel mode, which is just like the inetd mode of operation (both modes serve one connection over stdin/stdout, and then exit), except that the connection is considered to be preauthenticated with the username of the current UID. This flag is automatically passed for you by the client when running over a tunnel agent such as ssh. That means there's rarely any need for you to pass this option to svnserve. So if you find yourself typing
svnserve --tunnelon the command line and wondering what to do next, see “SSH 隧道”一节. -
--tunnel-user NAME -
与
--tunnel选项结合使用;告诉svnserve假定NAME就是认证用户,而不是svnserve进程的UID用户,当希望多个用户通过SSH共享同一个系统帐户,但是维护各自的提交标示符时非常有用。 -
--version -
Displays version information and a list of repository backend modules available, and then exits.
名称
svnversion — 总结工作拷贝的本地修订版本。
描述
svnversion是用来总结工作拷贝修订版本混合的程序,结果修订版本号或范围会写到标准输出。
通常在构建过程中利用其输出定义程序的版本号码。
如果提供TRAIL_URL,URL的尾端部分用来监测是否WC_PATH本身已经跳转(监测WC_PATH的跳转不需要依赖TRAIL_URL)。
当没有定义WC_PATH,会使用当前路径作为工作拷贝路径,如果没有显式定义WC_PATH,TRAIL_URL将无法定义。
选项
Like svnserve, svnversion has no subcommands—only options.
--no-newline(-n)-
忽略输出的尾端新行。.
--committed(-c)-
使用最后修改修订版本而不是当前的(例如,本地存在的最高修订版本)修订版本。
--help(-h)-
打印帮助摘要。
-
--version -
打印svnversion,如果没有错误则退出。
例子
如果工作拷贝都是一样的修订版本(例如,在更新后那一刻),会打印修订版本:
$ svnversion 4168
添加TRAIL_URL来展示工作拷贝不是从你希望的地方跳转过来的,注意这个命令需要WC_PATH:
$ svnversion . /var/svn/trunk 4168
对于混合修订版本的工作拷贝,修订版本的范围会被打印:
$ svnversion 4123:4168
如果工作拷贝包含修改,后面会紧跟一个"M":
$ svnversion 4168M
如果工作拷贝已经跳转,后面会有一个"S":
$ svnversion 4168S
因此,这里是一个混合修订版本,跳转的工作拷贝包含了一些本地修改:
$ svnversion 4212:4168MS
如果从一个目录而不是工作拷贝调用,svnversion假定它是一个导出的工作拷贝并且打印"exported":
$ svnversion exported
名称
mod_dav_svn Configuration Directives — Apache configuration
directives for serving Subversion repositories through the
Apache HTTP Server.
指示
-
DAV svn -
This directive must be included in any
DirectoryorLocationblock for a Subversion repository. It tells httpd to use the Subversion backend formod_davto handle all requests. -
SVNAllowBulkUpdates On|Off -
This directive toggles support for all-inclusive responses to update-style
REPORTrequests. Subversion clients useREPORTrequests to get information about directory tree checkouts and updates frommod_dav_svn. They can ask the server to send that information in one of two ways: with the entirety of the tree's information in one massive response, or with a skelta (a skeletal representation of a tree delta) which contains just enough information for the client to know what additional data to request from the server. When this directive is included with a value ofoff,mod_dav_svnwill only ever respond to theseREPORTrequests with skelta responses, regardless of the type of responses requested by the client.Most folks won't need to use this directive at all. It primarily exists for administrators who wish—for security or auditing reasons—to force Subversion clients to fetch individually all the files and directories needed for updates and checkouts, thus leaving an audit trail of
GETandPROPFINDrequests in Apache's logs. The default value of this directive ison. -
SVNAutoversioning On|Off -
This directive, when its value is
on, allows write requests from WebDAV clients to result in automatic commits. A generic log message is autogenerated and attached to each revision. If you enable Autoversioning, you'll likely want to setModMimeUsePathInfo Onso thatmod_mimecan setsvn:mime-typeto the correct mime-type automatically (as best asmod_mimeis able to, of course). For more information, see 附录 C, WebDAV和自动版本. The default value of this directive isoff. -
SVNPathdirectory-path -
这个指示指定Subversion版本库文件文件系统的位置,在一个Subversion版本库的配置块里,必须提供这个指示或
SVNParentPath,但不能同时存在。 -
SVNSpecialURIcomponent -
Specifies the URI component (namespace) for special Subversion resources. The default is “
!svn”, and most administrators will never use this directive. Set this only if there is a pressing need to have a file named!svnin your repository. If you change this on a server already in use, it will break all of the outstanding working copies, and your users will hunt you down with pitchforks and flaming torches. -
SVNReposNamename -
指定Subversion版本库在
HTTP GET请求中使用的名字,这个值会作为所有目录列表(当你用web浏览器察看Subversion版本库时会看到)的标题,这个指示是可选的。 -
SVNIndexXSLTdirectory-path -
目录列表所使用的XSL转化的URI,这个指示可选。
-
SVNParentPathdirectory-path -
指定子目录会是版本库的父目录在文件系统的位置,在一个Subversion版本库的配置块里,必须提供这个指示或
SVNPath,但不能同时存在。 -
SVNPathAuthzfile-path -
控制开启和关闭路径为基础的授权,更多细节见“Disabling path-based checks”一节。
-
SVNListParentPath On|Off -
When set to
On, allows aGETofSVNParentPath, which results in a listing of all repositories under that path. The default setting isOff. -
SVNMasterURIurl -
Specifies a URI to the master Subversion repository (used for a write-through proxy).
-
SVNActivitiesDBdirectory-path -
Specifies the location in the filesystem where the activities database should be stored. By default, mod_dav_svn creates and uses a directory in the repository called
dav/activities.d. The path specified with this option must be an absolute path.If specified for an
SVNParentPatharea, mod_dav_svn appends the basename of the repository to the path specified here. For example:<Location /svn> DAV svn # any "/svn/foo" URL will map to a repository in /net/svn.nfs/repositories/foo SVNParentPath "/net/svn.nfs/repositories" # any "/svn/foo" URL will map to an activities db in /var/db/svn/activities/foo SVNActivitiesDB "/var/db/svn/activities" </Location>
High-level logging
This is a list of Subversion action log messages produced by Apache's high-level logging mechanism, followed by an example of the log message. See “Apache logging”一节 for details on logging.
- Checkout or export
-
checkout-or-export /path r62 depth=infinity - Commit
-
commit harry r100 - Diffs
-
diff /path r15:20 depth=infinity ignore-ancestrydiff /path1@15 /path2@20 depth=infinity ignore-ancestry - Fetching a directory
-
get-dir /trunk r17 text - Fetch a file
-
get-file /path r20 props - Fetch file revision
-
get-file-revs /path r12:15 include-merged-revisions - Fetching of merge information
-
get-mergeinfo (/path1 /path2) - Lock
-
lock /path steal - Log
-
log (/path1,/path2,/path3) r20:90 discover-changed-paths revprops=() - Replaying of revisions (svnsync)
-
replay /path r19 - Revision property change
-
change-rev-prop r50 propertyname - Revision property list
-
rev-proplist r34 - 状态
-
remote-status /path r62 depth=infinity - Switch
-
switch /pathA /pathB@50 depth=infinity - Unlock
-
unlock /path break - 更新
-
update /path r17 send-copyfrom-args
Subversion允许用户在文件或目录上发明任意名称的版本化属性和非版本化属性,唯一的限制就是“svn:”是Subversion本身的保留前缀,用户可以设置这些属性来改变Subversion的行为方式,用户不能发明新的“svn:”属性。
-
svn:executable -
如果出现在一个文件上,客户端会将此文件在Unix工作拷贝中设置为可执行,见“文件的可执行性”一节。
-
svn:mime-type -
如果出现在一个文件,这个值表示了文件的mime-type,这允许客户端在执行更新时决定以行为依据的合并是否安全,同时也会影响使用浏览器浏览文件时的行为方式。见“文件内容类型”一节。
-
svn:ignore -
If present on a directory, the value is a list of unversioned file patterns to be ignored by svn status and other subcommands. See “忽略未版本控制的条目”一节.
-
svn:keywords -
如果出现在一个文件上,这个值告诉客户端如何扩展文件的特定关键字,见“关键字替换”一节。
-
svn:eol-style -
If present on a file, the value tells the client how to manipulate the file's line-endings in the working copy and in exported trees. See “行结束字符串”一节 and svn export.
-
svn:externals -
If present on a directory, the value is a multiline list of other paths and URLs the client should check out. See “外部定义”一节.
-
svn:special -
If present on a file, indicates that the file is not an ordinary file, but a symbolic link or other special object. [56]
-
svn:needs-lock -
如果出现在一个文件上,告诉客户端在工作拷贝将文件置为只读,可以提醒我们在修改以前必须解锁。见“锁定交流”一节。
-
svn:mergeinfo -
Used by Subversion to track merge data. See “Mergeinfo and Previews”一节 for details, but you should never edit this property unless you really know what you're doing.
-
svn:author -
如果出现,则保存了创建这个修订版本的认证用户名。(如果没有出现,则修订版本是匿名提交的。)
-
svn:date -
保存了ISO 8601格式的修订版本创建UTC时间,这个值来自服务器主机时钟,不是客户端的。
-
svn:log -
保存了描述修订版本的日志信息。
-
svn:autoversioned -
如果出现,则修订版本是通过自动版本化特性创建,见“自动版本化”一节。
名称
start-commit — 开始提交的通知
描述
start-commit在开始事务之前执行,通常是用来确定用户是否有提交权限。
If the start-commit hook program returns a nonzero exit value, the commit is stopped before the commit transaction is even created, and anything printed to stderr is marshalled back to the client.
名称
pre-commit — 在提交结束之前提醒。
描述
The pre-commit hook is run just
before a commit transaction is promoted to a new revision.
Typically, this hook is used to protect against commits that
are disallowed due to content or location (for example, your
site might require that all commits to a certain branch
include a ticket number from the bug tracker, or that the
incoming log message is nonempty).
If the pre-commit hook program
returns a nonzero exit value, the commit is aborted, the
commit transaction is removed, and anything printed to
stderr is marshalled back to the client.
名称
post-commit — 成功提交的通知。
描述
The post-commit hook is run after the
transaction is committed and a new revision created. Most
people use this hook to send out descriptive emails about
the commit or to notify some other tool (such as an issue
tracker) that a commit has happened. Some configurations
also use this hook to trigger backup processes.
If the post-commit hook returns a
nonzero exit status, the commit will
not be aborted since it has already
completed. However, anything that the hook printed
to STDERR will be marshalled back to the
client, making it easier to diagnose hook failures.
名称
pre-revprop-change — 修订版本属性修改的通知。
描述
The pre-revprop-change hook is run
immediately prior to the modification of a revision property
when performed outside the scope of a normal commit. Unlike
the other hooks, the default state of this one is to deny
the proposed action. The hook must actually exist and
return a zero exit value before a revision property
modification can happen.
If the pre-revprop-change hook
doesn't exist, isn't executable, or returns a nonzero exit
value, no change to the property will be made, and anything
printed to stderr is marshalled back to the client.
名称
post-revprop-change — 修订版本属性修改成功的通知
描述
The post-revprop-change hook is run
immediately after to the modification of a revision property
when performed outside the scope of a normal commit. As can
be derived from the description of its counterpart, the
pre-revprop-change hook, this hook will
not run at all unless
the pre-revprop-change hook is
implemented. It is typically used to send email
notification of the property change.
If the post-revprop-change hook returns a
nonzero exit status, the change will
not be aborted since it has already
completed. However, anything that the hook printed
to STDERR will be marshalled back to the
client, making it easier to diagnose hook failures.
名称
pre-lock — 路径锁定尝试的通知。
描述
The pre-lock hook runs whenever
someone attempts to lock a path. It can be used to prevent
locks altogether or to create a more complex policy
specifying exactly which users are allowed to lock
particular paths. If the hook notices a pre-existing lock,
then it can also decide whether a user is allowed
to “steal” the existing lock.
If the pre-lock hook program returns
a nonzero exit value, the lock action is aborted and
anything printed to stderr is marshalled back to the
client.
名称
post-lock — 成功锁定路径的通知。
描述
The post-lock hook runs after one or
more paths has been locked. It is typically used to send
email notification of the lock event.
If the post-lock hook returns a
nonzero exit status, the lock will
not be aborted since it has already
completed. However, anything that the hook printed
to STDERR will be marshalled back to the
client, making it easier to diagnose hook failures.
名称
pre-unlock — 路径解锁尝试的通知。
描述
The pre-unlock hook runs whenever
someone attempts to remove a lock on a file. It can be used
to create policies that specify which users are allowed to
unlock particular paths. It's particularly important for
determining policies about lock breakage. If user A locks a
file, is user B allowed to break the lock? What if the lock
is more than a week old? These sorts of things can be
decided and enforced by the hook.
If the pre-unlock hook program
returns a nonzero exit value, the unlock action is aborted
and anything printed to stderr is marshalled back to the
client.
名称
post-unlock — 路径成功解锁的通知。
描述
The post-unlock hook runs after one
or more paths has been unlocked. It is typically used to
send email notification of the unlock event.
If the post-unlock hook returns a
nonzero exit status, the unlock will
not be aborted since it has already
completed. However, anything that the hook printed
to STDERR will be marshalled back to the
client, making it easier to diagnose hook failures.
如果你渴望快速配置Subversion并运行(而且你喜欢通过实验学习),本章会展示如何创建版本库,导入代码,然后以工作拷贝检出,继续我们会给出本书的相关章节的链接。
警告
如果读者还不熟悉版本控制,以及在Subversion和CVS中使用的“拷贝-修改-合并”模型这些基础的概念,那么建议在进一步学习之前,首先阅读第 1 章 基本概念。
Subversion是基于APR构建的。APR全称为Apache Portable Runtime library,是一个移植性很好的程序库。APR库提供了全部与操作系统相关的操作接口,如磁盘访问、内存管理等等,这使得Subversion自身能够在不加修改的情况下运行于不同的操作系统之上。Subversion对APR的依赖并不意味着必须使用Apache作为它的网络服务器程序,相反,Apache只是Subversion支持的网络服务器程序之一。APR是一个独立的程序库,任何应用程序都可以使用它(Apache也是基于它开发的)。这就是说,Subversion能够在所有可运行Apache服务器的操作系统上运转,如Windows、Linux、各种BSD、Mac OS X、Netware等等。
The easiest way to get Subversion is to download a binary
package built for your operating system. Subversion's web site
(http://subversion.tigris.org) often has these
packages available for download, posted by volunteers. The site
usually contains graphical installer packages for users of
Microsoft operating systems. If you run a Unix-like operating
system, you can use your system's native package distribution
system (RPMs, DEBs, the ports tree, etc.) to get
Subversion.
Alternately, you can build Subversion directly from source
code, though it's not always an easy task. (If you're not
experienced at building open source software packages, you're
probably better off downloading a binary distribution instead!)
From the Subversion web site, download the latest source-code
release. After unpacking it, follow the instructions in
the INSTALL file to build it. Note that a
released source package may not contain everything you need to
build a command-line client capable of talking to a remote
repository. Starting with Subversion 1.4 and later, the
libraries Subversion depends on (apr, apr-util, and neon) are
distributed in a separate source package suffixed
with -deps. These libraries are now common
enough that they may already be installed on your system. If
not, you'll need to unpack the dependency package into the same
directory where you unpacked the main Subversion source.
Regardless, it's possible that you may want to fetch other
optional dependencies such as Berkeley DB and possibly Apache
httpd. If you want to do a complete build, make sure you have
all of the packages documented in
the INSTALL file.
如果你是一个喜欢使用最新软件的人,你可以从Subversion本身的版本库得到Subversion最新的源代码,显然,你首先需要一个Subversion客户端,有了之后,你就可以从http://svn.collab.net/repos/svn/trunk/检出一个Subversion源代码的工作拷贝:[57]
$ svn checkout http://svn.collab.net/repos/svn/trunk subversion A subversion/HACKING A subversion/INSTALL A subversion/README A subversion/autogen.sh A subversion/build.conf …
The preceding command will create a working copy of the
latest (unreleased) Subversion source code into a subdirectory
named subversion in your current working
directory. You can adjust that last argument as you see fit.
Regardless of what you call the new working copy directory,
though, after this operation completes, you will now have the
Subversion source code. Of course, you will still need to fetch
a few helper libraries (apr, apr-util, etc.)—see the
INSTALL file in the top level of the
working copy for details.
“Please make sure your seat backs are in their full, upright position and that your tray tables are stored. Flight attendants, prepare for take-off….”
这是一个非常高层次的教程,能够帮助你熟悉Subversion的基本配置和操作,在结束这个教程时,你一定能够对Subversion的典型使用有了一个基础的认识。
注意
运行下面的例子需要首先正确安装Subversion客户端程序svn以及管理工具svnadmin,并且必须为1.2或更新版本的Subversion程序(可以运行svn --version来检查Subversion的版本。)
Subversion的所有版本化数据都储存在中心版本库中。因此首先,我们需要创建一个版本库:
$ svnadmin create /var/svn/repos $ ls /var/svn/repos conf/ dav/ db/ format hooks/ locks/ README.txt
This command creates a new directory,
/var/svn/repos, which contains a Subversion
repository. This new directory contains (among other things) a
collection of database files. You won't see your versioned
files if you peek inside. For more information about repository
creation and maintenance, see 第 5 章 版本库管理.
Subversion has no concept of a “project.” The repository is just a virtual versioned filesystem, a large tree that can hold anything you wish. Some administrators prefer to store only one project in a repository, and others prefer to store multiple projects in a repository by placing them into separate directories. The merits of each approach are discussed in “规划你的版本库结构”一节. Either way, the repository manages only files and directories, so it's up to humans to interpret particular directories as “projects”. So while you might see references to projects throughout this book, keep in mind that we're only ever talking about some directory (or collection of directories) in the repository.
In this example, we assume that you already have some sort
of project (a collection of files and directories) that you wish
to import into your newly created Subversion repository. Begin
by organizing your data into a single directory called
myproject (or whatever you wish). For
reasons explained in 第 4 章 分支与合并, your
project's tree structure should contain three top-level
directories named branches,
tags, and trunk. The
trunk directory should contain all of your
data, while the branches and
tags directories are empty:
/tmp/myproject/branches/
/tmp/myproject/tags/
/tmp/myproject/trunk/
foo.c
bar.c
Makefile
…
branches、tags和trunk这三个子目录不是Subversion必须的。但这样做是Subversion的习惯用法,我们还是遵守这个约定吧。
准备好了数据之后,就可以使用svn import命令(参见“Getting Data into Your Repository”一节)将其导入到版本库中:
$ svn import /tmp/myproject file:///var/svn/repos/myproject -m "initial import" Adding /tmp/myproject/branches Adding /tmp/myproject/tags Adding /tmp/myproject/trunk Adding /tmp/myproject/trunk/foo.c Adding /tmp/myproject/trunk/bar.c Adding /tmp/myproject/trunk/Makefile … Committed revision 1. $
现在版本库中已经保存了目录中的数据。如前所述,直接查看版本库是看不到文件和目录的;它们存放在数据库之中。但是版本库的虚拟文件系统中则包含了一个名为myproject的顶级目录,其中依此保存了所有的数据。
注意我们在一开始创建的那个/tmp/myproject目录并没有改变,Subversion并不在意它(事实上,完全可以删除这个目录)。要开始使用版本库数据,我们还要创建一个新的用于存储数据的“工作拷贝”,这是一个私有工作区。从Subversion版本库里“检出”一个myproject/trunk目录工作拷贝的操作如下:
$ svn checkout file:///var/svn/repos/myproject/trunk myproject A myproject/foo.c A myproject/bar.c A myproject/Makefile … Checked out revision 1.
现在,在myproject目录下生成了一个版本库数据的独立拷贝。我们可以在这个工作拷贝中编辑文件,并将修改提交到版本库中。
-
进入工作拷贝目录,编辑某个文件的内容。
-
运行svn diff以标准差别格式查看修改的内容。
-
运行svn commit将更改提交到版本库中。
-
Run svn update to bring your working copy “up to date” with the repository.
完整的工作拷贝操作指南,请参见第 2 章 基本使用。
现在,Subversion版本库可以通过网络方式访问。参考第 6 章 服务配置,了解不同服务器软件的使用以及配置方法。
[57] Note that the URL checked out in the example ends not
with svn, but with a subdirectory thereof
called trunk. See our discussion of
Subversion's branching and tagging model for the reasoning
behind this.
This appendix is a guide for CVS users new to Subversion. It's essentially a list of differences between the two systems as “viewed from 10,000 feet.” For each section, we provide backreferences to relevant chapters when possible.
尽管Subversion的目标是接管当前和未来的CVS用户基础,需要一些新的特性设计来修正一些CVS“不好的”行为习惯,这意味着,作为一个CVS用户,你或许需要打破习惯—忘记一些奇怪的习惯来作为开始。
In CVS, revision numbers are per file. This is because CVS stores its data in RCS files; each file has a corresponding RCS file in the repository, and the repository is roughly laid out according to the structure of your project tree.
在Subversion,版本库看起来像是一个单独的文件系统,每次提交导致一个新的文件系统;本质上,版本库是一堆树,每棵树都有一个单独的修订版本号。当有人谈论“修订版本54”时,他们是在讨论一个特定的树(并且间接来说,文件系统在提交54次之后的样子)。
Technically, it's not valid to talk about “revision 5
of foo.c.” Instead, one would say
“foo.c as it appears in revision
5.” Also, be careful when making assumptions about the
evolution of a file. In CVS, revisions 5 and 6 of
foo.c are always different. In Subversion,
it's most likely that foo.c did
not change between revisions 5 and
6.
Similarly, in CVS, a tag or branch is an annotation on the
file or on the version information for that individual file,
whereas in Subversion, a tag or branch is a copy of an entire
tree (by convention, into the /branches
or /tags directories that appear at the top
level of the repository, beside /trunk). In
the repository as a whole, many versions of each file may be
visible: the latest version on each branch, every tagged
version, and of course the latest version on the trunk
itself. So, to refine the terms even further, one would often
say “foo.c as it appears in
/branches/REL1 in revision
5.”
更多细节见“修订版本”一节.
Subversion会记录目录树的结构,不仅仅是文件的内容。这是编写Subversion替代CVS最重要的一个原因。
以下是对你这意味着什么的说明,作为一个前CVS用户:
-
svn add和svn delete现在也工作在目录上了,就像在文件上一样,还有svn copy和svn move也一样。然而,这些命令不会导致版本库即时的变化,相反,工作的项目只是“预定要”添加和删除,在运行svn commit之前没有版本库的修改。
-
Directories aren't dumb containers anymore; they have revision numbers like files. (Or more properly, it's correct to talk about “directory
foo/in revision 5.”)
让我们再讨论一下最后一点,目录版本化是一个困难的问题;因为我们希望允许混合修订版本的工作拷贝,有一些防止我们滥用这个模型的限制。
From a theoretical point of view, we define “revision
5 of directory foo” to mean a
specific collection of directory entries and properties. Now
suppose we start adding and removing files from
foo, and then commit. It would be a lie
to say that we still have revision 5 of
foo. However, if we bumped
foo's revision number after the commit,
that would be a lie too; there may be other changes to
foo we haven't yet received, because we
haven't updated yet.
Subversion通过在.svn区域偷偷的纪录添加和删除来处理这些问题,当你最后运行svn update,所有的账目会到版本库结算,并且目录的新修订版本号会正确设置。因此,只有在更新之后才可以真正安全地说我们有了一个“完美的”修订版本目录。在大多数时候,你的工作拷贝会保存“不完美的”目录修订版本。
Similarly, a problem arises if you attempt to commit property changes on a directory. Normally, the commit would bump the working directory's local revision number. But again, that would be a lie, as there may be adds or deletes that the directory doesn't yet have, because no update has happened. Therefore, you are not allowed to commit property changes on a directory unless the directory is up to date.
关于目录版本的更多讨论见“混合修订版本的工作拷贝”一节。
近些年来,磁盘空间变得异常便宜和丰富,但是网络带宽还没有,因此Subversion工作拷贝为紧缺资源进行了优化。
The .svn administrative directory
serves the same purpose as the CVS
directory, except that it also stores read-only,
“pristine” copies of your files. This allows you
to do much things offline:
- svn status
-
显示你所做的本地修改(见“查看你的修改概况”一节)
- svn diff
-
显示修改的详细信息(见see “检查你的本地修改的详情”一节)
- svn revert
-
删除你的本地修改(见“取消本地修改”一节)
另外,原始文件的缓存允许Subversion客户端在提交时只提交区别,这是CVS做不到的。
The last subcommand in the list—svn revert—is new. It will not only remove local changes, but it will also unschedule operations such as adds and deletes. While deleting the file and then running svn update will still work, doing so distorts the true purpose of updating. And, while we're on this subject…
Subversion attempts to erase a lot of the confusion between the cvs status and cvs update commands.
The cvs status command has two purposes:
first, to show the user any local modifications in the working
copy, and second, to show the user which files are out of date.
Unfortunately, because of CVS's hard-to-read status output, many
CVS users don't take advantage of this command at all. Instead,
they've developed a habit of running cvs
update or cvs -n update to quickly
see their changes. If users forget to use
the -n option, this has the side effect of
merging repository changes they may not be ready to deal
with.
Subversion removes this muddle by making the output of svn status easy to read for both humans and parsers. Also, svn update prints only information about files that are updated, not local modifications.
svn status打印所有本地修改的文件,缺省情况下,不会联系版本库,然而这个命令接受一些选项,如下是一些最常用的:
-
-u -
访问版本库检测并显示过期的信息。
-
-v -
显示所有版本控制下的文件。
-
-N -
Run nonrecursively (do not descend into subdirectories).
status命令有两种输出格式,缺省是“短”格式,本地修改像这样:
$ svn status M foo.c M bar/baz.c
如果你指定--show-updates(-u)选项,就会使用较长的格式输出:
$ svn status -u
M 1047 foo.c
* 1045 faces.html
* bloo.png
M 1050 bar/baz.c
Status against revision: 1066
In this case, two new columns appear. The second column
contains an asterisk if the file or directory is out of date.
The third column shows the working copy's revision number of the
item. In the previous example, the asterisk indicates that
faces.html would be patched if we updated,
and that bloo.png is a newly added file in
the repository. (The absence of any revision number next to
bloo.png means that it doesn't yet exist in
the working copy.)
此刻,你必须赶快看一下svn status中所说的可能属性代码,下面是一些你会看到的常用状态代码:
A Resource is scheduled for Addition
D Resource is scheduled for Deletion
M Resource has local Modifications
C Resource has Conflicts (changes have not been completely merged
between the repository and working copy version)
X Resource is eXternal to this working copy (may come from another
repository). See “外部定义”一节
? Resource is not under version control
! Resource is missing or incomplete (removed by another tool than
Subversion)
关于svn status的详细讨论,见“查看你的修改概况”一节。
svn update updates your working copy, and prints only information about files that it updates.
Subversion has combined CVS's P and
U codes into just U. When
a merge or conflict occurs, Subversion simply prints
G or C, rather than a
whole sentence about it.
关于svn update的详细讨论,见“更新你的工作拷贝”一节。
Subversion doesn't distinguish between filesystem space and “branch” space; branches and tags are ordinary directories within the filesystem. This is probably the single biggest mental hurdle that a CVS user will need to cross. Read all about it in 第 4 章 分支与合并.
警告
Since Subversion treats branches and tags as ordinary directories, your project's various lines of development probably live in subdirectories of the main project directory. So remember to check out using the URL of the subdirectory that contains the particular line of development you want, not the project's root URL. If you make the mistake of checking out the root of the project, you may very well wind up with a working copy that contains a complete copy of your project's content for each and every one of its branches and tags. [58]
Subversion的一个新特性就是你可以对文件和目录任意附加元数据(或者是“属性”),属性是关联在工作拷贝文件或目录的任意名称/值对。
为了设置或得到一个属性名称,使用svn propset和svn propget子命令,列出对象所有的属性,使用svn proplist。
更多信息见“属性”一节。
CVS marks conflicts with inline “conflict
markers”, and then prints a C during
an update or merge operation. Historically, this has caused
problems, because CVS isn't doing enough. Many users forget
about (or don't see) the C after it whizzes
by on their terminal. They often forget that the conflict
markers are even present, and then accidentally commit files
containing those conflict markers.
Subversion solves this problem in a pair of ways. First, when a conflict occurs in a file, Subversion records the fact that the file is in a state of conflict, and won't allow you to commit changes to that file until you explicitly resolve the conflict. Secondly, Subversion 1.5 provides interactive conflict resolution, which allows you to resolve conflicts as they happen instead of having to go back and do so after the update or merge operation completes. See “解决冲突(合并别人的修改)”一节 for more about conflict resolution in Subversion.
In the most general sense, Subversion handles binary files more gracefully than CVS does. Because CVS uses RCS, it can only store successive full copies of a changing binary file. Subversion, however, expresses differences between files using a binary differencing algorithm, regardless of whether they contain textual or binary data. That means that all files are stored differentially (compressed) in the repository.
CVS users have to mark binary files with
-kb flags in order to prevent data from being
garbled (due to keyword expansion and line-ending translations).
They sometimes forget to do this.
Subversion使用更加异想天开的方法—第一,如果你不明确的告诉它(详情见“关键字替换”一节和“行结束字符串”一节)这样做,它不会做任何关键字或行结束转化的操作,缺省情况下Subversion会把所有的数据看作字节串,所有的储存在版本库的文件都处于未转化的状态。
第二,Subversion维护了一个内部的概念来区别一个文件是“文本”还是“二进制”文件,但这个概念只在工作拷贝非常重要,在svn update,Subversion会对本地修改的文本文件执行上下文的合并,但是对二进制文件不会。
To determine whether a contextual merge is possible,
Subversion examines the svn:mime-type
property. If the file has no svn:mime-type
property, or has a mime-type that is textual (e.g.,
text/*),
Subversion assumes it is text. Otherwise, Subversion assumes
the file is binary. Subversion also helps users by running a
binary-detection algorithm in the svn import
and svn add commands. These commands will
make a good guess and then (possibly) set a binary
svn:mime-type property on the file being
added. (If Subversion guesses wrong, the user can always remove
or hand-edit the property.)
Unlike CVS, a Subversion working copy is aware that it has checked out a module. That means that if somebody changes the definition of a module (e.g., adds or removes components), then a call to svn update will update the working copy appropriately, adding and removing components.
Subversion defines modules as a list of directories within a directory property; see “外部定义”一节.
With CVS's pserver, you are required to log in to the server (using the cvs login command) before performing any read or write operation—you sometimes even have to log in for anonymous operations. With a Subversion repository using Apache httpd or svnserve as the server, you don't provide any authentication credentials at the outset—if an operation that you perform requires authentication, the server will challenge you for your credentials (whether those credentials are username and password, a client certificate, or even both). So if your repository is world-readable, you will not be required to authenticate at all for read operations.
相对于CVS,Subversion会一直在磁盘(在你的~/.subversion/auth/目录)缓存凭证,除非你通过--no-auth-cache选项告诉它不这样做。
这个行为也有例外,当使用SSH管道的svnserve服务器时,使用svn+ssh://的URL模式这种情况下,ssh会在通道刚开始时无条件的要求认证。
Perhaps the most important way to familiarize CVS users with Subversion is to let them continue to work on their projects using the new system. And while that can be somewhat accomplished using a flat import into a Subversion repository of an exported CVS repository, the more thorough solution involves transferring not just the latest snapshot of their data, but all the history behind it as well, from one system to another. This is an extremely difficult problem to solve; it involves deducing changesets in the absence of atomicity and translating between the systems' completely orthogonal branching policies, among other complications. Still, there are a handful of tools claiming to at least partially support the ability to convert existing CVS repositories into Subversion ones.
The most popular (and most mature) conversion tool is
cvs2svn (http://cvs2svn.tigris.org/), a Python
script originally created by members of Subversion's own
development community. This tool is meant to run exactly once:
it scans your CVS repository multiple times and attempts to
deduce commits, branches, and tags as best it can. When it
finishes, the result is a either a Subversion repository or a
portable Subversion dumpfile representing your code's history.
See the web site for detailed instructions and caveats.
目录
WebDAV is an extension to HTTP, and it is growing more and more popular as a standard for file sharing. Today's operating systems are becoming extremely Web-aware, and many now have built-in support for mounting “shares” exported by WebDAV servers.
如果你使用Apache/mod_dav_svn作为你的Subversion网络服务器,某种程度上,你也是在运行一个WebDAV服务器。这个附录提供了这种协议一些背景知识,Subversion如何使用它,Subversion如何和认识WebDAV的软件交互工作。
DAV stands for “Distributed Authoring and Versioning.” RFC 2518 defines a set of concepts and accompanying extension methods to HTTP 1.1 that make the Web into a more universal read/write medium. The basic idea is that a WebDAV-compliant web server can act like a generic file server; clients can “mount” shared folders over HTTP that behave much like other network filesystems (such as NFS or SMB).
The tragedy, though, is that despite the acronym, the RFC specification doesn't actually describe any sort of version control. Basic WebDAV clients and servers assume that only one version of each file or directory exists, and that it can be repeatedly overwritten.
Because RFC 2518 left out versioning concepts, another committee was left with the responsibility of writing RFC 3253 a few years later. The new RFC adds versioning concepts to WebDAV, placing the “V” back in “DAV”—hence the term “DeltaV.” WebDAV/DeltaV clients and servers are often called just “DeltaV” programs, since DeltaV implies the existence of basic WebDAV.
The original WebDAV standard has been widely successful. Every modern computer operating system has a general WebDAV client built in (details to follow), and a number of popular standalone applications are also able to speak WebDAV—Microsoft Office, Dreamweaver, and Photoshop to name a few. On the server end, Apache HTTP Server has been able to provide WebDAV services since 1998 and is considered the de-facto open source standard. There are several other commercial WebDAV servers available, including Microsoft's own IIS.
DeltaV, unfortunately, has not been so successful. It's very difficult to find any DeltaV clients or servers. The few that do exist are relatively unknown commercial products, and thus it's very difficult to test interoperability. It's not entirely clear as to why DeltaV has remained stagnant. Some opine that the specification is just too complex. Others argue that while WebDAV's features have mass appeal (even the least technical users appreciate network file sharing), version control features just aren't interesting or necessary for most users. Finally, some believe that DeltaV remains unpopular because there's still no open source server product that implements it well.
When Subversion was still in its design phase, it seemed like a great idea to use Apache as a network server. It already had a module to provide WebDAV services. DeltaV was a relatively new specification. The hope was that the Subversion server module (mod_dav_svn) would eventually evolve into an open source DeltaV reference implementation. Unfortunately, DeltaV has a very specific versioning model that doesn't quite line up with Subversion's model. Some concepts were mappable; others were not.
这是什么意思呢?
First, the Subversion client is not a fully implemented
DeltaV client. It needs certain types of things from the server
that DeltaV itself cannot provide, and thus is largely dependent
on a number of Subversion-specific
HTTP REPORT requests that
only mod_dav_svn understands.
Second, mod_dav_svn is not a fully realized DeltaV server. Many portions of the DeltaV specification were irrelevant to Subversion, and thus left unimplemented.
在开发者社区一直有这样的讨论,是否值得弥补这种形势。改变Subversion的设计来匹配DeltaV看起来并不现实,所以可能没有办法让客户端从普通的DeltaV服务器上得到所有的东西。另一方面,mod_dav_svn可以继续开发来实现所有的DeltaV,但缺乏这样做的动力—几乎没有能与之交户的DeltaV客户端。
While the Subversion client is not a full DeltaV client, nor the Subversion server a full DeltaV server, there's still a glimmer of WebDAV interoperability to be happy about: autoversioning.
Autoversioning is an optional feature defined in the DeltaV
standard. A typical DeltaV server will reject an ignorant
WebDAV client attempting to do a PUT to a
file that's under version control. To change a
version-controlled file, the server expects a series of proper
versioning requests: something like
MKACTIVITY, CHECKOUT,
PUT, CHECKIN. But if the
DeltaV server supports autoversioning, then write requests from
basic WebDAV clients are accepted. The server behaves as if the
client had issued the proper series of
versioning requests, performing a commit under the hood. In
other words, it allows a DeltaV server to interoperate with
ordinary WebDAV clients that don't understand versioning.
Because so many operating systems already have integrated WebDAV clients, the use case for this feature can be incredibly appealing to administrators working with non-technical users. Imagine an office of ordinary users running Microsoft Windows or Mac OS. Each user “mounts” the Subversion repository, which appears to be an ordinary network folder. They use the shared folder as they always do: open files, edit them, save them. Meanwhile, the server is automatically versioning everything. Any administrator (or knowledgeable user) can still use a Subversion client to search history and retrieve older versions of data.
This scenario isn't fiction—it's real and it works, as
of Subversion 1.2 and later. To activate autoversioning in
mod_dav_svn, use the
SVNAutoversioning directive within the
httpd.conf Location
block, like so:
<Location /repos> DAV svn SVNPath /var/svn/repository SVNAutoversioning on </Location>
When Subversion autoversioning is active, write requests from WebDAV clients result in automatic commits. A generic log message is automatically generated and attached to each revision.
Before activating this feature, however, understand what
you're getting into. WebDAV clients tend to do
many write requests, resulting in a huge
number of automatically committed revisions. For example, when
saving data, many clients will do a PUT of a
0-byte file (as a way of reserving a name) followed by another
PUT with the real file data. The single
file-write results in two separate commits. Also consider that
many applications autosave every few minutes, resulting in even
more commits.
If you have a post-commit hook program that sends email, you
may want to disable email generation either altogether or on
certain sections of the repository; it depends on whether you
think the influx of emails will still prove to be valuable
notifications or not. Also, a smart post-commit hook program
can distinguish between a transaction created via autoversioning
and one created through a normal svn commit.
The trick is to look for a revision property
named svn:autoversioned. If present, the
commit was made by a generic WebDAV client.
Another feature that may be a useful complement for
Subversion's autoversioning comes from Apache's
mod_mime module. If a WebDAV client adds a
new file to the repository, there's no opportunity for the user
to set the the svn:mime-type property. This
might cause the file to appear as generic icon when viewed
within a WebDAV shared folder, not having an association with
any application. One remedy is to have a sysadmin (or other
Subversion-knowledgeable person) check out a working copy and
manually set the svn:mime-type property on
necessary files. But there's potentially no end to such cleanup
tasks. Instead, you can use the
ModMimeUsePathInfo directive in your
Subversion <Location> block:
<Location /repos> DAV svn SVNPath /var/svn/repository SVNAutoversioning on ModMimeUsePathInfo on </Location>
这个指示允许mod_mime在使用自动版本化添加新文件时尝试自动检测新文件的mime-type,这个模块查看文件的扩展名,有可能的话还包括检查内容;如果文件符合某个常用模式,就会自动设置文件的svn;mime-type。
All WebDAV clients fall into one of three categories—standalone applications, file-explorer extensions, or filesystem implementations. These categories broadly define the types of WebDAV functionality available to users. 表 C.1 “” gives our categorization as well as a quick description of some common pieces of WebDAV-enabled software. More details about these software offerings, as well as their general category, can be found in the sections that follow.
表 C.1.
| 软件 | 类型 | Windows | Mac | Linux | 描述 |
|---|---|---|---|---|---|
| Adobe Photoshop | 独立的WebDAV应用程序 | X | Image editing software, allowing direct opening from, and writing to, WebDAV URLs. | ||
| Cadaver | 独立的WebDAV应用程序 | X | X | Command-line WebDAV client supporting file transfer, tree, and locking operations. | |
| DAV Explorer | 独立的WebDAV应用程序 | X | X | X | Java GUI tool for exploring WebDAV shares. |
| Macromedia Dreamweaver | 独立的WebDAV应用程序 | X | Web production software able to directly read from and write to WebDAV URLs. | ||
| Microsoft Office | 独立的WebDAV应用程序 | X | Office productivity suite with several components able to directly read from and write to WebDAV URLs. | ||
| Microsoft Web 文件夹 | 文件浏览器WebDAV扩展 | X | GUI file explorer program able to perform tree operations on a WebDAV share. | ||
| GNOME Nautilus | 文件浏览器WebDAV扩展 | X | GUI file explorer able to perform tree operations on a WebDAV share. | ||
| KDE Konqueror | 文件浏览器WebDAV扩展 | X | GUI file explorer able to perform tree operations on a WebDAV share. | ||
| Mac OS X | WebDAV文件系统实现 | X | Operating system has built-in support for mounting WebDAV shares.. | ||
| 驱动器映射程序,可以将Windows驱动器加载为远程的WebDAV共享 | WebDAV文件系统实现 | X | Drive-mapping program for assigning Windows drive letters to a mounted remote WebDAV share. | ||
| 文件传输软件,可以将Windows驱动器加载为远程的WebDAV共享 | WebDAV文件系统实现 | X | File transfer software, which, among other things, allows the assignment of Windows drive letters to a mounted remote WebDAV share. | ||
| davfs2 | WebDAV文件系统实现 | X | Linux file system driver that allows you to mount a WebDAV share. |
A WebDAV application is a program that speaks WebDAV protocols with a WebDAV server. We'll cover some of the most popular programs with this kind of WebDAV support.
在Windows下,有许多已知的应用程序支持WebDAV客户端功能,例如微软Office,[59]Adobe的Photoshop和Macromedia的Dreamweaver程序,他们可以直接打开和保存URL,并且在编辑文件时经常使用WebDAV的锁。
Note that while many of these programs also exist for the Mac OS X, they do not appear to support WebDAV directly on that platform. In fact, on Mac OS X, the dialog box doesn't allow one to type a path or URL at all. It's likely that the WebDAV features were deliberately left out of Macintosh versions of these programs, since OS X already provides such excellent low-level filesystem support for WebDAV.
cadaver is a bare-bones Unix command-line program for
browsing and changing WebDAV shares. Like the Subversion
client, it uses the neon HTTP library—not
surprisingly, since both neon and cadaver are written by the
same author. cadaver is free software (GPL license) and is
available at
http://www.webdav.org/cadaver/.
Using cadaver is similar to using a command-line FTP program, and thus it's extremely useful for basic WebDAV debugging. It can be used to upload or download files in a pinch, and also to examine properties, and to copy, move, lock or unlock files:
$ cadaver http://host/repos
dav:/repos/> ls
Listing collection `/repos/': succeeded.
Coll: > foobar 0 May 10 16:19
> playwright.el 2864 May 4 16:18
> proofbypoem.txt 1461 May 5 15:09
> westcoast.jpg 66737 May 5 15:09
dav:/repos/> put README
Uploading README to `/repos/README':
Progress: [=============================>] 100.0% of 357 bytes succeeded.
dav:/repos/> get proofbypoem.txt
Downloading `/repos/proofbypoem.txt' to proofbypoem.txt:
Progress: [=============================>] 100.0% of 1461 bytes succeeded.
DAV Explorer is another standalone WebDAV client, written
in Java. It's under a free Apache-like license and is
available at http://www.ics.uci.edu/~webdav/.
It does everything cadaver does, but has the
advantages of being portable and being a more user-friendly GUI
application. It's also one of the first clients to support
the new WebDAV Access Control Protocol (RFC 3744).
Of course, DAV Explorer's ACL support is useless in this
case, since mod_dav_svn doesn't support
it. The fact that both cadaver and DAV Explorer support
some limited DeltaV commands isn't particularly useful
either, since they don't allow MKACTIVITY
requests. But it's not relevant anyway; we're assuming all
of these clients are operating against an autoversioning
repository.
Some popular file explorer GUI programs support WebDAV extensions that allow a user to browse a DAV share as if it was just another directory on the local computer, and to perform basic tree editing operations on the items in that share. For example, Windows Explorer is able to browse a WebDAV server as a “network place.” Users can drag files to and from the desktop, or can rename, copy, or delete files in the usual way. But because it's only a feature of the file-explorer, the DAV share isn't visible to ordinary applications. All DAV interaction must happen through the explorer interface.
Microsoft was one of the original backers of the WebDAV specification, and first started shipping a client in Windows 98, which was known as Web Folders. This client was also shipped in Windows NT4 and 2000.
The original Web Folders client was an extension to Explorer, the main GUI program used to browse filesystems. It works well enough. In Windows 98, the feature might need to be explicitly installed if Web Folders aren't already visible inside My Computer. In Windows 2000, simply add a new “network place”, enter the URL, and the WebDAV share will pop up for browsing.
With the release of Windows XP, Microsoft started shipping
a new implementation of Web Folders, known as the WebDAV
Mini-Redirector. The new implementation is a
filesystem-level client, allowing WebDAV shares to be mounted
as drive letters. Unfortunately, this implementation is
incredibly buggy. The client usually tries to convert http
URLs (http://host/repos) into UNC share
notation (\\host\repos); it also often
tries to use Windows Domain authentication to respond to
basic-auth HTTP challenges, sending usernames as
HOST\username. These interoperability
problems are severe and documented in numerous places around
the Web, to the frustration of many users. Even Greg Stein,
the original author of Apache's WebDAV module, bluntly
states that XP Web Folders simply can't operate against an Apache
server.
Windows Vista's implementation of Web Folders seems to be almost the same as XP's, so it has the same sort of problems (at the time of writing).
However, there seem to be workarounds for both XP and Vista that allow Web Folders to work against Apache. Users have mostly reported success with these techniques, so we'll relay them here.
On Windows XP, you have two options. First, search
Microsoft's web site for update KB90730, “Software
Update for Web Folders.” This may fix all your
problems. If it doesn't, it seems that the original pre-XP
Web Folders implementation is still buried within the
system. You can unearth it by going to Network
Places and adding a new network place. When prompted,
enter the URL of the repository, but include a
port number in the URL. For
example, http://host/repos should be
entered as http://host:80/repos instead.
Respond to any authentication prompts with your Subversion
credentials.
On Windows Vista, the same KB90730 update may clear
everything up. But there may still be other issues. Some
users have reported that Vista considers
all http:// connections insecure, and thus
will always fail any authentication challenges from Apache
unless the connection happens
over http://. If you're unable to connect
to the Subversion repository via SSL, you can tweak the
system registry to turn off this behavior. Just set the
key HKEY_LOCAL_MACHINE\SYSTEM\CurrentControlSet\Services\WebClient\Parameters\BasicAuthLevel
from 1 to 2. A final warning: be sure to set up the Web
Folder to point to the repository's root directory
(/), rather than some subdirectory
such as /trunk. Vista Web Folders
seems to work only against repository roots.
In general, while these workarounds may function for you, you might get a better overall experience using a third-party WebDAV client such as WebDrive or NetDrive.
Nautilus is the official file manager/browser for the
GNOME desktop (http://www.gnome.org), and
Konqueror is the manager/browser for the KDE desktop (http://www.kde.org). Both of these applications
have an explorer-level WebDAV client built in, and they
operate just fine against an autoversioning repository.
In GNOME's Nautilus, select the menu item and enter the URL in the dialog box presented. The repository should then be displayed like any other filesystem.
KDE的Konqueror里你需要在地址栏使用webdav://模式来输入URL,如果你输入http://的URL,Konqueror会像普通的web浏览器。你会看到mod_dav_svn输出的普通HTML目录列表。通过输入webdav://host/repos代替http://host/repos,Konqueror就成为了一个WebDAV客户端,并且按照文件系统的方式显示版本库。
The WebDAV filesystem implementation is arguably the best sort of WebDAV client. It's implemented as a low-level filesystem module, typically within the operating system's kernel. This means that the DAV share is mounted like any other network filesystem, similar to mounting an NFS share on Unix or attaching an SMB share as drive letter in Windows. As a result, this sort of client provides completely transparent read/write WebDAV access to all programs. Applications aren't even aware that WebDAV requests are happening.
Both WebDrive and NetDrive are excellent commercial
products that allow a WebDAV share to be attached as drive
letters in Windows. As a result, you can operate on the
contents of these WebDAV-backed pseudo-drives as easily as
you can against real local hard drives, and in the same
ways. WebDrive can be purchased from South River
Technologies (http://www.southrivertech.com).
Novell's NetDrive is freely available online, but requires
users to have a Netware license.
Apple's OS X operating system has an integrated
filesystem-level WebDAV client. From the Finder, select the
menu
item. Enter a WebDAV URL, and it appears as a disk on the
desktop, just like any other mounted volume. You can also
mount a WebDAV share from the Darwin terminal by using the
webdav filesystem type with the
mount command:
$ mount -t webdav http://svn.example.com/repos/project /some/mountpoint $
注意如果mod_dav_svn是1.2之前的版本,OS X不能按照可读写装载,而是会成为只读。这是因为,OS X坚持要读写共享支持锁定,而锁定文件出现在Subversion 1.2。
Also, OS X's WebDAV client can sometimes be overly
sensitive to HTTP redirects. If OS X is unable to mount the
repository at all, you may need to enable the BrowserMatch
directive in the Apache server's
httpd.conf:
BrowserMatch "^WebDAVFS/1.[012]" redirect-carefully
[59] 在Windows下,有一些有名的集成WebDAV客户端功能的软件,例如Microsoft's Office、Adobe的Photoshop和Macromedia的Dreamweaver。它们都可以直接打开和保存URL,也可以在编辑时大量的使用WebDAV的锁定。
Copyright (c) 2002-2007
Ben Collins-Sussman, Brian W. Fitzpatrick, C. Michael Pilato.
This work is licensed under the Creative Commons Attribution License.
To view a copy of this license, visit
http://creativecommons.org/licenses/by/2.0/ or send a letter to
Creative Commons, 559 Nathan Abbott Way, Stanford, California 94305,
USA.
A summary of the license is given below, followed by the full legal
text.
--------------------------------------------------------------------
You are free:
* to copy, distribute, display, and perform the work
* to make derivative works
* to make commercial use of the work
Under the following conditions:
Attribution. You must give the original author credit.
* For any reuse or distribution, you must make clear to others the
license terms of this work.
* Any of these conditions can be waived if you get permission from
the author.
Your fair use and other rights are in no way affected by the above.
The above is a summary of the full license below.
====================================================================
Creative Commons Legal Code
Attribution 2.0
CREATIVE COMMONS CORPORATION IS NOT A LAW FIRM AND DOES NOT PROVIDE
LEGAL SERVICES. DISTRIBUTION OF THIS LICENSE DOES NOT CREATE AN
ATTORNEY-CLIENT RELATIONSHIP. CREATIVE COMMONS PROVIDES THIS
INFORMATION ON AN "AS-IS" BASIS. CREATIVE COMMONS MAKES NO WARRANTIES
REGARDING THE INFORMATION PROVIDED, AND DISCLAIMS LIABILITY FOR
DAMAGES RESULTING FROM ITS USE.
License
THE WORK (AS DEFINED BELOW) IS PROVIDED UNDER THE TERMS OF THIS
CREATIVE COMMONS PUBLIC LICENSE ("CCPL" OR "LICENSE"). THE WORK IS
PROTECTED BY COPYRIGHT AND/OR OTHER APPLICABLE LAW. ANY USE OF THE
WORK OTHER THAN AS AUTHORIZED UNDER THIS LICENSE OR COPYRIGHT LAW IS
PROHIBITED.
BY EXERCISING ANY RIGHTS TO THE WORK PROVIDED HERE, YOU ACCEPT AND
AGREE TO BE BOUND BY THE TERMS OF THIS LICENSE. THE LICENSOR GRANTS
YOU THE RIGHTS CONTAINED HERE IN CONSIDERATION OF YOUR ACCEPTANCE OF
SUCH TERMS AND CONDITIONS.
1. Definitions
a. "Collective Work" means a work, such as a periodical issue,
anthology or encyclopedia, in which the Work in its entirety in
unmodified form, along with a number of other contributions,
constituting separate and independent works in themselves, are
assembled into a collective whole. A work that constitutes a
Collective Work will not be considered a Derivative Work (as
defined below) for the purposes of this License.
b. "Derivative Work" means a work based upon the Work or upon the
Work and other pre-existing works, such as a translation,
musical arrangement, dramatization, fictionalization, motion
picture version, sound recording, art reproduction, abridgment,
condensation, or any other form in which the Work may be recast,
transformed, or adapted, except that a work that constitutes a
Collective Work will not be considered a Derivative Work for the
purpose of this License. For the avoidance of doubt, where the
Work is a musical composition or sound recording, the
synchronization of the Work in timed-relation with a moving
image ("synching") will be considered a Derivative Work for the
purpose of this License.
c. "Licensor" means the individual or entity that offers the Work
under the terms of this License.
d. "Original Author" means the individual or entity who created the Work.
e. "Work" means the copyrightable work of authorship offered under
the terms of this License.
f. "You" means an individual or entity exercising rights under this
License who has not previously violated the terms of this
License with respect to the Work, or who has received express
permission from the Licensor to exercise rights under this
License despite a previous violation.
2. Fair Use Rights. Nothing in this license is intended to reduce,
limit, or restrict any rights arising from fair use, first sale or
other limitations on the exclusive rights of the copyright owner
under copyright law or other applicable laws.
3. License Grant. Subject to the terms and conditions of this License,
Licensor hereby grants You a worldwide, royalty-free,
non-exclusive, perpetual (for the duration of the applicable
copyright) license to exercise the rights in the Work as stated
below:
a. to reproduce the Work, to incorporate the Work into one or more
Collective Works, and to reproduce the Work as incorporated in
the Collective Works;
b. to create and reproduce Derivative Works;
c. to distribute copies or phonorecords of, display publicly,
perform publicly, and perform publicly by means of a digital
audio transmission the Work including as incorporated in
Collective Works;
d. to distribute copies or phonorecords of, display publicly,
perform publicly, and perform publicly by means of a digital
audio transmission Derivative Works.
e.
For the avoidance of doubt, where the work is a musical composition:
i. Performance Royalties Under Blanket Licenses. Licensor
waives the exclusive right to collect, whether
individually or via a performance rights society
(e.g. ASCAP, BMI, SESAC), royalties for the public
performance or public digital performance (e.g. webcast)
of the Work.
ii. Mechanical Rights and Statutory Royalties. Licensor waives
the exclusive right to collect, whether individually or
via a music rights agency or designated agent (e.g. Harry
Fox Agency), royalties for any phonorecord You create from
the Work ("cover version") and distribute, subject to the
compulsory license created by 17 USC Section 115 of the US
Copyright Act (or the equivalent in other jurisdictions).
f. Webcasting Rights and Statutory Royalties. For the avoidance of
doubt, where the Work is a sound recording, Licensor waives the
exclusive right to collect, whether individually or via a
performance-rights society (e.g. SoundExchange), royalties for
the public digital performance (e.g. webcast) of the Work,
subject to the compulsory license created by 17 USC Section 114
of the US Copyright Act (or the equivalent in other
jurisdictions).
The above rights may be exercised in all media and formats whether now
known or hereafter devised. The above rights include the right to make
such modifications as are technically necessary to exercise the rights
in other media and formats. All rights not expressly granted by
Licensor are hereby reserved.
4. Restrictions.The license granted in Section 3 above is expressly
made subject to and limited by the following restrictions:
a. You may distribute, publicly display, publicly perform, or
publicly digitally perform the Work only under the terms of this
License, and You must include a copy of, or the Uniform Resource
Identifier for, this License with every copy or phonorecord of
the Work You distribute, publicly display, publicly perform, or
publicly digitally perform. You may not offer or impose any
terms on the Work that alter or restrict the terms of this
License or the recipients' exercise of the rights granted
hereunder. You may not sublicense the Work. You must keep intact
all notices that refer to this License and to the disclaimer of
warranties. You may not distribute, publicly display, publicly
perform, or publicly digitally perform the Work with any
technological measures that control access or use of the Work in
a manner inconsistent with the terms of this License
Agreement. The above applies to the Work as incorporated in a
Collective Work, but this does not require the Collective Work
apart from the Work itself to be made subject to the terms of
this License. If You create a Collective Work, upon notice from
any Licensor You must, to the extent practicable, remove from
the Collective Work any reference to such Licensor or the
Original Author, as requested. If You create a Derivative Work,
upon notice from any Licensor You must, to the extent
practicable, remove from the Derivative Work any reference to
such Licensor or the Original Author, as requested.
b. If you distribute, publicly display, publicly perform, or
publicly digitally perform the Work or any Derivative Works or
Collective Works, You must keep intact all copyright notices for
the Work and give the Original Author credit reasonable to the
medium or means You are utilizing by conveying the name (or
pseudonym if applicable) of the Original Author if supplied; the
title of the Work if supplied; to the extent reasonably
practicable, the Uniform Resource Identifier, if any, that
Licensor specifies to be associated with the Work, unless such
URI does not refer to the copyright notice or licensing
information for the Work; and in the case of a Derivative Work,
a credit identifying the use of the Work in the Derivative Work
(e.g., "French translation of the Work by Original Author," or
"Screenplay based on original Work by Original Author"). Such
credit may be implemented in any reasonable manner; provided,
however, that in the case of a Derivative Work or Collective
Work, at a minimum such credit will appear where any other
comparable authorship credit appears and in a manner at least as
prominent as such other comparable authorship credit.
5. Representations, Warranties and Disclaimer
UNLESS OTHERWISE MUTUALLY AGREED TO BY THE PARTIES IN WRITING,
LICENSOR OFFERS THE WORK AS-IS AND MAKES NO REPRESENTATIONS OR
WARRANTIES OF ANY KIND CONCERNING THE WORK, EXPRESS, IMPLIED,
STATUTORY OR OTHERWISE, INCLUDING, WITHOUT LIMITATION, WARRANTIES OF
TITLE, MERCHANTIBILITY, FITNESS FOR A PARTICULAR PURPOSE,
NONINFRINGEMENT, OR THE ABSENCE OF LATENT OR OTHER DEFECTS, ACCURACY,
OR THE PRESENCE OF ABSENCE OF ERRORS, WHETHER OR NOT
DISCOVERABLE. SOME JURISDICTIONS DO NOT ALLOW THE EXCLUSION OF IMPLIED
WARRANTIES, SO SUCH EXCLUSION MAY NOT APPLY TO YOU.
6. Limitation on Liability. EXCEPT TO THE EXTENT REQUIRED BY
APPLICABLE LAW, IN NO EVENT WILL LICENSOR BE LIABLE TO YOU ON ANY
LEGAL THEORY FOR ANY SPECIAL, INCIDENTAL, CONSEQUENTIAL, PUNITIVE
OR EXEMPLARY DAMAGES ARISING OUT OF THIS LICENSE OR THE USE OF THE
WORK, EVEN IF LICENSOR HAS BEEN ADVISED OF THE POSSIBILITY OF SUCH
DAMAGES.
7. Termination
a. This License and the rights granted hereunder will terminate
automatically upon any breach by You of the terms of this
License. Individuals or entities who have received Derivative
Works or Collective Works from You under this License, however,
will not have their licenses terminated provided such
individuals or entities remain in full compliance with those
licenses. Sections 1, 2, 5, 6, 7, and 8 will survive any
termination of this License.
b. Subject to the above terms and conditions, the license granted
here is perpetual (for the duration of the applicable copyright
in the Work). Notwithstanding the above, Licensor reserves the
right to release the Work under different license terms or to
stop distributing the Work at any time; provided, however that
any such election will not serve to withdraw this License (or
any other license that has been, or is required to be, granted
under the terms of this License), and this License will continue
in full force and effect unless terminated as stated above.
8. Miscellaneous
a. Each time You distribute or publicly digitally perform the Work
or a Collective Work, the Licensor offers to the recipient a
license to the Work on the same terms and conditions as the
license granted to You under this License.
b. Each time You distribute or publicly digitally perform a
Derivative Work, Licensor offers to the recipient a license to
the original Work on the same terms and conditions as the
license granted to You under this License.
c. If any provision of this License is invalid or unenforceable
under applicable law, it shall not affect the validity or
enforceability of the remainder of the terms of this License,
and without further action by the parties to this agreement,
such provision shall be reformed to the minimum extent necessary
to make such provision valid and enforceable.
d. No term or provision of this License shall be deemed waived and
no breach consented to unless such waiver or consent shall be in
writing and signed by the party to be charged with such waiver
or consent.
e. This License constitutes the entire agreement between the
parties with respect to the Work licensed here. There are no
understandings, agreements or representations with respect to
the Work not specified here. Licensor shall not be bound by any
additional provisions that may appear in any communication from
You. This License may not be modified without the mutual written
agreement of the Licensor and You.
Creative Commons is not a party to this License, and makes no warranty
whatsoever in connection with the Work. Creative Commons will not be
liable to You or any party on any legal theory for any damages
whatsoever, including without limitation any general, special,
incidental or consequential damages arising in connection to this
license. Notwithstanding the foregoing two (2) sentences, if Creative
Commons has expressly identified itself as the Licensor hereunder, it
shall have all rights and obligations of Licensor.
Except for the limited purpose of indicating to the public that the
Work is licensed under the CCPL, neither party will use the trademark
"Creative Commons" or any related trademark or logo of Creative
Commons without the prior written consent of Creative Commons. Any
permitted use will be in compliance with Creative Commons'
then-current trademark usage guidelines, as may be published on its
website or otherwise made available upon request from time to time.
Creative Commons may be contacted at http://creativecommons.org/.
====================================================================
符号
- 属性, 属性
- 版本
- 版本库
-
- hooks
-
- post-commit, post-commit
- post-lock, post-lock
- post-revprop-change, post-revprop-change
- post-unlock, post-unlock
- pre-commit, pre-commit
- pre-lock, pre-lock
- pre-revprop-change, pre-revprop-change
- pre-unlock, pre-unlock
- start-commit, start-commit
B
- BASE, 修订版本关键字
H
- HEAD, 修订版本关键字
P
- PREV, 修订版本关键字
S
- Subversion
-
- history of, Subversion的历史
- svn
-
- 子命令
-
- add, svn add
- blame, svn blame
- cat, svn cat
- changelist, svn changelist
- checkout, svn checkout
- cleanup, svn cleanup
- commit, svn commit
- copy, svn copy
- delete, svn delete
- diff, svn diff
- export, svn export
- help, svn help
- import, svn import
- info, svn info
- list, svn list
- lock, svn lock
- log, svn log
- merge, svn merge
- mergeinfo, svn mergeinfo
- mkdir, svn mkdir
- move, svn move
- propdel, svn propdel
- propedit, svn propedit
- propget, svn propget
- proplist, svn proplist
- propset, svn propset
- resolve, svn resolve
- resolved, svn resolved
- revert, svn revert
- status, svn status
- switch, svn switch
- unlock, svn unlock
- update, svn update
- svnadmin
-
- 子命令
-
- crashtest, svnadmin crashtest
- create, svnadmin create
- deltify, svnadmin deltify
- dump, svnadmin dump
- help, svnadmin help
- hotcopy, svnadmin hotcopy
- list-dblogs, svnadmin list-dblogs
- list-unused-dblogs, svnadmin list-unused-dblogs
- load, svnadmin load
- lslocks, svnadmin lslocks
- lstxns, svnadmin lstxns
- recover, svnadmin recover
- rmlocks, svnadmin rmlocks
- rmtxns, svnadmin rmtxns
- setlog, svnadmin setlog
- setrevprop, svnadmin setrevprop
- setuuid, svnadmin setuuid
- upgrade, svnadmin upgrade
- verify, svnadmin verify
- svnlook
-
- 子命令
-
- author, svnlook author
- cat, svnlook cat
- changed, svnlook changed
- date, svnlook date
- diff, svnlook diff
- dirs-changed, svnlook dirs-changed
- help, svnlook help
- history, svnlook history
- info, svnlook info
- lock, svnlook lock
- log, svnlook log
- propget, svnlook propget
- proplist, svnlook proplist
- tree, svnlook tree
- uuid, svnlook uuid
- youngest, svnlook youngest
- svnsync
-
- 子命令
-
- copy-revprops, svnsync copy-revprops
- help, svnsync help
- initialize, svnsync initialize
- synchronize, svnsync synchronize
- svnversion, svnversion